ping. Remove mounting bracket from back panel.

Mounting

Bracket

Figure 5

Removing Front Panel of Heater

1.Remove three screws on bottom front of front panel.

2.Pull bottom of front panel forward, then down (see figure 6)

Figure 6

Attaching Mounting Bracket to Wall

Use holes on each end of mounting bracket to attach bracket to wall. These holes are 16 inches apart. At- tach mounting bracket to wall in one of two following ways.

1.Attach to wall studs

2.Attach to wall anchor

Attaching to Wall Stud:

This way is the best providing the strongest mounting in wood frame houses.

Attaching to Wall Anchor:

This way allows you to attach mounting bracket to hol- low walls (wall areas between studs) or to solid walls (concrete or masonry).

Decide which way best suits your needs. Either method will provide a secure hold for the mounting bracket.

1.Tape mounting bracket to wall where heater will be located. Make sure mounting bracket is level. For wall stud mounting locate one end of the mounting bracket over a wall stud.

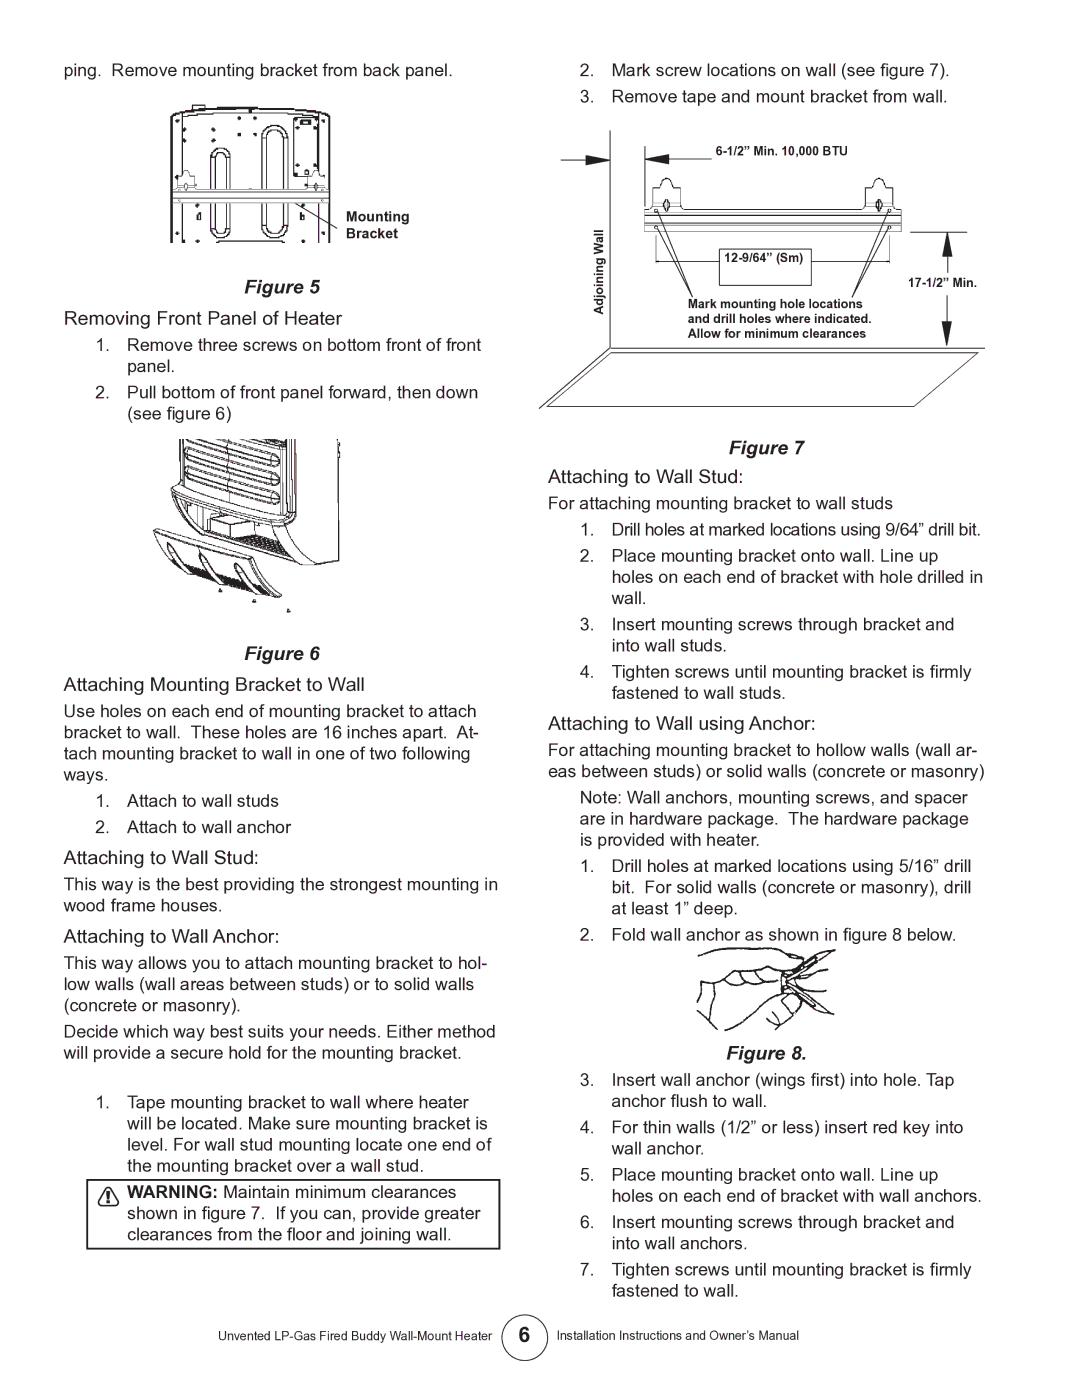
WARNING: Maintain minimum clearances shown in figure 7. If you can, provide greater clearances from the floor and joining wall.­

2.Mark screw locations on wall (see figure 7).

3.Remove tape and mount bracket from wall.

6-1/2” Min. 10,000 BTU

Wall


Adjoining


12-9/64” (Sm)


17-1/2” Min.


Mark mounting hole locations


and drill holes where indicated.


Allow for minimum clearances


Figure 7

Attaching to Wall Stud:

For attaching mounting bracket to wall studs

1.Drill holes at marked locations using 9/64” drill bit.

2.Place mounting bracket onto wall. Line up holes on each end of bracket with hole drilled in wall.

3.Insert mounting screws through bracket and into wall studs.

4.Tighten screws until mounting bracket is firmly fastened to wall studs.

Attaching to Wall using Anchor:

For attaching mounting bracket to hollow walls (wall ar- eas between studs) or solid walls (concrete or masonry)

Note: Wall anchors, mounting screws, and spacer are in hardware package. The hardware package is provided with heater.

1.Drill holes at marked locations using 5/16” drill bit. For solid walls (concrete or masonry), drill at least 1” deep.

2.Fold wall anchor as shown in figure 8 below.

Figure 8.

3.Insert wall anchor (wings first) into hole. Tap anchor flush to wall.

4.For thin walls (1/2” or less) insert red key into wall anchor.

5.Place mounting bracket onto wall. Line up holes on each end of bracket with wall anchors.

6.Insert mounting screws through bracket and into wall anchors.

7.Tighten screws until mounting bracket is firmly

fastened to wall.

Unvented LP-Gas Fired Buddy Wall-Mount Heater

6

Installation Instructions and Owner’s Manual

Page 6
Image 6
Mr. Heater MHVFB10LP installation instructions Attaching to Wall Stud

MHVFB10LP specifications

Mr. Heater MHVFB10LP is a powerful and efficient portable propane heater designed for optimal performance in a variety of outdoor and indoor applications. This innovative heating solution is ideal for individuals looking to warm large spaces, such as garages, workshops, and various outdoor events. With its user-friendly design and advanced technology, the MHVFB10LP delivers both comfort and convenience.

One of the standout features of the MHVFB10LP is its impressive heating capacity, providing up to 10,000 BTUs of heat. This output can effectively warm areas up to 225 square feet, making it an excellent choice for both small and moderately sized spaces. The heater has a high-efficiency rating, achieving a 99.9% fuel efficiency, which ensures that users get the most out of their propane supply.

The MHVFB10LP is equipped with an adjustable heat setting, allowing users to customize their heating experience as needed. Whether you need a gentle warmth or a significant boost in temperature, this heater can easily accommodate your requirements. Additionally, the radiant technology utilized in this heater provides warm, even heat across the given space, ensuring a comfortable environment.

Safety is paramount when it comes to heating solutions, and Mr. Heater has incorporated various safety features into the MHVFB10LP. The heater is designed with an automatic shut-off feature that activates if the unit is tipped over or if it detects a low oxygen level. This provides peace of mind for users, allowing them to focus on enjoying their space without undue concern.

The portability of the MHVFB10LP is another noteworthy characteristic. Weighing in at a manageable size, the unit features a convenient carrying handle, allowing users to easily transport it from one location to another. This makes it ideal for camping trips, tailgating events, and workshops alike.

Furthermore, the MHVFB10LP is designed for easy operation, featuring an integrated piezo igniter that allows for quick starts without the need for matches or lighter fluid. This ensures that users can enjoy warmth almost instantly.

In summary, the Mr. Heater MHVFB10LP is a versatile, efficient, and safe propane heater that meets the heating needs of a wide array of users. From its powerful heating capacity and adjustable settings to its safety features and portability, the MHVFB10LP stands out as an essential tool for comfort in both work and leisure activities. Whether you’re looking to ward off the chill on a cold day or need a reliable heat source for your outdoor adventures, this heater delivers exceptional performance.