Manuals
/
MTD
/
Lawn and Garden
/
Snow Blower
MTD
769-03247
warranty
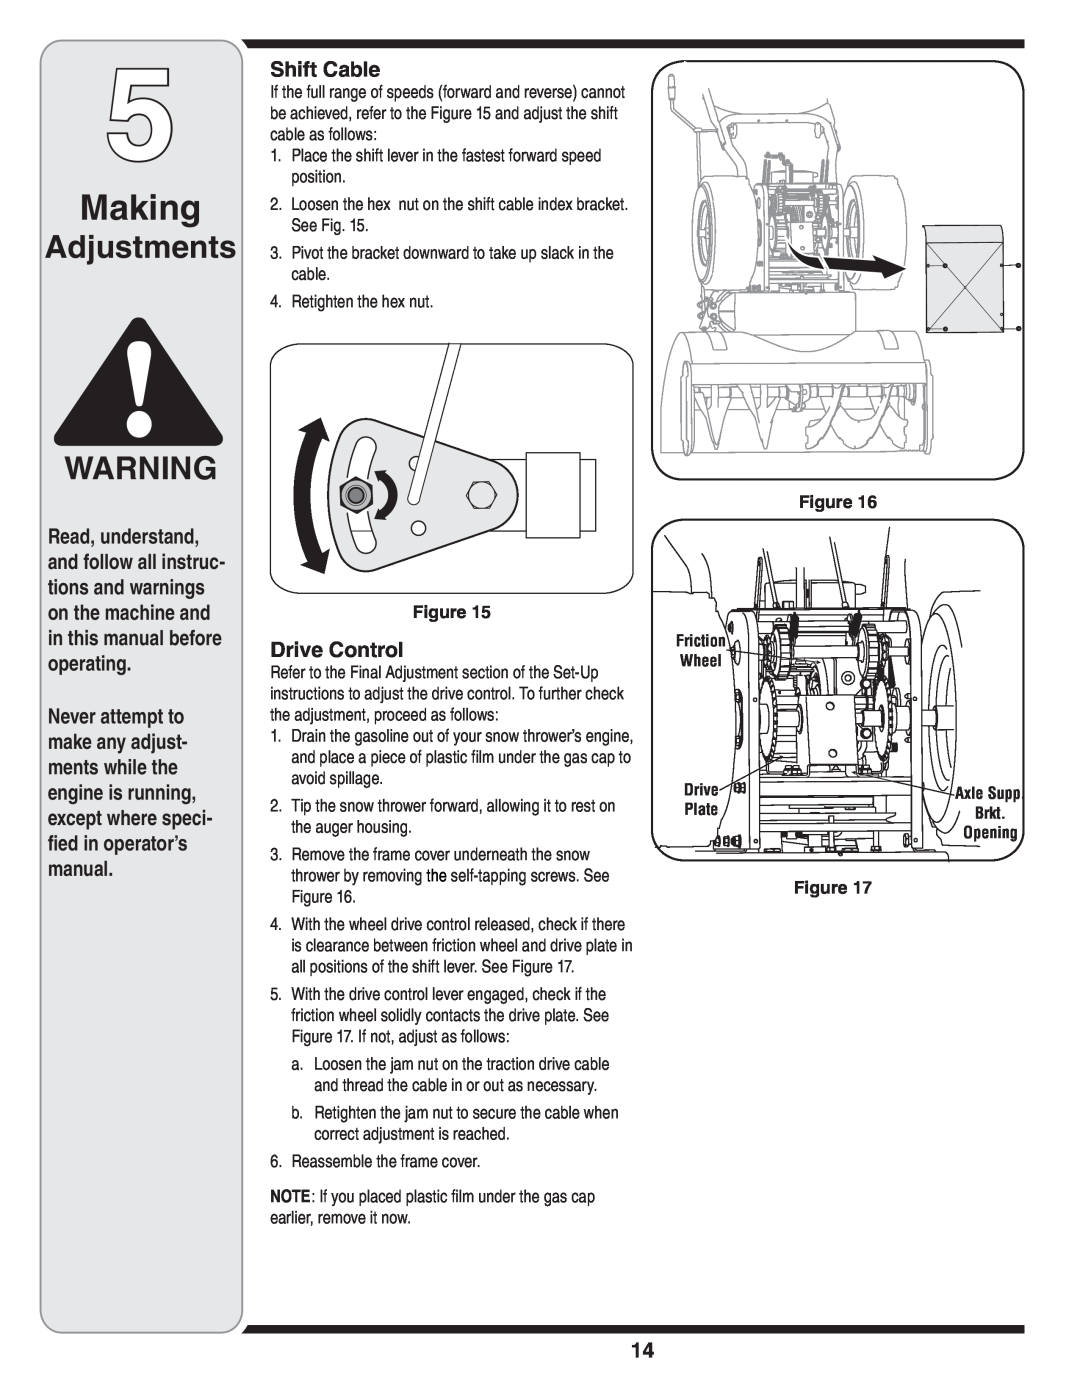
Making, Adjustments
Models:
769-03247
1
14
56
56
Download
56 pages
56.57 Kb
11
12
13
14
15
16
17
18
Troubleshooting
Parts list
Warranty
Maintenance
moteur de Commandes
Items Required For Assembly
Final Adjustments
Chute Clean-Out Tool
courroies les de Remplacement
Safety
Page 14
Image 14
Page 13
Page 15
Page 14
Image 14
Page 13
Page 15
Contents
Two-Stage Snow Thrower
READ SAFETY RULES AND INSTRUCTIONS
OPERATOR’S MANUAL
CAREFULLY BEFORE OPERATING EQUIPMENT
Customer Support
Table of Contents
Finding and Recording Model Number
in this manual and on the machine
Safety Labels
result in personal injury. When you see this symbol, HEED
ITS WARNING Your Responsibility Restrict the use
Training
Safe Operation
Practices
Preparation
Operation
Maintenance & Storage
Safe Operation Practices
Do not modify engine
Before Assembly
Setting Up Your Snow Thrower
Items Required For Assembly
Loose Parts
Attaching the Chute Assembly
Clean-Out Tool
Clean-Out Tool
Final Adjustments
Drift Cutters If Equipped
Skid Shoes
Tire Pressure Pneumatic Tires
R R1
Operating Your Snow Thrower
Know Your Snow Thrower
Shift Lever
Two-Way Chute Control
Chute Clean-Out Tool
Drive Control / Auger Control Lock
Ignition Key
Electric Starter on certain models
Gas & Oil Fill-Up
Starting The Engine
If you have a grounded three-prong receptacle, proceed as follows
Operating Tips
To Engage Drive
To Engage Augers
General Recommendations
Adjustments
Making
3. Retighten the hex nuts loosened earlier
See Figure Adjust skid shoes as follows
2. Raise or lower the skid shoe to desired position
4. Repeat on the other side of the snow thrower
Engine
Maintaining Your Snow Thrower
Drive and Shifting Mechanism
Wheels
Replacing Belts
Auger Belt
Drive Belt
B C A
Changing Friction Wheel Rubber
Friction Wheel Assembly
friction wheel assembly and hold assembly in position
Remove hex screw and washer Hex Shaft
Off-Season Storage
Cause
Trouble Shooting
Problem
Remedy
Warranty
FOUR YEAR SUPREME WARRANTY
à la page 2 pour ce qui concerne les pièces et/ou accessoires
For parts and/or accessories refer to customer support on page
Adressez-vous au «Service après-vente»
9 23
PART
Parts List Pièces détachées
à la page 2 pour ce qui concerne les pièces et/ou accessoires
N DE
49 légèrement au-dessus du goudron 24 Réglez-la au maximum en
85 Torque to 20-30 in./lbs
Serrez à un couple14 de 20-30 po-lb
cas dallées gravillonnées
à la page 2 pour ce qui concerne les pièces et/ou accessoires
DESCRIPTION
PART
N DE
PIÈCE
à la page 2 pour ce qui concerne les pièces et/ou accessoires
63 100 Tec
5368
B 43
DESCRIPTION
PART
N DE
PIÈCE
DESCRIPTION
PART
N DE
PIÈCE
à la page 2 pour ce qui concerne les pièces et/ou accessoires
2 page on support customer to refer accessories and/or parts For
frottement
ANS QUATRE DE SUPRÊME GARANTIE
Garantie
Causes
Solution
Dépannage
Problème
à carburant le Videz gaz
saison hors Remisage
AVERTISSEMENT
33 Figure
d’entretien Régime
34 Figure
3 Figure
d’entraînement Courroie
30 Figure
courroies les de Remplacement
Éloignez
Moteur
Roues
vitesse de ment
patins et Lame
sol le entre maximal ment
Réglages
plate lame la et
19 Figure
Ouverture
d’essieu
support de
16 Figure
tarières les embrayer Pour
souffleuse la de Utilisation
AVERTISSEMENT
transmission la embrayer Pour
avant instructions les toutes sement
d’huile et d’essence Pleins
électrique démarreur le d’utiliser
soigneu Suivez .conducteur le blesser
de d’essayer avant immobilisées soient
tarière la de commande la de /Blocage l’entraînement de Commande
goulotte la dégager
se pièces les toutes que ce jusqu’à
14 Figure
souffleuse la de Commandes
moteur de Commandes
R1 R
pneuma Bandages pneus des Pression
montage de Instructions
tiques
13 Figure
AVERTISSEMENT
montage de
Instructions
main la à goulotte la dans
montage de Instructions
guidon du Montage
3 Figure 2 Figure 1 Figure
goulotte la de manivelle la de Montage
l’assemblage Avant
SYMBOLE! CE ACCOMPAGNE QUI L’AVERTISSEMENT RESPECTEZ
sécurité de Consignes
Remisage et Entretien
moyenne utile vie de Durée
Utilisation
sécurité
de Consignes
Préparation
sécurité de Étiquettes
est goulotte la de dégagement de outil Un
matières des Table
vente-après Service
modèle de numéro le trouver Pour
phases deux à neige à Souffleuses
D’UTILISATION NOTICE
Top
Page
Image
Contents