6

Adjustments

&

Maintenance

WARNING

Disconnect the spark plug wire and ground it against the engine to prevent unintended starting.

NEVER attempt to make any adjust- ments while

the engine is run- ning, except where specified in

the operator’s manual.

Before servicing, repairing, or inspect- ing, disengage the control bail and stop engine. Wait until all moving parts have come to a complete stop.

Side View

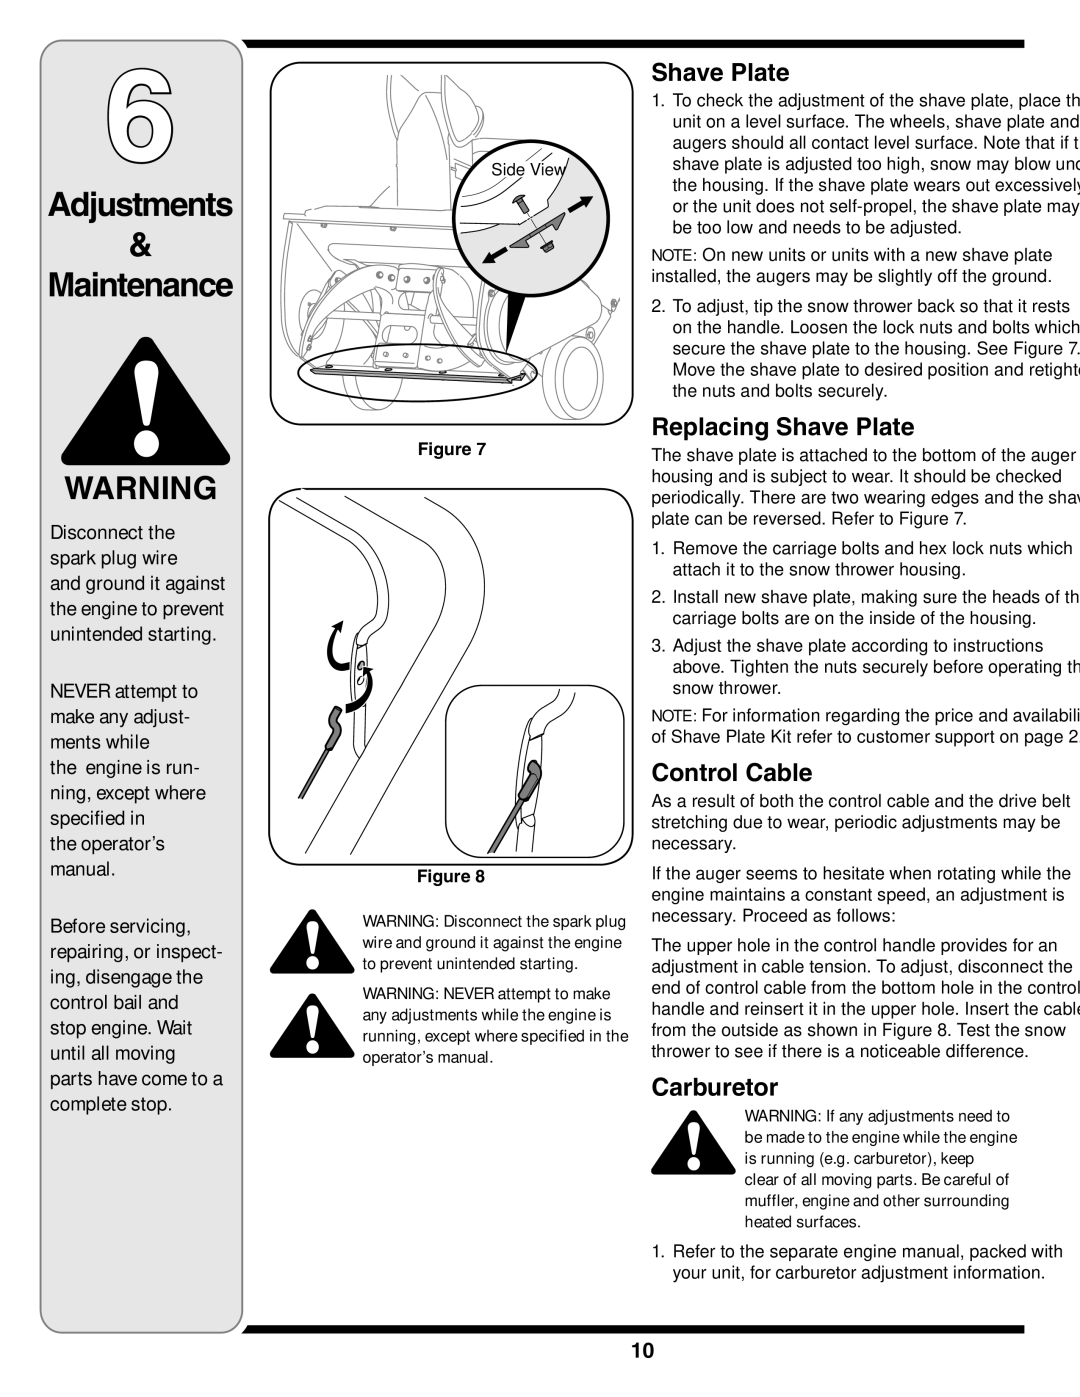
Figure 7

Figure 8

WARNING: Disconnect the spark plug wire and ground it against the engine to prevent unintended starting.

WARNING: NEVER attempt to make any adjustments while the engine is running, except where specified in the operator’s manual.

Shave Plate

1.To check the adjustment of the shave plate, place the unit on a level surface. The wheels, shave plate and augers should all contact level surface. Note that if the shave plate is adjusted too high, snow may blow under the housing. If the shave plate wears out excessively, or the unit does not self-propel, the shave plate may be too low and needs to be adjusted.

NOTE: On new units or units with a new shave plate installed, the augers may be slightly off the ground.

2.To adjust, tip the snow thrower back so that it rests on the handle. Loosen the lock nuts and bolts which secure the shave plate to the housing. See Figure 7. Move the shave plate to desired position and retighten the nuts and bolts securely.

Replacing Shave Plate

The shave plate is attached to the bottom of the auger housing and is subject to wear. It should be checked periodically. There are two wearing edges and the shave plate can be reversed. Refer to Figure 7.

1.Remove the carriage bolts and hex lock nuts which attach it to the snow thrower housing.

2.Install new shave plate, making sure the heads of the carriage bolts are on the inside of the housing.

3.Adjust the shave plate according to instructions above. Tighten the nuts securely before operating the snow thrower.

NOTE: For information regarding the price and availability of Shave Plate Kit refer to customer support on page 2.

Control Cable

As a result of both the control cable and the drive belt stretching due to wear, periodic adjustments may be necessary.

If the auger seems to hesitate when rotating while the engine maintains a constant speed, an adjustment is necessary. Proceed as follows:

The upper hole in the control handle provides for an adjustment in cable tension. To adjust, disconnect the end of control cable from the bottom hole in the control handle and reinsert it in the upper hole. Insert the cable from the outside as shown in Figure 8. Test the snow thrower to see if there is a noticeable difference.

Carburetor

WARNING: If any adjustments need to be made to the engine while the engine is running (e.g. carburetor), keep clear of all moving parts. Be careful of muffler, engine and other surrounding heated surfaces.

1.Refer to the separate engine manual, packed with your unit, for carburetor adjustment information.

10

Page 10
Image 10
MTD S250, S261, S240, S230, S260 warranty Replacing Shave Plate, Control Cable, Carburetor

261, 240, S260, S250, S230 specifications

The MTD S240, S250, S260, and S261 are part of MTD's robust lineup of snow throwers designed to tackle the harsh conditions of winter. Each model is engineered with features and technologies that enhance performance, durability, and ease of use.

The MTD S240 is a compact and lightweight snow thrower, ideal for residential users who need to clear driveways and small walkways. It features a powerful engine that provides reliable performance throughout the winter months. Its 21-inch clearing width and 12-inch intake height allow for efficient snow removal. The S240 is equipped with an adjustable chute that lets users direct the snow exactly where they want, and its manual start makes it straightforward for anyone to operate.

Moving up the range, the MTD S250 provides additional power and features that cater to larger areas. With a wider clearing width of 24 inches, it can handle heavier snowfall with ease. This model is designed with an electric start function, making it convenient for users. The S250 also benefits from advanced traction technology, providing optimal grip and maneuverability on icy surfaces. Its self-propelling feature allows users to navigate effortlessly through snow-ridden paths.

The S260 extends the capabilities even further, incorporating a larger engine that enhances its snow-clearing capabilities. This model boasts a 26-inch clearing width and an impressive intake height, making it suitable for deeper snow conditions. The S260 also includes an LED headlight, which allows for visibility during nighttime snow removal. Its heavy-duty build ensures that it can withstand the rigors of tough winter conditions while reducing maintenance needs.

Lastly, the MTD S261 is a pinnacle model that comes with all the advanced features necessary for professional-grade snow removal. With a larger and more powerful engine, this snow thrower is capable of managing the most challenging snow conditions. Its 27-inch clearing width combined with a high intake height allows it to tackle even the heaviest of snowfalls. The S261 also features an ergonomic design, including heated hand grips and fingertip controls, ensuring comfort for the user during extended operation.

In conclusion, the MTD S240, S250, S260, and S261 models each come equipped with unique features tailored to various snow-clearing needs. From compact residential solutions to powerful options for professional use, MTD provides a snow thrower for every challenge that winter throws your way.