7
Lighting Instructions
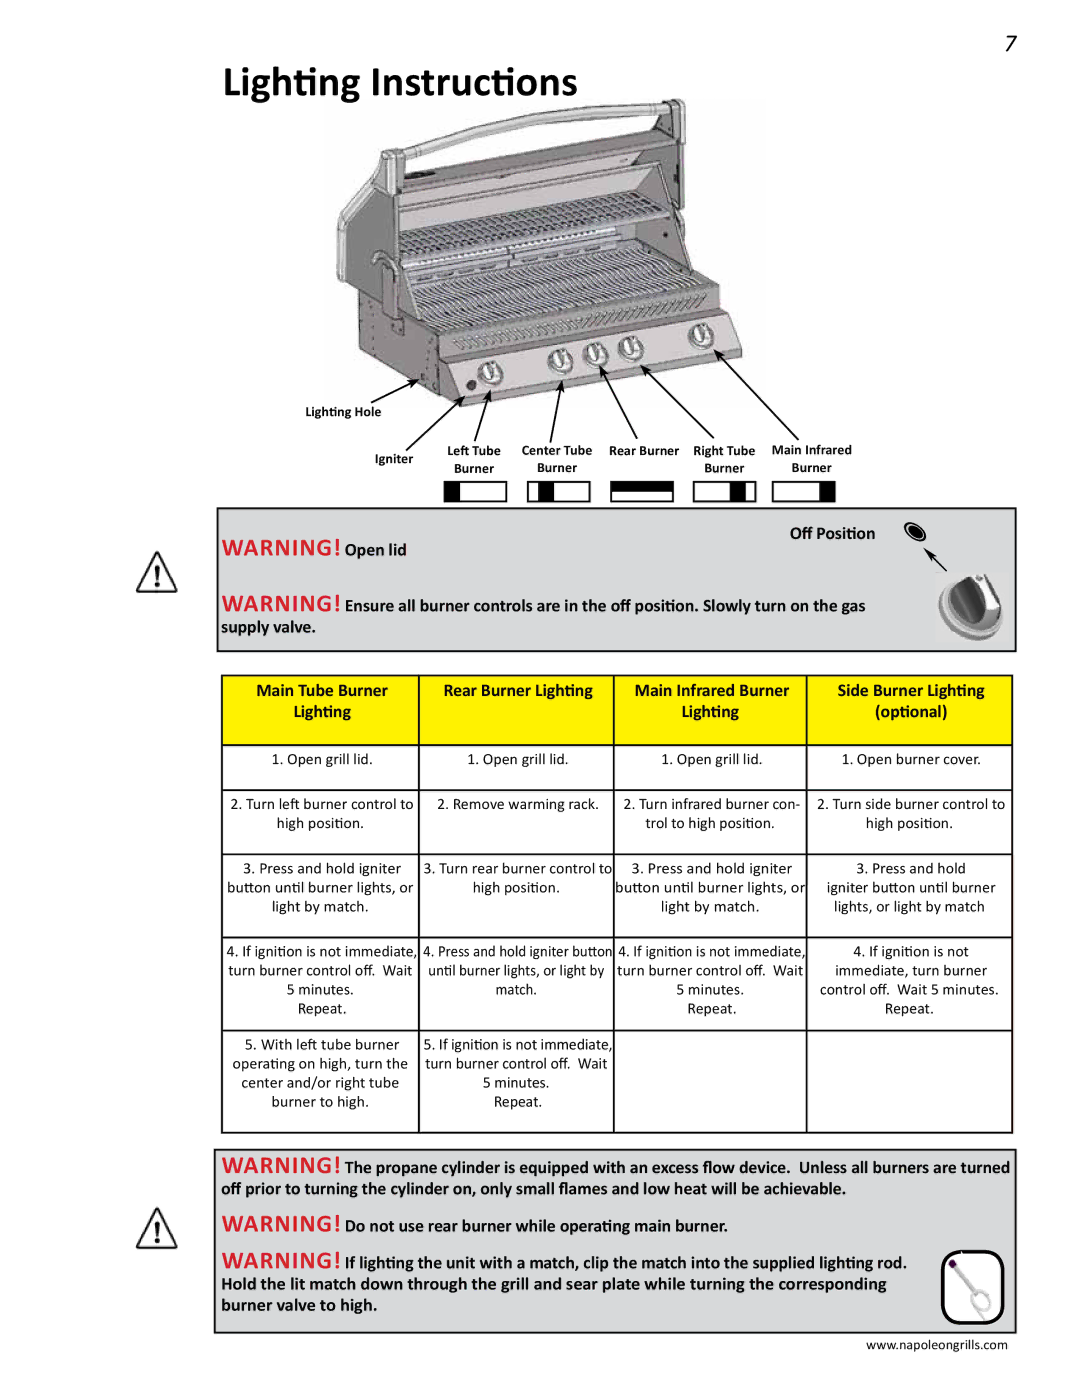
Lighting Hole |
|
|
|
|
|
|
|
|
|
|
|
|
|
|
|
|
Igniter | Left Tube | Center Tube | Rear Burner Right Tube | Main Infrared | ||||||||||||
Burner |
| Burner |
|
| Burner |
| Burner | |||||||||
|
|
|
|
| ||||||||||||
|
|
|
|
|
|
|
|
|
|
|
|
|
|
|
|
|
|
|
|
|
|
|
|
|
|
|
|
|
|
|
|
|
|
|
|
|
|
|
|
|
|
|
|
|
|
|
|
|
|
|
WARNING! Open lidOff Position
WARNING! Ensure all burner controls are in the off position. Slowly turn on the gas supply valve.
Main Tube Burner | Rear Burner Lighting | Main Infrared Burner | Side Burner Lighting |
Lighting |
| Lighting | (optional) |
|
|
|
|
1. Open grill lid. | 1. Open grill lid. | 1. Open grill lid. | 1. Open burner cover. |
|
|
|
|
2. Turn left burner control to | 2. Remove warming rack. | 2. Turn infrared burner con- | 2. Turn side burner control to |
high position. |
| trol to high position. | high position. |
|
|
|
|
3. Press and hold igniter | 3. Turn rear burner control to | 3. Press and hold igniter | 3. Press and hold |
button until burner lights, or | high position. | button until burner lights, or | igniter button until burner |
light by match. |
| light by match. | lights, or light by match |
|
|
|
|
4. If ignition is not immediate, | 4. Press and hold igniter button | 4. If ignition is not immediate, | 4. If ignition is not |
turn burner control off. Wait | until burner lights, or light by | turn burner control off. Wait | immediate, turn burner |
5 minutes. | match. | 5 minutes. | control off. Wait 5 minutes. |
Repeat. |
| Repeat. | Repeat. |
|
|
|
|
5. With left tube burner | 5. If ignition is not immediate, |
|
|
operating on high, turn the | turn burner control off. Wait |
|
|
center and/or right tube | 5 minutes. |
|
|
burner to high. | Repeat. |
|
|
|
|
|
|
WARNING! The propane cylinder is equipped with an excess flow device. Unless all burners are turned off prior to turning the cylinder on, only small flames and low heat will be achievable.
WARNING! Do not use rear burner while operating main burner.
WARNING! If lighting the unit with a match, clip the match into the supplied lighting rod. Hold the lit match down through the grill and sear plate while turning the corresponding burner valve to high.
www.napoleongrills.com
