Commandes

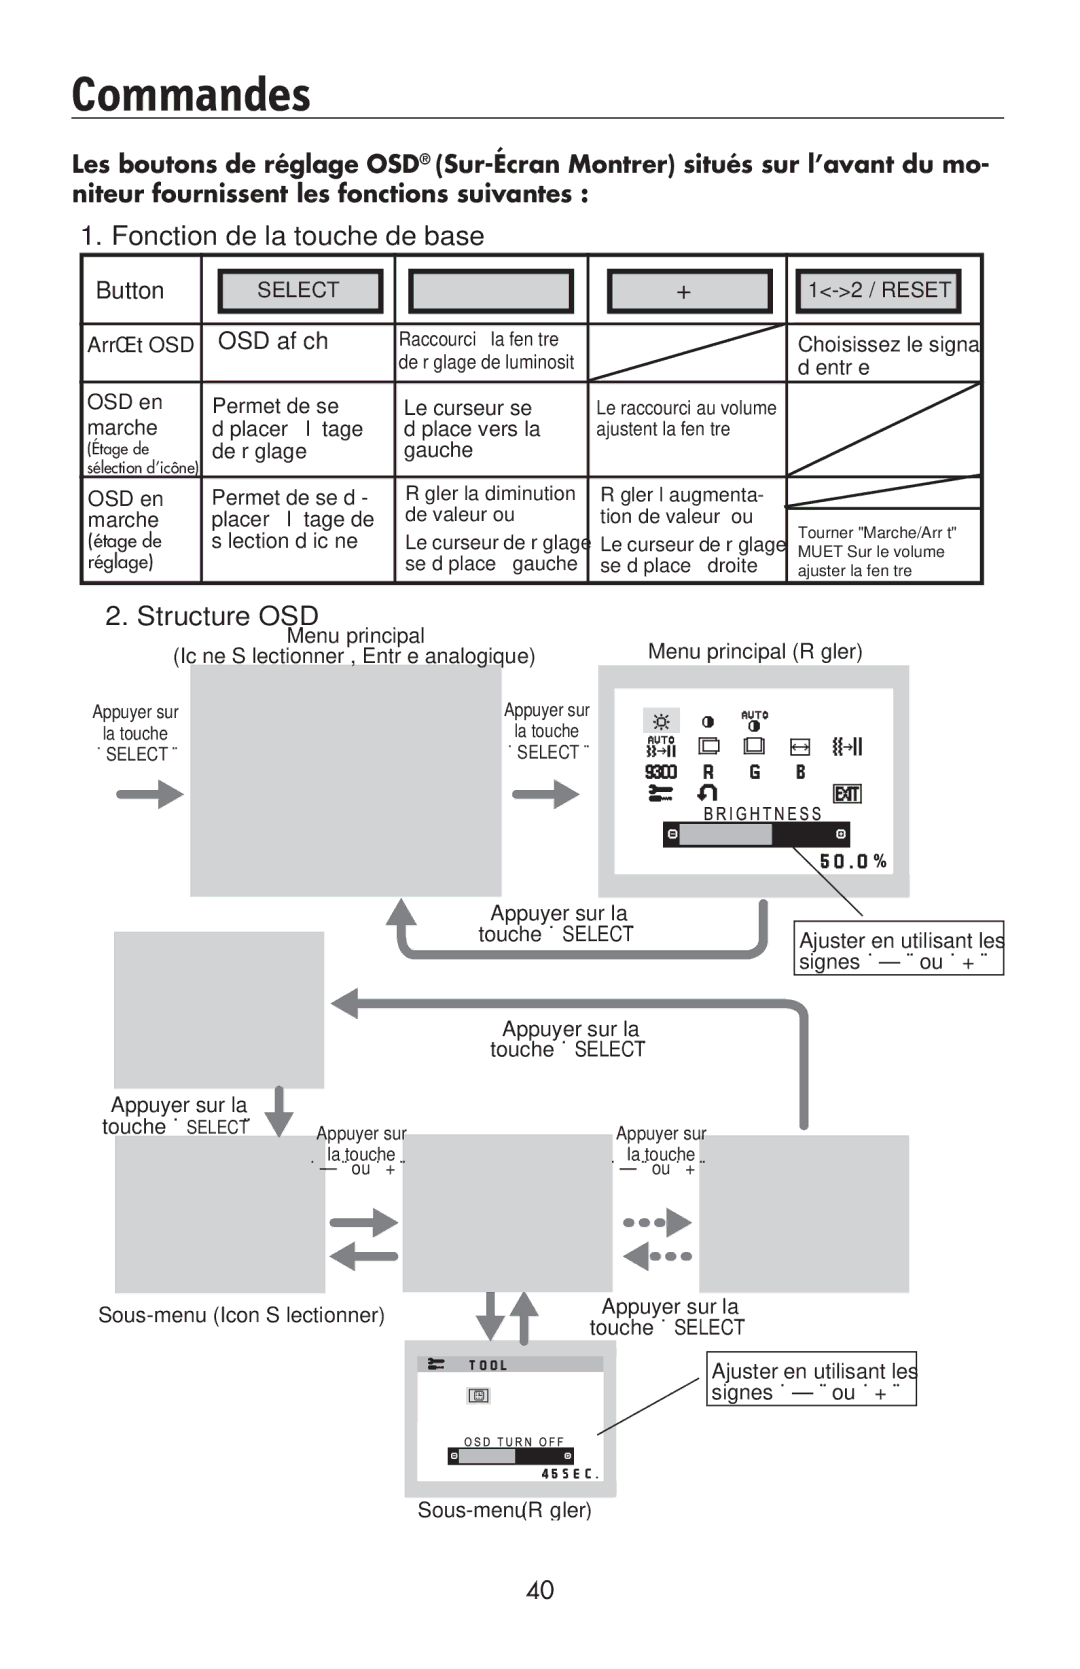
Les boutons de réglage OSD® (Sur-Écran Montrer) situés sur l’avant du mo- niteur fournissent les fonctions suivantes :

1. Fonction de la touche de base


Button


SELECT


+


1<->2 / RESET


Arrêt OSD


OSD affiché

Raccourci à la fenêtre


Choisissez le signal


de réglage de luminosité


d’entrée

OSD en

Permet de se

Le curseur se

Le raccourci au volume


marche

déplacer à l’étage

déplace vers la

ajustent la fenêtre


(Étage de

de réglage

gauche


sélection d’icône)


OSD en

Permet de se dé-

Régler la diminution


Régler l’augmenta-


marche

placer à l’étage de

de valeur ou


tion de valeur ou


Tourner "Marche/Arrêt"

(étage de

sélection d’icône

Le curseur de réglage


Le curseur de réglage


MUET Sur le volume

réglage)


se déplace à gauche


se déplace à droite


ajuster la fenêtre

2. Structure OSD


Menu principal


Menu principal (Régler)


(Icône Sélectionner , Entrée analogique)


Appuyer sur


Appuyer sur


la touche


la touche


« SELECT »


« SELECT »


Appuyer sur la


touche « SELECT »


Appuyer sur la


touche « SELECT »


Appuyer sur la


touche « SELECT »


Appuyer sur


Appuyer sur


«

la touche

»


la touche


– » ou « +

« – » ou « + »


Ajuster en utilisant les signes « – » ou « + »

Sous-menu (Icon Sélectionner)

Appuyer sur la

touche « SELECT »

Ajuster en utilisant les signes « – » ou « + »

Sous-menu (Régler)

40

Page 37
Image 37
NEC LCD195NXM user manual Commandes, Fonction de la touche de base

LCD195NXM specifications

The NEC LCD195NXM is a state-of-the-art LCD monitor that sets a benchmark for performance, usability, and visual clarity. Designed primarily for professional use, this monitor incorporates a set of features that cater to the needs of both IT professionals and casual users alike.

With a 19-inch screen, the LCD195NXM boasts a resolution of 1280 x 1024 pixels, providing crisp images and sharp text. The 5 ms response time ensures smooth video playback, making it ideal for both office applications and light gaming. One of the key features of this monitor is its excellent color accuracy, which is crucial for graphic design, photography, and other visual arts. The advanced In-Plane Switching (IPS) technology delivers consistent colors and wider viewing angles, minimizing the color distortion that can occur when viewed from different angles.

The NEC LCD195NXM is also designed with ergonomics in mind. It offers flexibility in its stand with options for height adjustment, tilt, and swivel, which contributes to an improved user experience by allowing for personalized positioning. This is especially helpful in multi-monitor setups, as users can create a seamless work environment that enhances productivity.

Energy efficiency is another characteristic that stands out in the NEC LCD195NXM. The monitor is equipped with eco-friendly features that contribute to lower power consumption without compromising performance. This is not only beneficial for the environment but also helps reduce electricity costs.

Connectivity options are plentiful, equipped with VGA and DVI-D input ports, allowing for easy connections to a variety of devices including computers and laptops. Additionally, the presence of built-in speakers further enhances the multi-media experience.

Furthermore, the NEC LCD195NXM is backed by robust warranty and support from NEC, ensuring peace of mind for users. Its sleek design, advanced technologies, and user-centered features make it a viable option for anyone looking for a reliable and efficient display solution. Overall, the NEC LCD195NXM stands out as a versatile and capable monitor, suitable for both professional and personal environments.