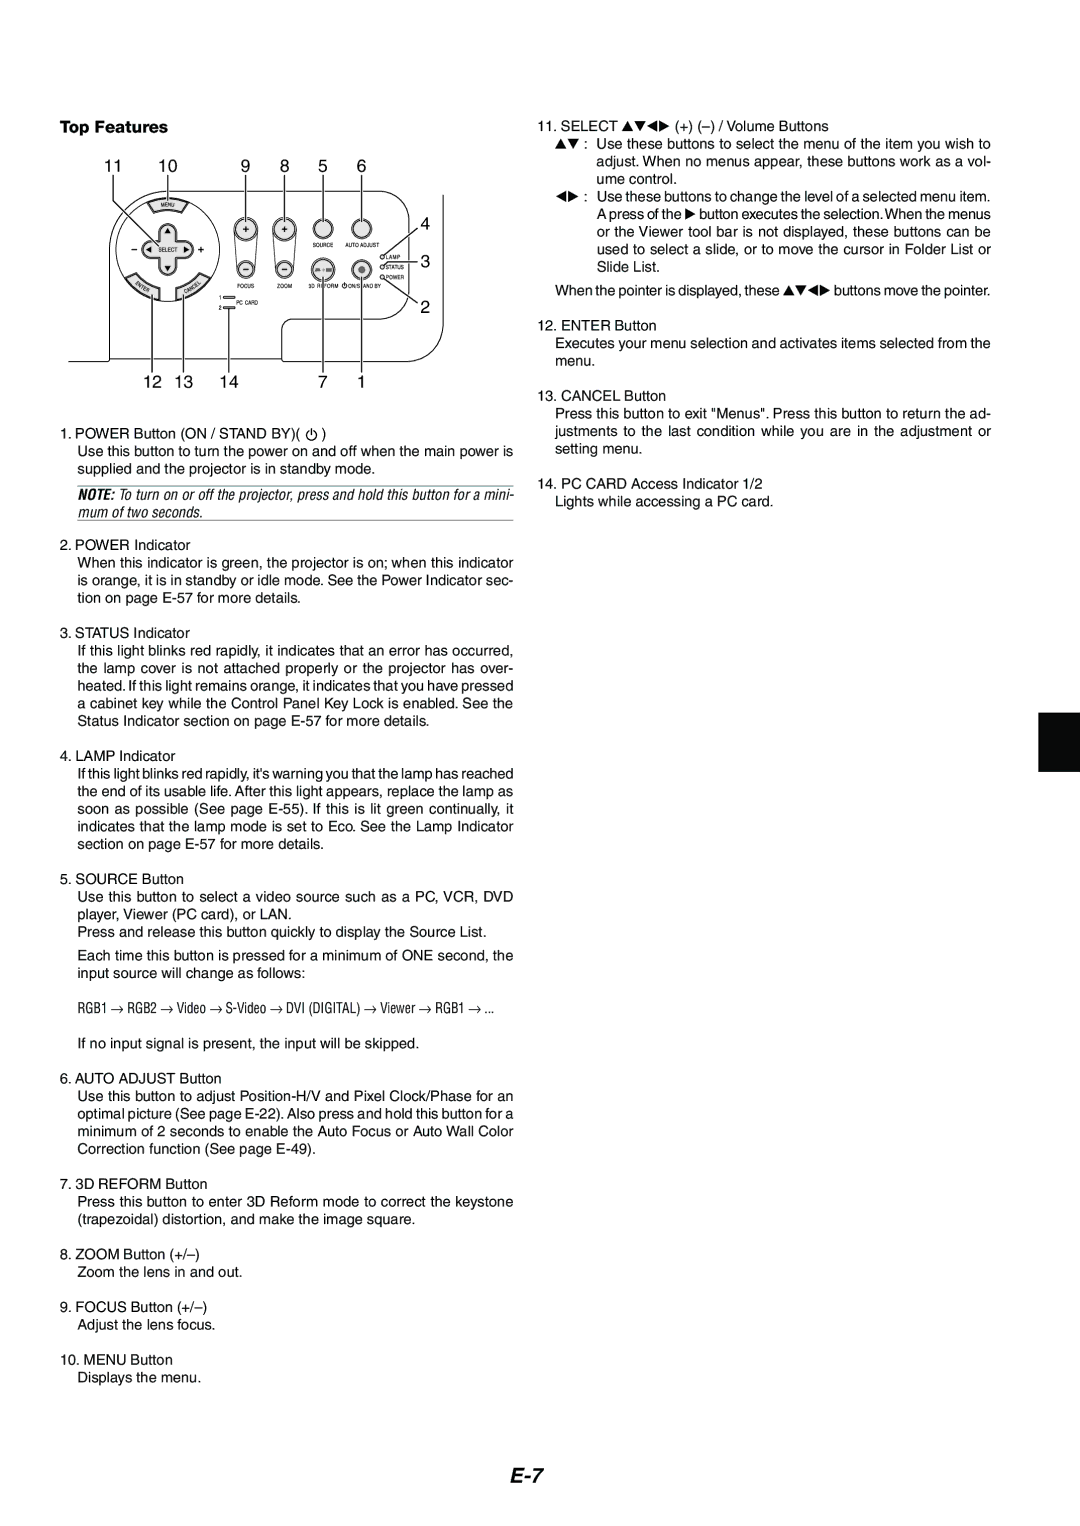
Top Features

11

10

9

8

5

6

4

3

2

12

13

14

7

1

1. POWER Button (ON / STAND BY)( )

Use this button to turn the power on and off when the main power is supplied and the projector is in standby mode.

NOTE: To turn on or off the projector, press and hold this button for a mini- mum of two seconds.

2. POWER Indicator

When this indicator is green, the projector is on; when this indicator is orange, it is in standby or idle mode. See the Power Indicator sec- tion on page E-57 for more details.

3. STATUS Indicator

If this light blinks red rapidly, it indicates that an error has occurred, the lamp cover is not attached properly or the projector has over- heated. If this light remains orange, it indicates that you have pressed a cabinet key while the Control Panel Key Lock is enabled. See the Status Indicator section on page E-57 for more details.

4.LAMP Indicator

If this light blinks red rapidly, it's warning you that the lamp has reached the end of its usable life. After this light appears, replace the lamp as soon as possible (See page E-55). If this is lit green continually, it indicates that the lamp mode is set to Eco. See the Lamp Indicator section on page E-57 for more details.

5.SOURCE Button

Use this button to select a video source such as a PC, VCR, DVD player, Viewer (PC card), or LAN.

Press and release this button quickly to display the Source List.

Each time this button is pressed for a minimum of ONE second, the input source will change as follows:

RGB1 RGB2 Video S-Video DVI (DIGITAL) Viewer RGB1 ...

If no input signal is present, the input will be skipped.

6.AUTO ADJUST Button

Use this button to adjust Position-H/V and Pixel Clock/Phase for an optimal picture (See page E-22). Also press and hold this button for a minimum of 2 seconds to enable the Auto Focus or Auto Wall Color Correction function (See page E-49).

7.3D REFORM Button

Press this button to enter 3D Reform mode to correct the keystone (trapezoidal) distortion, and make the image square.

8.ZOOM Button (+/–) Zoom the lens in and out.

9.FOCUS Button (+/–) Adjust the lens focus.

10.MENU Button

Displays the menu.

11. SELECT

(+) (–) / Volume Buttons

:Use these buttons to select the menu of the item you wish to adjust. When no menus appear, these buttons work as a vol- ume control.

:Use these buttons to change the level of a selected menu item.

A press of the button executes the selection.When the menus or the Viewer tool bar is not displayed, these buttons can be used to select a slide, or to move the cursor in Folder List or Slide List.

When the pointer is displayed, these

buttons move the pointer.

12. ENTER Button

Executes your menu selection and activates items selected from the menu.

13. CANCEL Button

Press this button to exit "Menus". Press this button to return the ad- justments to the last condition while you are in the adjustment or setting menu.

14.PC CARD Access Indicator 1/2 Lights while accessing a PC card.

E-7

Page 7
Image 7
NEC MT1075/MT1065 user manual Top Features, Select

MT1075/MT1065 specifications

The NEC MT1075 and MT1065 are high-quality projectors that cater to various presentation needs, making them popular choices in both business and educational settings. Known for their impressive specifications and features, these models deliver outstanding performance, complemented by advanced technologies.

One of the standout features of the NEC MT1075 and MT1065 is their brightness. The MT1075 boasts a luminous output of 3700 ANSI lumens, while the MT1065 offers a slightly lower output of 3600 ANSI lumens. This high brightness level ensures that images remain clear and vivid, even in well-lit environments, making them suitable for large auditoriums, classrooms, and conference rooms.

These projectors employ DLP (Digital Light Processing) technology, which enhances image quality by providing sharp, vibrant colors and high contrast ratios. DLP technology ensures that moving images appear smooth and free from motion blur, making these projectors ideal for displaying videos, animations, and dynamic presentations. The MT1075 and MT1065 also support various resolution formats, with their native SVGA (800 x 600) resolution able to accommodate higher resolutions with clarity.

Another significant characteristic of these projectors is their connectivity options. Both models offer a range of input ports, including VGA, composite video, and S-Video, ensuring compatibility with multiple devices such as laptops, DVD players, and gaming consoles. Additionally, they feature audio input and built-in speakers, providing a complete multimedia experience.

The lightweight design of the NEC MT1075 and MT1065 enhances portability, making them easy to transport and set up in different locations. Their built-in features, such as keystone correction and manual zoom, provide flexibility in positioning the projectors and adjusting the image to fit various screen sizes.

Energy efficiency is another important aspect of the NEC MT1075 and MT1065. Both models utilize advanced lamp technology that ensures long-lasting performance, reducing the frequency of lamp replacements and associated maintenance costs.

Overall, the NEC MT1075 and MT1065 projectors are versatile and reliable, making them suitable for a wide range of applications. Their combination of brightness, advanced DLP technology, connectivity options, and user-friendly features make them an excellent choice for professionals and educators looking to make impactful presentations. With their durability and enhanced image quality, the MT1075 and MT1065 stand out in the competitive projector market.