5. Using the Viewer

Inserting and Removing a PC Card

NOTE:

Do not try to force the PC card into the slot.

A dummy card is inserted into the PC CARD slot at the time of shipment. First remove the dummy card before use.

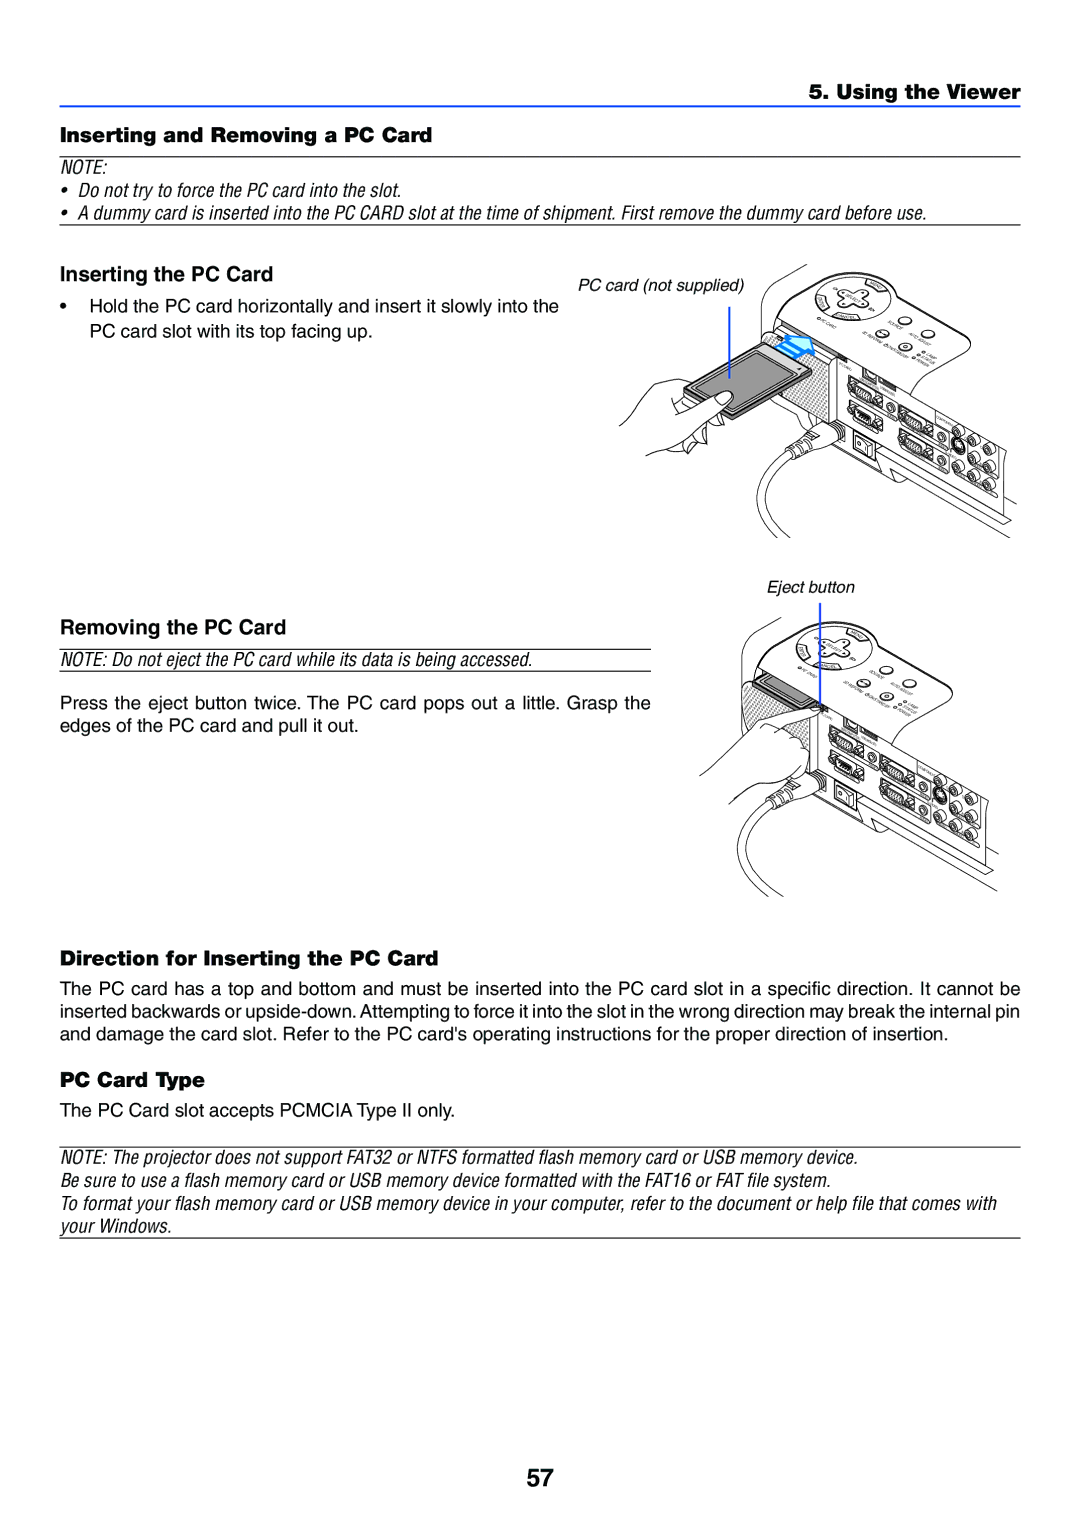
Inserting the PC Card

PC card (not supplied)

Hold the PC card horizontally and insert it slowly into the PC card slot with its top facing up.


ME


SELECT

NU


E


E


N


T


R


P

CANC EL


SO


CC


AR


UR


D


3D


CE


RE


A


UT


FO


OA


RM


DJU


ON


ST


/ST


AN


LA


DB


Y

PO

STA

MP


PC


TU


CA


R


RD


USB

(CO

MPU

TER)USB

(MOUSE)

MO

NIT

OR

OUT


PC


AUDIO


CO


MPO


CO

CO


NENT


NTR


OL

MP

UTE


Y


AC

IN


R1


C


A


b/Pb


CO


UD

C


IO

r/Pr


MP


S-


U


VIDE


TER2


O


L

A


AU

/MO

UD

NO

IO

DIO

V


R


IDEO


L

A


/MO

UD


NO

IO


R

Removing the PC Card

NOTE: Do not eject the PC card while its data is being accessed.

Press the eject button twice. The PC card pops out a little. Grasp the edges of the PC card and pull it out.

Eject button


ME


NU


E


S


E


N


LE


T


C


E


T


R


PC

CANC EL


CARD


SOURCE


3D

REFORM


AUTO


ADJUST


ON/STAND


BY


LAMP


PC

CA


STATUS


POWER


RD


USB(COMPUTER)

USB(MOUSE)

MO

NIT


OR


OUT


AU

CO


PC


DIO

MPO


CO

CO


NENT


NTR


OL

MP


Y


AC


UTE


IN


R1


Cb


A


/Pb


CO

UD

C


IO

r/Pr


MP


S-V


UTE


IDE


R2


O


L

A


AU

/MO

UD

IO

NO

DIO

V


R


IDEO


L

A


/MO

UD

IO


NO


R

Direction for Inserting the PC Card

The PC card has a top and bottom and must be inserted into the PC card slot in a specific direction. It cannot be inserted backwards or upside-down. Attempting to force it into the slot in the wrong direction may break the internal pin and damage the card slot. Refer to the PC card's operating instructions for the proper direction of insertion.

PC Card Type

The PC Card slot accepts PCMCIA Type II only.

NOTE: The projector does not support FAT32 or NTFS formatted flash memory card or USB memory device. Be sure to use a flash memory card or USB memory device formatted with the FAT16 or FAT file system.

To format your flash memory card or USB memory device in your computer, refer to the document or help file that comes with your Windows.

57

Page 57
Image 57
NEC VT770 Using the Viewer Inserting and Removing a PC Card, Inserting the PC Card, Removing the PC Card, PC Card Type

VT770 specifications

The NEC VT770 is a versatile and powerful projector designed for various applications, primarily in educational and corporate environments. It stands out for its remarkable image quality, ease of use, and innovative features that cater to both presenters and audiences.

One of the key features of the VT770 is its native XGA resolution (1024 x 768 pixels), which ensures clear and detailed images. It utilizes a 3LCD technology, which contributes to bright, vibrant colors and high light output. With a brightness rating of 2800 ANSI lumens, it performs exceptionally well in diverse lighting conditions, making it suitable for medium to large-sized rooms without compromising image quality.

The VT770 offers a contrast ratio of up to 600:1, which enhances the distinction between the brightest whites and the deepest blacks. This feature is particularly beneficial for presentations that involve detailed graphs or images, as it allows for precise visual communication. The projector’s lamp life extends to approximately 6000 hours in eco mode, thus reducing operational costs and the frequency of replacements.

Connectivity is another area where the VT770 excels. It comes equipped with multiple input options, including VGA, composite video, S-video, and HDMI. This flexibility allows users to connect various devices such as laptops, DVD players, and video game consoles seamlessly. Additionally, the projector supports optional wireless connectivity, enabling presentations without the hassle of cables.

User-friendly features are integrated into the VT770, including an intuitive control panel and remote control, allowing easy adjustments and navigation through settings. The projector also incorporates keystone correction, which aids in aligning the image and ensuring a squared display despite the projection angles.

Another distinguishing characteristic of the VT770 is its lightweight and portable design, making it an excellent choice for professionals on the go. It can be easily transported between locations, enabling spontaneous presentations without the need for extensive setup time.

In conclusion, the NEC VT770 is a feature-packed projector that combines high-quality imaging with flexible connectivity and user-friendly operation. Its suitability for educational and business presentations makes it an invaluable tool for professionals seeking reliable performance and portability.