Start Here
Congratulations on your purchase of | a NETGEAR | ™ | Model RH340 |
Internet Access ISDN Router. |
|
|
|
These instructions show you how to | configure your Windows |
| ® PC |
network and your NETGEAR router for Internet access through an |
|
| |
ISDN connection to an Internet service provider (ISP). For more |
| ||
detailed information about installing your router or configuring |
|
| |
additional features, refer to | Reference Guide for the Model RH340 |
| |
Internet Access ISDN Router | included on the RH340 Resources CD. |
| |
Package Contents
Unpack the contents of the package and verify them against the following list:
•Model RH340 Internet Access ISDN Router
•AC power adapter, 16 V AC output
•
•ISDN cable (black)
•
•
•This guide
•RH340 Resources CD containing FirstGear, Reference Manual, and Application Notes
•Warranty and Registration Card
•Support Information Card
Call your local retailer if there are any wrong, missing, or damaged parts. Keep the carton, including the original packing materials, to repack the router if there is a need to return it for repair.
Rear Panel
Refer to the diagram of the rear panel below to identify all ports on the
Model RH340 router when you make connections.
|
| Rear Panel of the Model RT340 Router | |||||
| AC adapter outlet |
|
| ISDN port | |||
|
|
| LAN |
|
|
|
|
POWER | 4 | 3 | 2 | 1 | MANAGER | ISDN | PHONE 1 PHONE 2 |
16VAC |
|
|
| ||||
|
|
| UTP LAN |
|
| Phone | |
|
|
| ports |
|
|
| ports |
Power switch |
|
|
|
| |||
|
|
|
|
| Manager port | 9456FA | |
Hardware Installation
Refer to the following illustration for installing and connecting your Model RH340 router.
Installing the Model RT340 Router
ISDN wall connection
|
|
| LAN |
|
|
|
|
POWER | 4 | 3 | 2 | 1 | PHONE 1 | PHONE 2 | |
|
|
|
|
| MGR |
|
|
Product Illustration
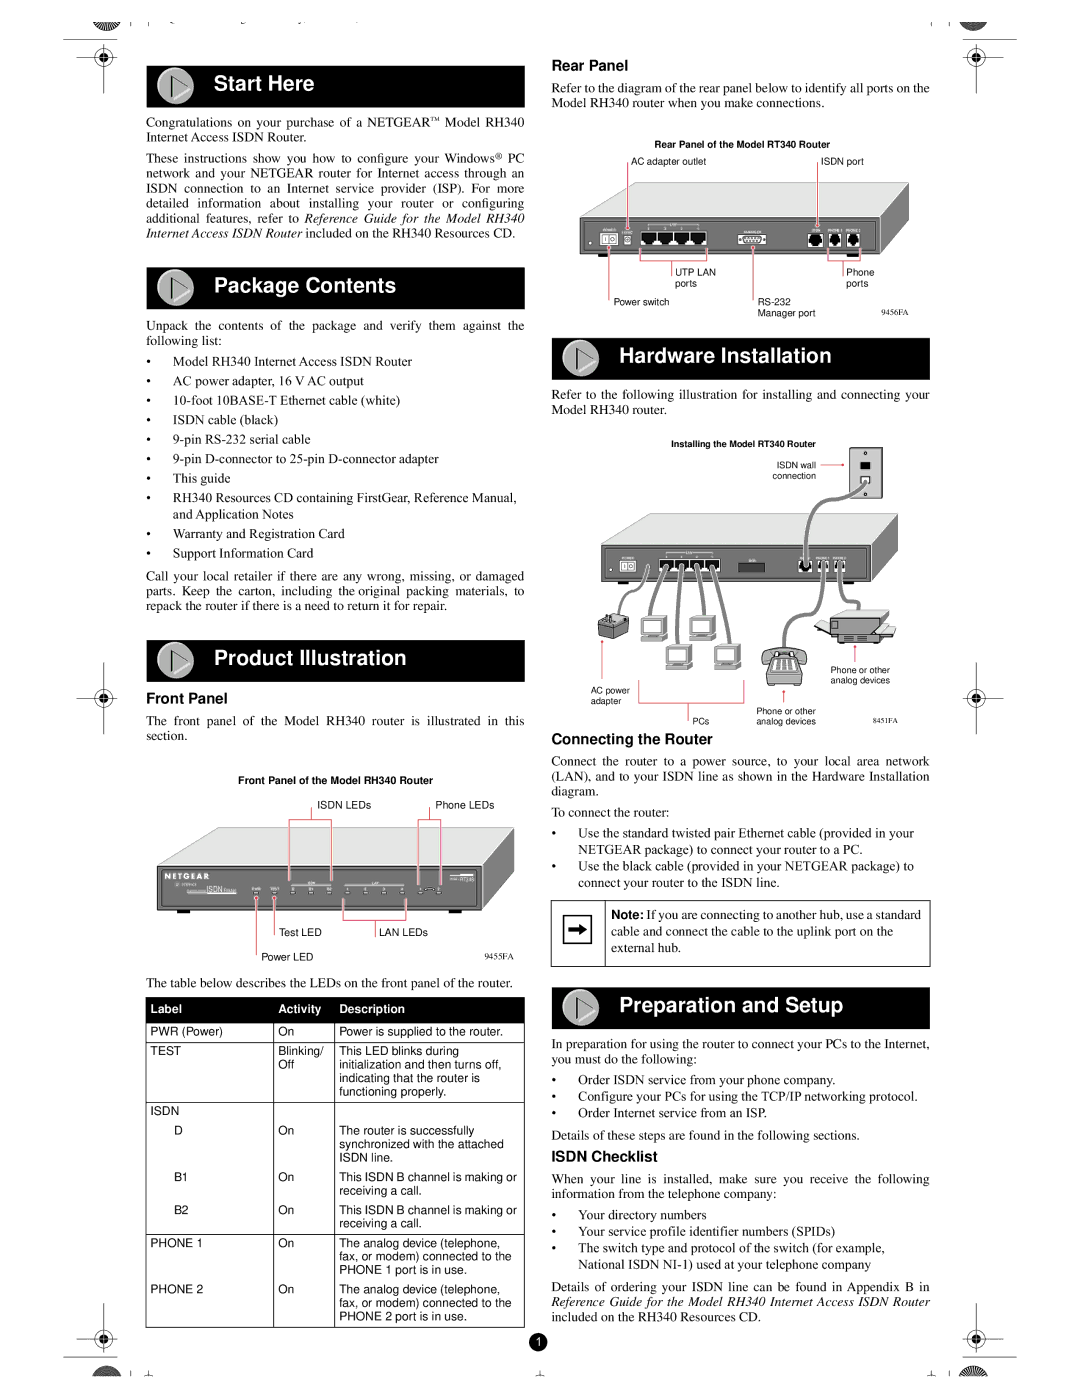
Front Panel
The front panel of the Model RH340 router is illustrated in this section.
|
|
| Front Panel of the Model RH340 Router | |||||||||||||||
|
|
|
|
|
|
| ISDN LEDs |
|
|
|
| Phone LEDs | ||||||
|
|
|
|
|
|
|
|
|
|
|
|
|
|
|
|
|
|
|
|
|
|
|
|
|
|
|
|
|
|
|
|
|
|
|
|
|
|
|
|
|
|
|
|
|
|
|
|
|
|
|
|
|
| MODEL RT348 |
| |
U INTERFACE |
|
|
| ISDN | LAN |
|
|
|
| |||||||||
| Remote Access ISDN Router | PWR TEST D B1 B2 12 | 3412 |
|
|
|
| |||||||||||
|
|
|
|
|
|
|
|
|
|
|
|
|
|
|
|
| ||
|
|
|
|
|
|
|
|
|
|
|
|
|
|
|
|
|
|
|
|
|
|
|
|
|
|
|
|
|
|
|
|
|
|
| |||
|
|
|
|
| Test LED |
| LAN LEDs | |||||||||||
|
|
|
| Power LED |
|
|
|
|
|
|
|
| 9455FA | |||||
|
|
|
|
|
|
|
|
|
|
|
| |||||||
The table below describes the LEDs on the front panel of the router.
Label | Activity | Description |
|
|
|
PWR (Power) | On | Power is supplied to the router. |
|
|
|
TEST | Blinking/ | This LED blinks during |
| Off | initialization and then turns off, |
|
| indicating that the router is |
|
| functioning properly. |
|
|
|
ISDN |
|
|
D | On | The router is successfully |
|
| synchronized with the attached |
|
| ISDN line. |
B1 | On | This ISDN B channel is making or |
|
| receiving a call. |
B2 | On | This ISDN B channel is making or |
|
| receiving a call. |
|
|
|
PHONE 1 | On | The analog device (telephone, |
|
| fax, or modem) connected to the |
|
| PHONE 1 port is in use. |
PHONE 2 | On | The analog device (telephone, |
|
| fax, or modem) connected to the |
|
| PHONE 2 port is in use. |
|
|
|
Phone or other analog devices
AC power adapter
| Phone or other |
|
PCs | analog devices | 8451FA |
Connecting the Router
Connect the router to a power source, to your local area network (LAN), and to your ISDN line as shown in the Hardware Installation diagram.
To connect the router:
•Use the standard twisted pair Ethernet cable (provided in your NETGEAR package) to connect your router to a PC.
•Use the black cable (provided in your NETGEAR package) to connect your router to the ISDN line.
Note: If you are connecting to another hub, use a standard cable and connect the cable to the uplink port on the external hub.
Preparation and Setup
In preparation for using the router to connect your PCs to the Internet, you must do the following:
•Order ISDN service from your phone company.
•Configure your PCs for using the TCP/IP networking protocol.
•Order Internet service from an ISP.
Details of these steps are found in the following sections.
ISDN Checklist
When your line is installed, make sure you receive the following information from the telephone company:
•Your directory numbers
•Your service profile identifier numbers (SPIDs)
•The switch type and protocol of the switch (for example, National ISDN
Details of ordering your ISDN line can be found in Appendix B in
Reference Guide for the Model RH340 Internet Access ISDN Router
included on the RH340 Resources CD.
1