screws in their holes before tightening them down. This will prevent crossthreading.
Before installing the spikes, turn the speakers upright and position them. When you have found the perfect spot, careful- ly tilt the speakers and screw in the spikes with the lock nuts on them. The speakers are awkward to move after the spikes are installed. Caution: The spikes are very sharp. To avoid injury, use extreme care when handling and installing them. Adjust the spikes as needed to ensure that the VT-1.2 is level and does not rock in any direction. Tighten then lock nuts against the bottom of the stabilizer bar to lock the spikes in place. If you have hardwood floors or floors with a scratch- able surface, you may choose not to use the spikes because they will pierce the surface. Rubber feet are provided and can be used in place of the spikes. Install the stabilizer bars, peel off the adhesive backings from the rubber feet, and place them over the holes where the spikes would screw in.
Connections
Before connecting speakers to your system, it is very important that you turn off the power to your amplifier / receiver to avoid damage to the equipment.
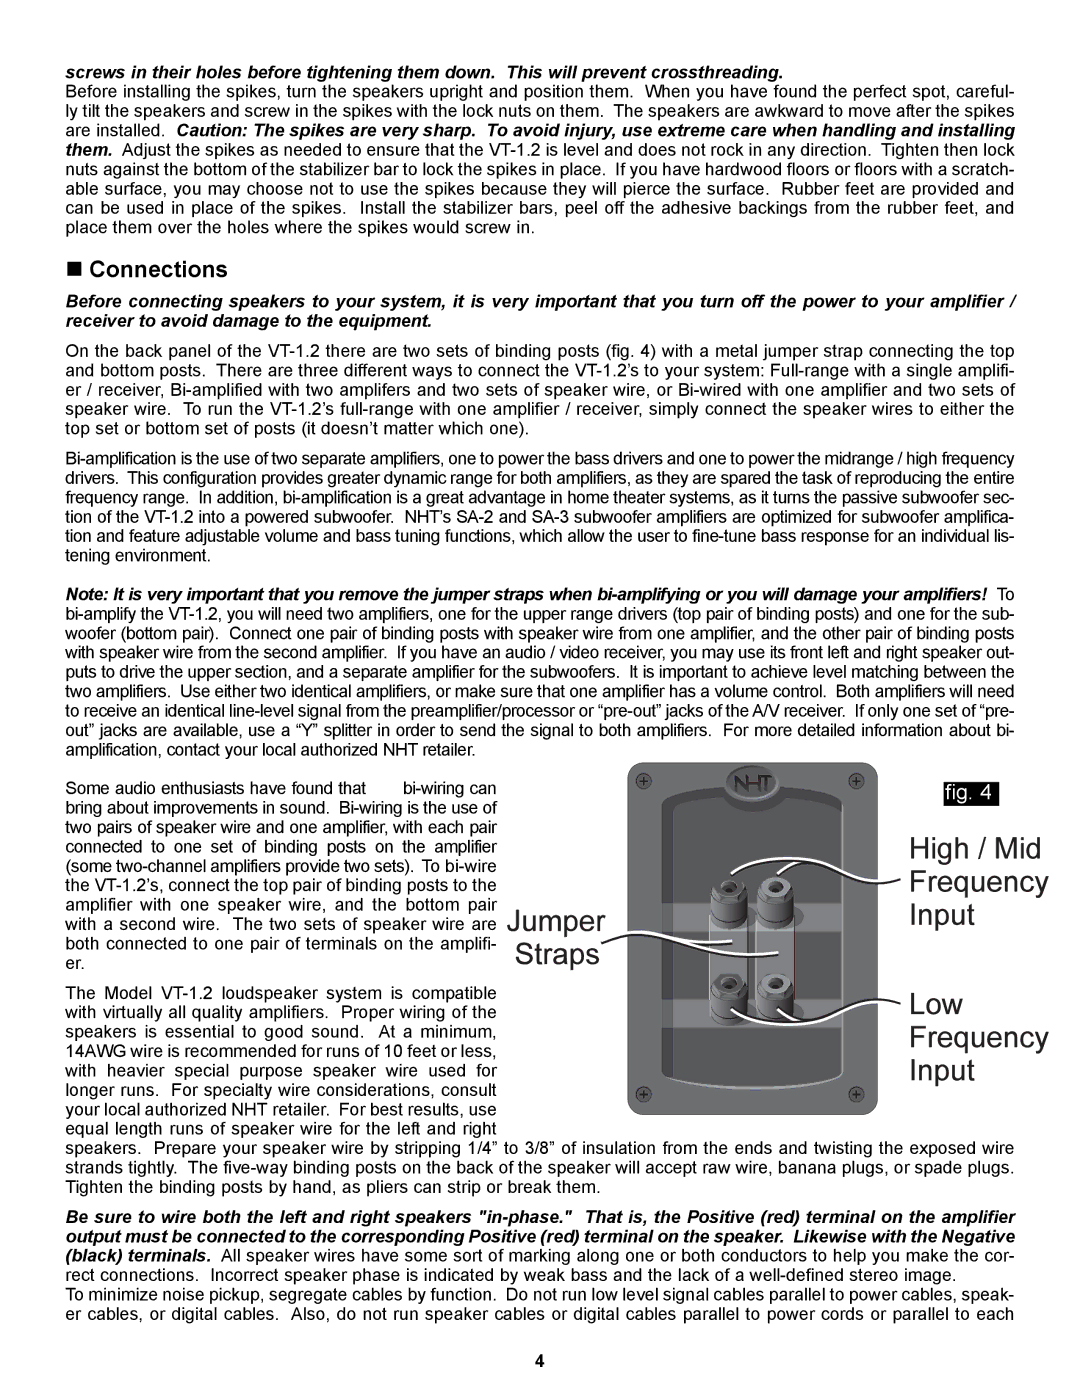
On the back panel of the VT-1.2 there are two sets of binding posts (fig. 4) with a metal jumper strap connecting the top and bottom posts. There are three different ways to connect the VT-1.2’s to your system: Full-range with a single amplifi- er / receiver, Bi-amplified with two amplifers and two sets of speaker wire, or Bi-wired with one amplifier and two sets of speaker wire. To run the VT-1.2’s full-range with one amplifier / receiver, simply connect the speaker wires to either the top set or bottom set of posts (it doesn’t matter which one).
Bi-amplification is the use of two separate amplifiers, one to power the bass drivers and one to power the midrange / high frequency drivers. This configuration provides greater dynamic range for both amplifiers, as they are spared the task of reproducing the entire frequency range. In addition, bi-amplification is a great advantage in home theater systems, as it turns the passive subwoofer sec- tion of the VT-1.2 into a powered subwoofer. NHT’s SA-2 and SA-3 subwoofer amplifiers are optimized for subwoofer amplifica- tion and feature adjustable volume and bass tuning functions, which allow the user to fine-tune bass response for an individual lis- tening environment.
Note: It is very important that you remove the jumper straps when bi-amplifying or you will damage your amplifiers! To bi-amplify the VT-1.2, you will need two amplifiers, one for the upper range drivers (top pair of binding posts) and one for the sub- woofer (bottom pair). Connect one pair of binding posts with speaker wire from one amplifier, and the other pair of binding posts with speaker wire from the second amplifier. If you have an audio / video receiver, you may use its front left and right speaker out- puts to drive the upper section, and a separate amplifier for the subwoofers. It is important to achieve level matching between the two amplifiers. Use either two identical amplifiers, or make sure that one amplifier has a volume control. Both amplifiers will need to receive an identical line-level signal from the preamplifier/processor or “pre-out” jacks of the A/V receiver. If only one set of “pre- out” jacks are available, use a “Y” splitter in order to send the signal to both amplifiers. For more detailed information about bi- amplification, contact your local authorized NHT retailer.
Some audio enthusiasts have found that | bi-wiring can | | | | | | | | | fig. 4 |
| | | | | | |
bring about improvements in sound. Bi-wiring is the use of | | | | | | | | | |
two pairs of speaker wire and one amplifier, with each pair | | | | | | | | | |
connected to one set of binding posts on the amplifier | | | | | | | | | |
(some two-channel amplifiers provide two sets). To bi-wire | | | | | | | | | |
the VT-1.2’s, connect the top pair of binding posts to the | | | | | | | | | |
amplifier with one speaker wire, and the bottom pair | | | | | | | | | |
| | | | | | | | |
with a second wire. The two sets of speaker wire are | | | | | | | | | |
both connected to one pair of terminals on the amplifi- | | | | | | | | | |
er. | | | | | | | | | | |
The Model VT-1.2 loudspeaker system is compatible
with virtually all quality amplifiers. Proper wiring of the speakers is essential to good sound. At a minimum,
14AWG wire is recommended for runs of 10 feet or less,
with heavier special purpose speaker wire used for longer runs. For specialty wire considerations, consult
your local authorized NHT retailer. For best results, use equal length runs of speaker wire for the left and right
speakers. Prepare your speaker wire by stripping 1/4” to 3/8” of insulation from the ends and twisting the exposed wire strands tightly. The five-way binding posts on the back of the speaker will accept raw wire, banana plugs, or spade plugs. Tighten the binding posts by hand, as pliers can strip or break them.
Be sure to wire both the left and right speakers "in-phase." That is, the Positive (red) terminal on the amplifier output must be connected to the corresponding Positive (red) terminal on the speaker. Likewise with the Negative (black) terminals. All speaker wires have some sort of marking along one or both conductors to help you make the cor- rect connections. Incorrect speaker phase is indicated by weak bass and the lack of a well-defined stereo image.
To minimize noise pickup, segregate cables by function. Do not run low level signal cables parallel to power cables, speak- er cables, or digital cables. Also, do not run speaker cables or digital cables parallel to power cords or parallel to each