User’s Manual
Trademark Information
Page
Do not disassemble
For Your Safety
Turn off in the event of malfunction
Handle the camera strap with care
Iii
For Your Safety
Observe caution when handling the battery
Handle moving parts with care
Observe caution when using the flash
Use appropriate cables
CD-ROMs
Modifications
Interface Cables
Wash hands after handling
Nikon Inc Walt Whitman Road Melville, New York
Table of Contents
Table of Contents
Viii
132
110
126
140
About This Manual
Life-Long Learning
Information and Precautions
Use Only Nikon Brand Electronic Accessories
Before Taking Important Pictures
Information and Precautions
Disposing of Data Storage Devices
Lens cover closed
Parts of the Camera
Camera Body
156
Parts of the Camera
Under the connector cover
USB/audio/video output connector
Tripod socket
CPlayback Button
AShooting Mode Button
Basic Operations
BeMovie-record Button
Basic Operations
Shutter-release Button
Attaching the Camera Strap
Dragging
Operating the Touch Panel
Tapping
Dragging and Dropping
Operating the Touch Panel
Using the Stylus
Attaching the Stylus
Attach the stylus to the strap as shown
Shooting Information Display
Shooting Operation Controls
Main Display of the Monitor/Touch Panel and Basic Operations
174
Playback mode
Playback Information Display
Album icon
Playback Operation Controls
Return to the previous screen
Tap z to display the setup menu
Operating the Tabs
Touch shooting
Shooting
Playback
Insert the battery
Inserting the Battery
Open the battery-chamber/memory card slot cover
Close the battery-chamber/memory card slot cover
Removing the Battery
Inserting the Battery
Prepare the Charging AC Adapter EH-69P
Charging the Battery
Insert the battery A16
Do not turn the camera on
Charging the Battery
Plug the Charging AC Adapter into an electrical outlet
AC Power Source
Charging Using Computer or Battery Charger
Power Saving Function Auto Off
Turning On and Off the Camera
Tap the desired language
Setting Display Language, Date and Time
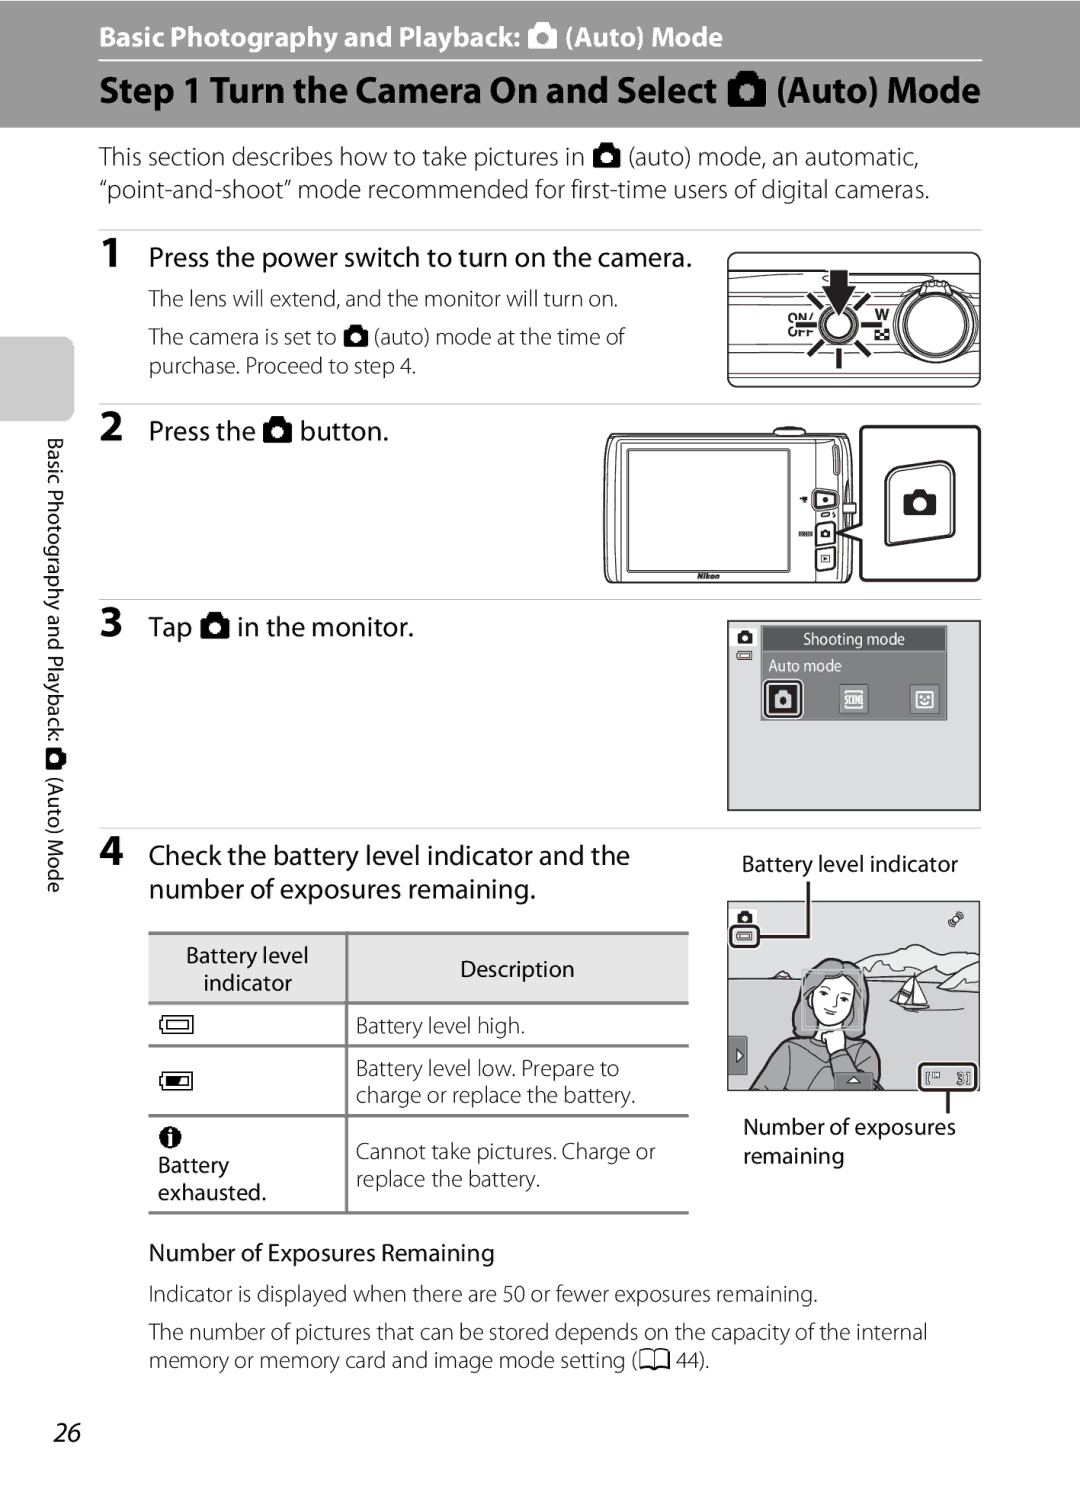
Press the power switch to turn on the camera
Tap Yes
Tap
Setting Display Language, Date and Time
Edit the date and time
Imprinting and Changing the Date and Time
Insert the memory card
Inserting Memory Cards
Removing Memory Cards
Inserting Memory Cards
Memory Cards
Write Protect Switch
Formatting Memory Cards
Number of Exposures Remaining
Turn the Camera On and Select AAuto Mode
Press the a button
Functions Available in AAuto Mode
Indicators Displayed in a Auto Mode
Turn the Camera On and Select a Auto Mode
Motion Detection
Ready the camera
When taking pictures of subjects other than people, or
Frame a Picture
Frame the picture
Frame a Picture
Using the Zoom
Digital Zoom
Digital Zoom and Interpolation
Press the shutter-release button the rest of the way down
Focus and Shoot
Press the shutter-release button halfway
Autofocus
When the Subject Is Close to the Camera
During Recording
Touch Shutter
Press the cplayback button
Playing Back Pictures Playback Mode
Playing Back and Deleting Pictures
Operating the Erase Selected Images Screen
Deleting Unwanted Pictures
Tap Yes on the delete confirmation dialog
Tap a picture to display y
Setting the Flash Mode
Using the Basic Shooting Functions
MFlash Mode
Auto Flash fires automatically when lighting is poor
Flash Mode Setting
Using the Basic Shooting Functions
Shooting When the Flash is Disabled c or Lighting is Dim
Flash Lamp
10s ten seconds Use on important occasions, such as
Taking Pictures with the Self-timer
Frame the picture and press Shutter-release button halfway
Weddings
Applied Simultaneously A78 for more information
Tap o
PMacro Mode
Macro Mode Setting
Rotate the zoom control to frame the picture
OChanging the Brightness Using Exposure Compensation
Exposure Compensation Value
Tap the desired shooting mode icon
Selecting a Shooting Mode
Press the a button in shooting mode
Following shooting modes can be selected
Scene auto selector, Portrait
Selecting a Shooting Mode
Face Detection
Flash mode1
Adjusting the AAuto Mode setting
Camera Settings that Cannot Be Applied Simultaneously
Image Mode
AImage Mode Changing Image Quality/Image Size
Adjusting the a Auto Mode setting
Number of Exposures Remaining
4224×2376 1210
Auto M Tap the bottom tab M q/s/rTouch shooting
QTouch Shutter Tapping the Monitor to Release the Shutter
Tap the desired subject to take a picture
Adjusting the a Auto Mode setting
Adjusting the AAuto Mode setting
Shooting Modes That Support Touch Shutter
SSubject Tracking Focusing on a Moving Subject
Register a subject
Touch Shooting Setting
Press the shutter-release button to take a picture
RTouch AF/AE Tapping the Monitor to Focus
Tap the subject at which the camera focuses
Shooting Modes That Enable Touch AF/AE Function
Adjusting the a Auto Mode setting
Auto M Tap the bottom tab M Eiso sensitivity
Auto default setting
Eiso Sensitivity
Fixed range auto
Auto M Tap the bottom tab M CContinuous
Enable continuous shooting or BSS best shot selector
Continuous
White Balance Adjusting Hue
Auto M Tap the bottom tab M w White balance
Tap b
Preset Manual
Tap Measure to measure a value for preset manual
Frame the reference object in the measuring window
Adjusting the a Auto Mode setting
Shooting Suited to Scenes Scene Mode
Selecting a Scene Mode
Image Mode Image Quality/Image Size Setting
Shooting Suited to Scenes Scene Mode
Shooting Settings in Scene Mode
Adjusting Scene Effect
Press the Abutton in shooting
Scene mode selection screen is Displayed
Camera enters scene auto selector scene mode
Tap xScene auto selector
Focusing in Scene Auto Selector Scene Mode
Functions Available in Scene Auto Selector Scene Mode
Selecting a Scene Mode to Take Pictures Features
Camera focuses on the subject at the center
Night portrait
Shooting Suited to Scenes Scene Mode
Night landscape
Sunset
Dusk/dawn
Flash is disabled
Fireworks show
Shooting Suited to Scenes Scene Mode
Pet portrait
Tap ADraw
Using the Draw Option
Memo is saved To cancel saving the memo, tap No
Tap p Panorama assist
Press the a button in shooting mode and tap C
Shooting for a Panorama
Tap a direction icon
Take the next picture
Tap Hwhen shooting is complete
RIndicator
Panorama Maker
Frame a picture
Shooting Smiling Faces Smart Portrait Mode
Press the a button in shooting mode and tap F
Shutter is automatically released
Auto Off in Smile Timer Mode
Shooting Smiling Faces Smart Portrait Mode
Self-timer Lamp
Releasing the Shutter Manually
Changing the Smart Portrait Mode Settings
YBlink proof
Settings in Smart Portrait Mode
Before saving the picture
Saved If the camera saved a picture in which the subject’s
Some shooting settings cannot be used with other functions
When Multi-shot 16 is selected, Motion
Restricted Setting Description
Camera Settings that Cannot Be Applied Simultaneously
Restricted Functions in Shooting Mode
Changing the Orientation Vertical/Horizontal of Pictures
Press the cplayback button to enter playback mode
Display pictures that have been taken a
Viewing Multiple Pictures Thumbnail Playback
Viewing Multiple Pictures Thumbnail Playback
Thumbnail Playback Mode Display
Thumbnail Display in Favorite Pictures and Auto Sort Mode
Protect icon
Taking a Closer Look Playback Zoom
Zoom out Rotated to f h. When the magnification
Playback mode Change
Use Description Zoom
Pictures Taken with Face Detection or Pet Detection
Taking a Closer Look Playback Zoom
Tap the desired playback mode icon
Selecting Playback Mode
Press the c button in playback mode
Playback mode selection menu is displayed
Tap h
Sorting Favorite Pictures Favorite Pictures Mode
Adding Pictures to Albums
Tap the desired album
Sorting Favorite Pictures Favorite Pictures Mode
List of albums is displayed
Press the c button in playback mode and tap h
Viewing Pictures in an Album
Repeat steps 1 and 2 to select a different album
Removing Pictures from Albums
Icon Controls, and tap K
Operations in Favorite Pictures Mode
Use Description Change the album
Selected album
Album icon and icon color selection screen is displayed
Changing Icons Assigned to Albums
Tap the desired folder
Adding/Viewing Favorite Pictures
Adding Pictures to Albums
Favorites Picture Playback
Press the c button in playback mode and tap F
Image Searching in Auto Sort Mode
Viewing Pictures in Auto Sort Mode
Tap the desired category
Auto Sort Mode Categories
Image Searching in Auto Sort Mode
Category and tap
Operations in Auto Sort Mode
Selected Category
Tap the desired date
Selecting a Date in List by Date Mode
Press the c button in playback mode and tap C
Dates for which pictures exist are listed
Use Description Change Cor D Tap Cor D Month
Operations in List by Date Mode
Setting controls, and cis tapped, the date Selected Date
Date and tap
Playback Options
Tap the right tab in full-frame playback a
Setting the Picture Rating
Or thumbnail playback A81 mode
See Operating the Tabs a 14 for more information
Slide show begins
BEnjoying Slide Show
Tap Start
101
DProtecting Important Pictures Protect
Protecting One Picture
Tap the desired pictures to be protected
Protecting Multiple Pictures
Removing Protection from Pictures
102
103
ACreating a Dpof Print Order
Creating a Print Order for One Picture
104
ACreating a Dpof Print Order
105
Monitor display switches to the print order setting screen
Creating a Print Order for Multiple Pictures
Canceling Print Order
Print Date
Tap Jor
FRotate Image
Tap f
107
Tap E
EVoice Memo Recording and Playback
Recording Voice Memos
Tap Wto record a voice memo
Tap Rto play the voice memo
Playing Voice Memos
Deleting Voice Memos
109
Fisheye, and Miniature effect
Editing Functions
Are Color options, Soft, Selective color, Cross screen
Restrictions on Picture Editing
111
Editing Functions
Original and Edited Pictures
Pictures
Picture Editing
Paint
112
Picture Editing
Using the Paint Tools
113
Write and Draw on Pictures
Decoration type
Add Decorations
Add a Frame
Decoration size
115
KQuick Retouch Enhancing Contrast and Saturation
Tap k
Choose the degree of enhancement performed and tap
ID-Lighting Enhancing Brightness and Contrast
Tap P
Bottom of the screen to adjust stretch effect
PStretch Stretching Pictures
Tap qor r, or tap or drag the slider at
Tap yor z, or tap or drag the slider at
OPerspective Control Adjusting a Sense of Perspective
Bottom of the screen to adjust perspective Control Tap
119
IFilter Effects Digital Filter
Tap Cor Dto select the type of the effects
New copies are stored as separate files
Tap Yes in the confirmation dialog
Preview the result of the effects
JGlamour Retouch
Tap eskin softening or kboth
121
Tap Yes
Tap the desired small copy size control
GSmall Picture Making Smaller Pictures
Tap g
123
124
OCrop Creating a Cropped Copy
Refine copy composition
125
Image Size
Recording Movies
Turn on the camera and be sure that it is in shooting mode
When the Shooting option in Monitor settings
Press the bemovie-record button again to end recording
Recording Movies
127
Recording Movies
Functions Available with Movie Recording
128
Changing the Movie Recording Settings
DMovie Options
Select the desired movie option to record
Movie Options and Maximum Movie Length
NMovie AF Mode
129
Choose how the camera focuses with recording movies
OOn
YWind Noise Reduction
130
POff
Movie Playback
Movie Playback
131
Deleting Movie
Hold down the c button to turn on the camera
Connecting to a TV
Tune the television to the video channel
132
Operations with TV Connection
Connecting to a TV
Video Mode
133
Install the Software
Connecting to a Computer
Before Connecting the Camera
Compatible Operating Systems
Transferring Images from a Camera to a Computer
Connecting to a Computer
Connecting the USB Cable
135
Source device Start Transfer
136
Windows
Button
Disconnecting the Camera
Charging the Battery
138
139
Charging While Connecting to a Computer
Charge Lamp
Connecting to a Printer
Printing Pictures
Camera is automatically turned on
Connecting the Camera to a Printer
Turn off the camera Turn on the printer
141
Tap Paper size
Printing Pictures One at a Time
Tap Copies
142
Tap the desired paper size
When the Print selection screen is displayed, tap F
Printing Multiple Pictures
Tap Start print
Print selection
Tap Print selection, Print all images, or Dpof printing
144
Paper Size
Cancel
145
Print all images
146
Setup Menu
Setup menu contains the following options
Setup Menu
Operating the Setup Menu
Tap the bottom tab in shooting or playback mode
Tap the desired option
148
Tap the bottom tab a 147 MTap z Setup menu McWelcome screen
CWelcome Screen
Picture and tap
Tap Time zone
DTime Zone and Date
Selecting Travel Destination Time Zone
Tap xTravel destination
Imprinting Date on Pictures
Tap Eor Fto choose the travel destination time zone and tap
WHome Time Zone
Time zone selection screen is displayed
151
Time Zones
Set the options below
EMonitor Settings
152
View/hide movie frame
153
Tap the bottom tab a 147 MTap z Setup menu MfPrint date
FPrint Date Imprinting Date and Time
Print Date and Print Order
154
Tap the bottom tab a 147 MTap z Setup menu Mw Electronic VR
WElectronic VR
Continuous is set to Single
UMotion Detection
When Multi-shot 16 a 54 is selected
Off Motion detection is not enabled
155
UDigital Zoom
Enable or disable digital zoom
HAF Assist
156
Tap the bottom tab A147 MTap z Setup menu MiSound settings
ISound Settings
Adjust the following sound settings
157
Tap the bottom tab a 147 MTap z Setup menu MkAuto off
When the Monitor Turns off for the Power Saving Function
Auto Off Settings
KAuto Off
MFormatting a Memory Card
MFormat Memory/Format Card
LFormatting the Internal Memory
159
Tap the bottom tab a 147 MTap z Setup menu MoVideo mode
OVideo Mode
Tap the bottom tab a 147 MTap z Setup menu MnLanguage
Language
VCharge by Computer
Tap the bottom tab a 147 MTap z Setup menu MdBlink warning
DBlink Warning
Use Description Rotate the zoom control to g
Operating the Blink Warning Screen
163
Face that blinked
PReset All
164
Movie
Setup Menu
165
Print date a Off
166
Others
Tap the desired copy option
HCopy Copy Between Internal Memory and Memory Card
Tap the desired option from the copy screen
Tap the pictures to be copied
Memory contains no images. Message
RFirmware Version
168
View the current camera firmware version
Maximizing Camera Life and Performance
169
Maximizing Camera Life and Performance
Battery
170
171
Cleaning
Storage
Do not use alcohol, thinner, or other volatile chemicals
AC adapter
Optional Accessories
172
Audio/video cable Audio Video Cable EG-CP14
173
Optional Accessories
Approved Memory Cards
Image/Sound File and Folder Names
174
Error Messages
175
P4224×2376
Error Messages
176
177
178
Resume to resume
179
Resume printing
Cartridge is empty
180
Troubleshooting
Display, Settings and Power Supply
Playback is set to Auto info for Monitor
Troubleshooting
181
182
Selector or Close-up scene mode
Electronically Controlled Cameras
183
184
185
4224×2376
186
Nikon Coolpix S4100 Digital Camera
Specifications
187
Specifications
188
Charging AC Adapter EH-69P
Rechargeable Li-ion Battery EN-EL19
Specifications
189
Supported Standards
190
191
Symbols
Index
192
193
194
Index White balance Wind noise reduction Zoom Zoom control 4
Page
YP1A0211