ED200-400mm f/4 if
安全上のご注意
熱くなる、煙が出る、こげ臭いなどの異常時は、速やかにカメラ の電池を取り出すこと
Page
Full On OFF
Jp 1 フード
はじめに
ピント合わせの方法
AF作動機能の使い方(カメラによって対応が異なります。P.6参照)
手ブレ補正機能(対応カメラはP.6参照) 手ブレ補正機能の概念図
絞り値の設定
10. 組み込み式フィルターホルダー(図A、B)
12. ファインダースクリーンとの組み合わせ
14. 付属アクセサリー
Page
Nomenclature
Lens hood Slip-in filter holder Lens hood screw
Focus operation button CPU contacts
$ Slip-in filter holder knob Memory Set button
Major features
Introduction
To limit the range of autofocus
Focusing
Autofocus with manual override M/A mode
Using the Focus lock button
Using Focus preset Figs. H, I, J
Set the Focus operation selection switch to Memory Recall
Memory set
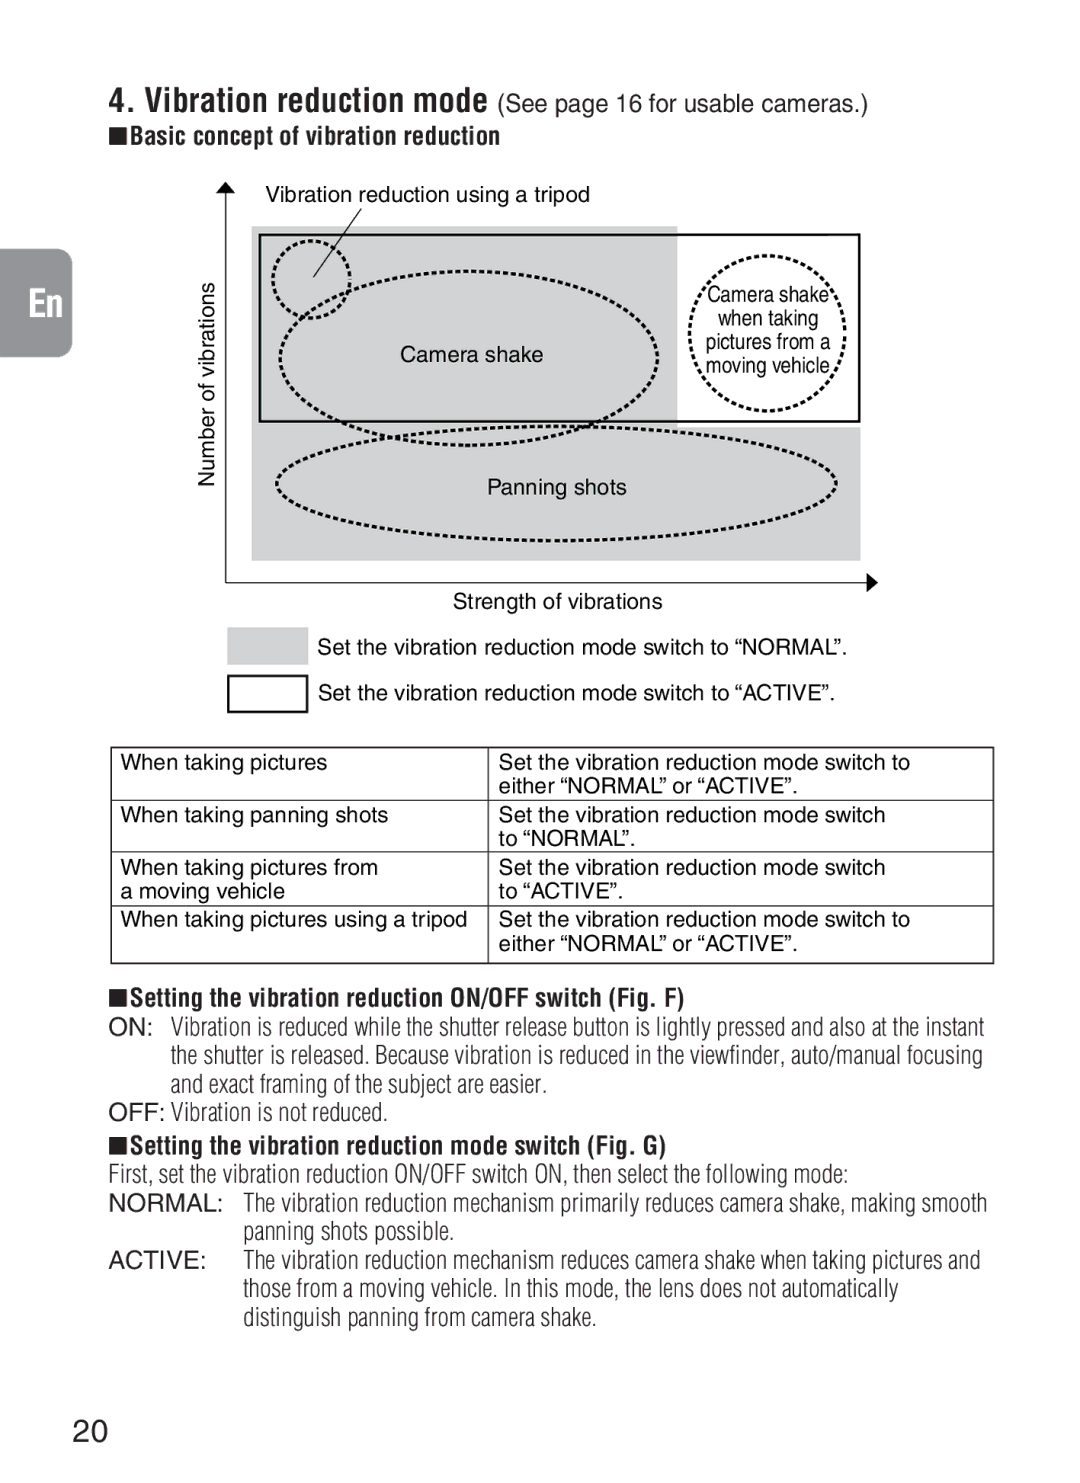
Vibration reduction mode See page 16 for usable cameras
Setting the vibration reduction ON/OFF switch Fig. F
Setting the vibration reduction mode switch Fig. G
Basic concept of vibration reduction
Focusing, zooming, and depth of field
Setting the aperture
Built-in rotating tripod collar
Lens hood HK-30
Slip-in filter holder Fig. A, B
Recommended focusing screens
Lens care
Specifications
Supplied accessories
Optional accessories
Page
Nomenklatur
Verwendbare Kameras und verfügbare Funktionen
Einführung
Die wichtigsten Merkmale
Aufnahmen aus einem bewegten Fahrzeug
Mindesteinstellabstand von 2,0 m bei AF und 1,95 m bei MF
Fokussieren
Autofokus-Modus mit manueller Einstellmöglichkeit M/A-Modus
Stellen Sie den Fokussierschalter Abb. D auf M/A
Begrenzung des Autofokusbereichs
Fokusverriegelung
Nutzung der Fokus-Voreinstellung Abb. H, I und J
Speichereinstellung
Speicheraufruf
Vibrationsreduktions-Funktion
Verwendbare Kameras siehe auf Seite
Grundlagen der Vibrationsreduktion
OFF Keine reduzierte Vibration
Scharfeinstellung, Zoomen und Tiefenschärfe
Blendeneinstellung
Eingebauter Stativanschluß
Gegenlichtblende HK-30
Blitzaufnahmen mit Kameras mit eingebautem Blitz
Schutzscheibe für Objektiv
Einsetzbarer Filterhalter Abb. a und B
Empfohlene Einstellscheiben
Pflege des Objektivs
Technische Daten
Zubehör
Sonderzubehör
Page
Bouton mémoire
Appareils utilisables et fonctions disponibles
Interrupteur de contrôle sonore
Principales caractéristiques
Autofocus avec priorité manuelle Mode M/A
Réglez le commutateur de mode de mise au point Fig. D à M/A
Mise au point
Fr bouton de mise au point sur lobjectif
Réglage mémoire
Sauvegardée
Rappel mémoire
Prendre une photo
Mode réduction de la vibration
Voir page 36 pour les appareils photo utilisables
Concept de base du système de réduction de la vibration
OFF La vibration n’est pas réduite
Réglage de l’ouverture
Collier de trépied rotatif intégré
Pare-soleil HK-30
Remarques concernant la réduction de la vibration
Verre de protection d’objectif
Support de filtre à insérer Fig. A, B
Prise de vues avec un appareil à flash intégré
Pas de 52mm
Ecrans de mise au point recommandés
Soin de l’objectif
Caractéristiques
Accessoires fournis
Accessoires en option
Page
Junta de goma de montaje del objetivo Contactos CPU
Nomenclatura
Cámaras que puede utilizar y funciones disponibles
Introducción
Principales funciones
Enfoque
Importante
Enfoque automático con prioridad manual Modo M/A
Para limitar el rango del enfoque automático
Recuperación de memoria
Ajuste de la memoria
Ajústelo a
Concepto básico de la reducción de vibración
Modo de reducción de vibración
Consulte la página 46 para ver las cámaras utilizables
Enfoque, zoom y profundidad de campo
Ajuste de abertura
OFF No se reduce la vibración
Notas sobre el uso de la reducción de la vibración
Collar del trípode rotatorio integrado
Visera del objetivo HK-30
Cristal protector del objetivo
Soporte del filtro deslizable Fig. A, B
Pantallas de enfoque recomendadas
Forma de cuidar el objetivo
Accesorios suministrados
Accesorios opcionales
Especificaciones
Collar del trípode únicamente desmontable Dimensiones
Interno manual por anillo de enfoque independiente
De voz VCM
Calibrado en metros y pies desde 2 m 7 pie a infinito ∞
Fotocamere utilizzabili e funzioni disponibili
Tasto della memoria
Introduzione
Caratteristiche principali
Messa a fuoco
401x, F-401s, F-401
Blocco della messa a fuoco
Uso della preimpostazione della messa a fuoco Fig, H, I, J
Impostazione della memoria
Fuoco è stata salvata in memoria
Concetto di base della riduzione delle vibrazioni
Modalità di riduzione delle vibrazioni
Per le fotocamere utilizzabili, vedere a pagina
Vibrazioni su Normal o su Active
Messa a fuoco, zoom e profondità di campo
Impostazione dell’apertura
Collare girevole incorporato per il cavalletto
Paraluce HK-30
Schermi di messa a fuoco consigliati
Accessori in dotazione
Accessori opzionali
Cura e manutenzione dell’obiettivo
Portafiltro a inserimento Filtro NC avvitabile da 52 mm
Caratteristiche tecniche
適用的相機及可用的功能
主要特色
對焦操作選擇開關(AF-L/記憶回複/AF-ON)和對焦操作按鈕
可由相機或鏡頭啟動AF-鎖功能-按下任一按鈕都可鎖定焦距
ON: 輕按快門鈕時及快門被起動的瞬間﹐振動被減弱-由於觀景窗中的
聚焦﹑變焦與景深
10. 插入式濾光鏡架(圖A, B)
12. 請使用聚焦屏
14. 所提供的配件
Page
Ch *4
備有2.0米(AF)及1.95米(MF)的最短對焦距離。
根據對焦操作選擇開關的位置不同,對焦操作按鈕的功能也有所不同﹕
可由相機或鏡頭啟動AF。鎖功能。按下任一按鈕都可鎖定焦距。
減振模式(適用相機見 76頁 。)
本鏡頭不帶光圈環,因此,請在機身上設定光圈。
可用于 300mm或更遠的焦距設置
各種聚焦屏可通用於尼康SLR相機的任何相應的攝影場景。 下面所列可用於本鏡頭:
半軟盒 CL-L2(內有防震軟墊) 專用插入式濾光鏡架 52mm旋入式NC濾鏡 專用鏡頭保護鏡 專用鏡頭保護鏡片盒
Page

![]()
![]() Set the vibration reduction mode switch to “NORMAL”.
Set the vibration reduction mode switch to “NORMAL”.