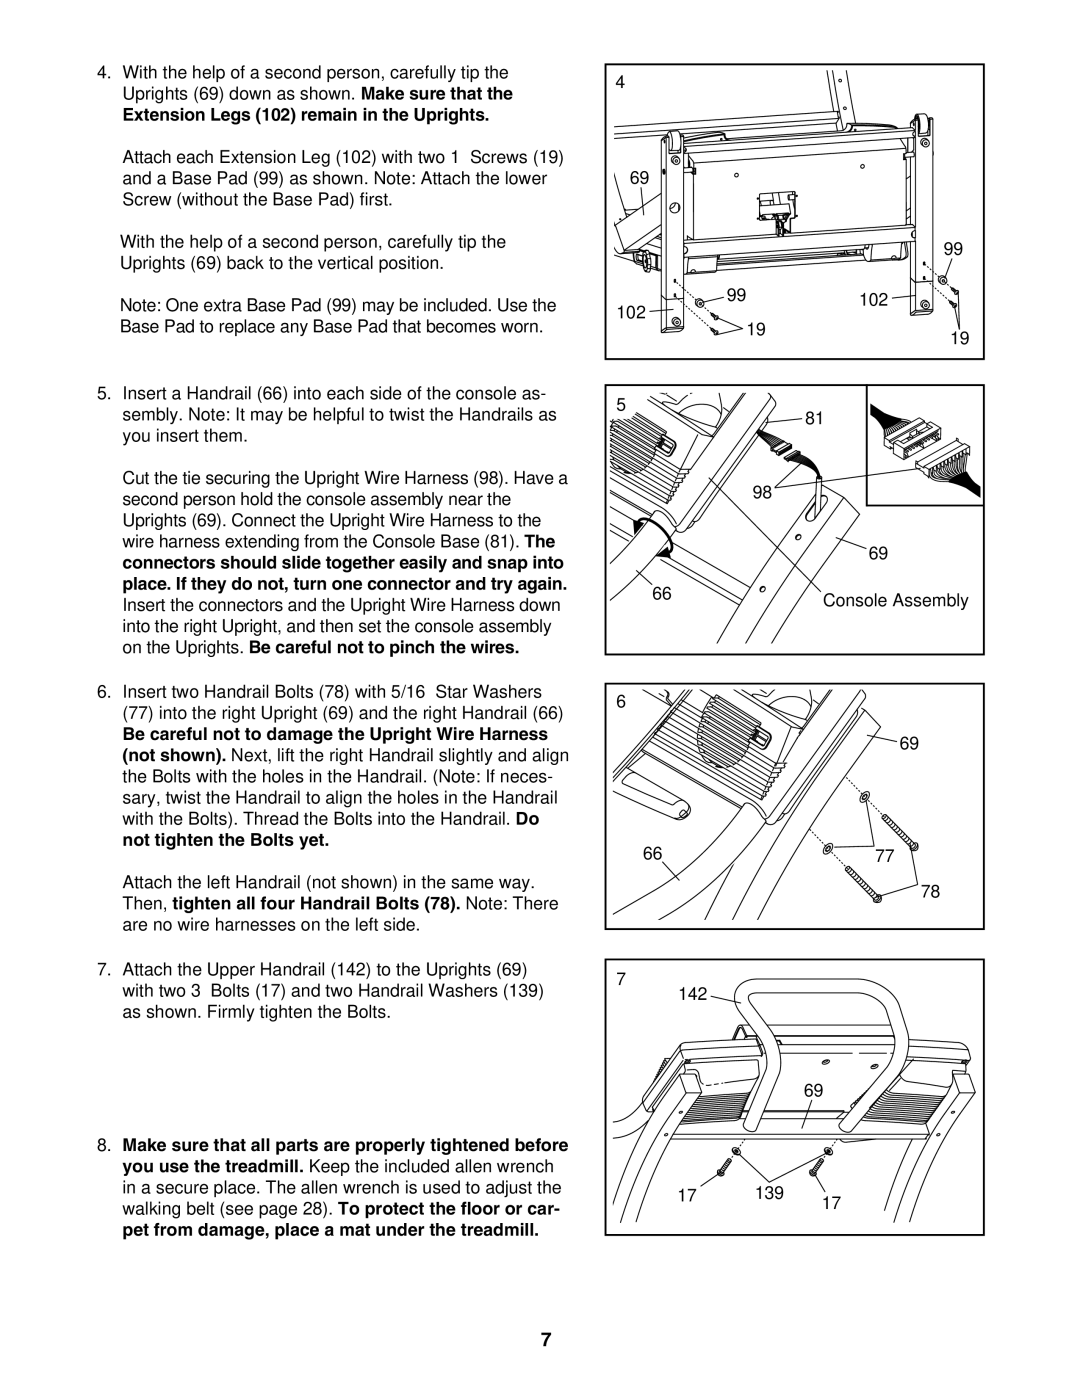
4. With the help of a second person, carefully tip the | 4 |
|
|
Uprights (69) down as shown. Make sure that the |
|
| |
|
|
| |
Extension Legs (102) remain in the Uprights. |
|
|
|
Attach each Extension Leg (102) with two 1” Screws (19) |
|
|
|
and a Base Pad (99) as shown. Note: Attach the lower | 69 |
|
|
Screw (without the Base Pad) first. |
|
|
|
With the help of a second person, carefully tip the |
|
| 99 |
Uprights (69) back to the vertical position. |
|
| |
|
|
| |
Note: One extra Base Pad (99) may be included. Use the | 99 |
| 102 |
102 |
|
| |
Base Pad to replace any Base Pad that becomes worn. | 19 |
| |
| 19 | ||
|
|
| |
5. Insert a Handrail (66) into each side of the console as- | 5 |
|
|
sembly. Note: It may be helpful to twist the Handrails as |
| 81 | |
|
| ||
you insert them. |
|
|
|
Cut the tie securing the Upright Wire Harness (98). Have a |
| 98 |
|
second person hold the console assembly near the |
|
| |
|
|
| |
Uprights (69). Connect the Upright Wire Harness to the |
|
|
|
wire harness extending from the Console Base (81). The |
|
| 69 |
connectors should slide together easily and snap into |
|
| |
|
|
| |
place. If they do not, turn one connector and try again. | 66 |
| Console Assembly |
Insert the connectors and the Upright Wire Harness down |
| ||
|
| ||
into the right Upright, and then set the console assembly |
|
|
|
on the Uprights. Be careful not to pinch the wires. |
|
|
|
6. Insert two Handrail Bolts (78) with 5/16” Star Washers | 6 |
|
|
(77) into the right Upright (69) and the right Handrail (66) |
|
| |
|
|
| |
Be careful not to damage the Upright Wire Harness |
|
| 69 |
(not shown). Next, lift the right Handrail slightly and align |
|
| |
|
|
| |
the Bolts with the holes in the Handrail. (Note: If neces- |
|
|
|
sary, twist the Handrail to align the holes in the Handrail |
|
|
|
with the Bolts). Thread the Bolts into the Handrail. Do |
|
|
|
not tighten the Bolts yet. | 66 |
| 77 |
|
| ||
Attach the left Handrail (not shown) in the same way. |
|
| 78 |
Then, tighten all four Handrail Bolts (78). Note: There |
|
| |
|
|
| |
are no wire harnesses on the left side. |
|
|
|
7. Attach the Upper Handrail (142) to the Uprights (69) | 7 |
|
|
with two 3” Bolts (17) and two Handrail Washers (139) |
|
| |
142 |
|
| |
as shown. Firmly tighten the Bolts. |
|
|
|
|
|
| 69 |
8. Make sure that all parts are properly tightened before |
|
|
| |
you use the treadmill. Keep the included allen wrench |
|
|
| |
in a secure place. The allen wrench is used to adjust the | 17 | 139 | 17 | |
walking belt (see page 28). To protect the floor or car- | ||||
|
| |||
pet from damage, place a mat under the treadmill. |
|
|
|
7