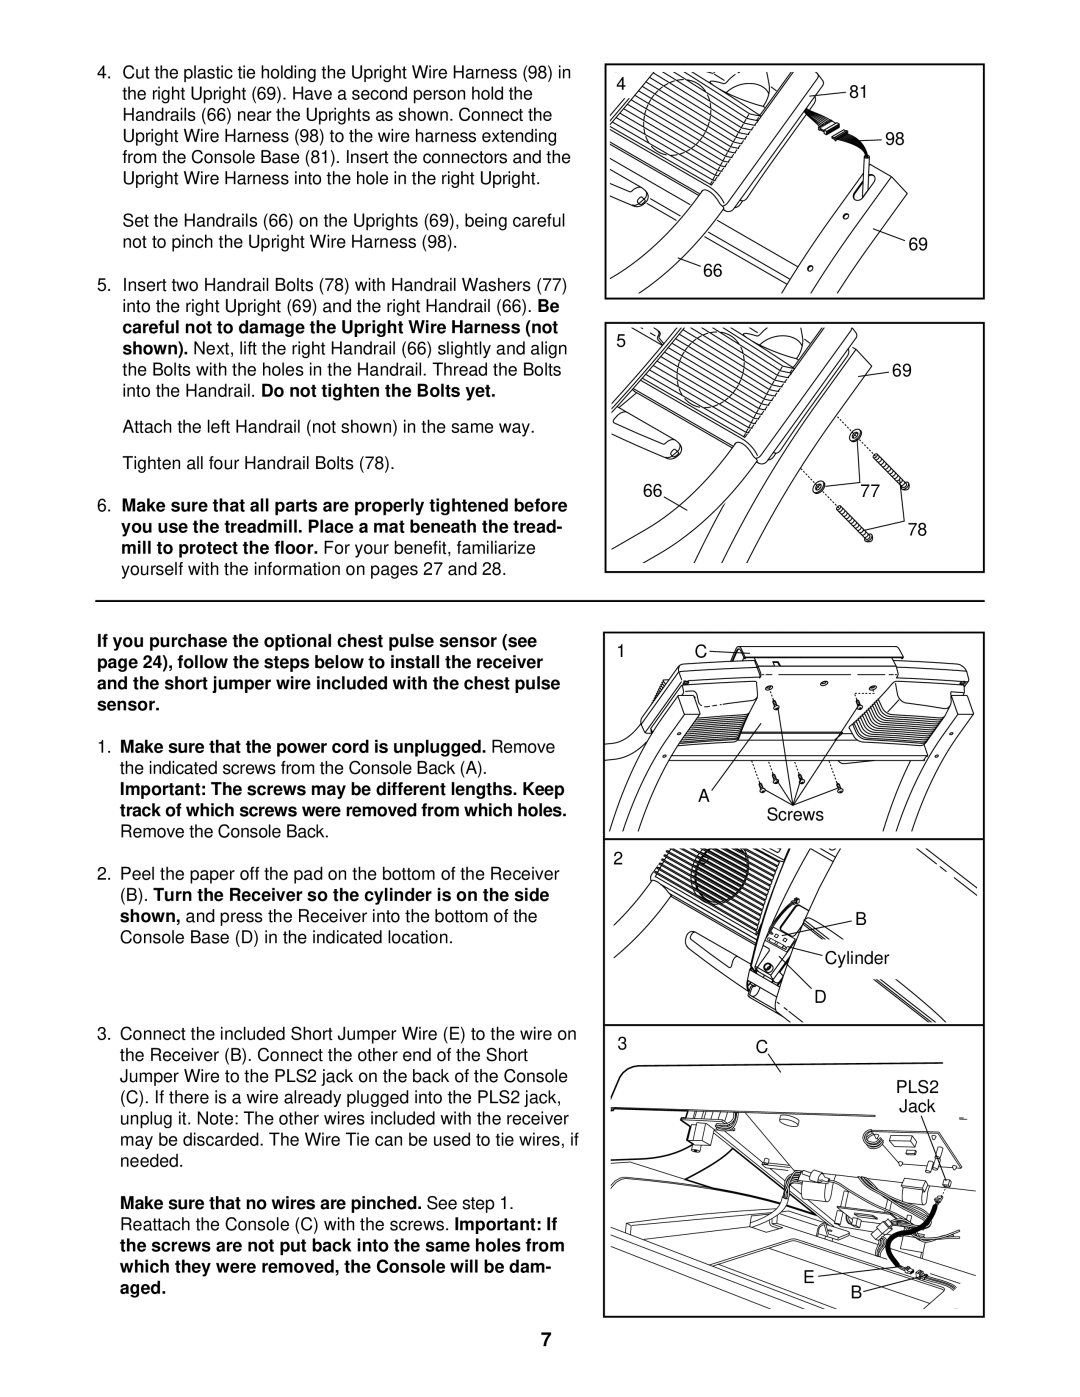
4. Cut the plastic tie holding the Upright Wire Harness (98) in | 4 | 81 | |
the right Upright (69). Have a second person hold the | |||
| |||
Handrails (66) near the Uprights as shown. Connect the |
|
| |
Upright Wire Harness (98) to the wire harness extending |
| 98 | |
from the Console Base (81). Insert the connectors and the |
|
| |
Upright Wire Harness into the hole in the right Upright. |
|
| |
Set the Handrails (66) on the Uprights (69), being careful |
|
| |
not to pinch the Upright Wire Harness (98). |
| 69 | |
5. Insert two Handrail Bolts (78) with Handrail Washers (77) |
| 66 | |
|
| ||
into the right Upright (69) and the right Handrail (66). Be |
|
| |
careful not to damage the Upright Wire Harness (not | 5 |
| |
shown). Next, lift the right Handrail (66) slightly and align |
| ||
|
| ||
the Bolts with the holes in the Handrail. Thread the Bolts |
| 69 | |
into the Handrail. Do not tighten the Bolts yet. |
|
| |
Attach the left Handrail (not shown) in the same way. |
|
| |
Tighten all four Handrail Bolts (78). |
|
| |
6. Make sure that all parts are properly tightened before | 66 | 77 | |
|
| ||
you use the treadmill. Place a mat beneath the tread- |
| 78 | |
mill to protect the floor. For your benefit, familiarize |
|
| |
yourself with the information on pages 27 and 28. |
|
| |
If you purchase the optional chest pulse sensor (see | 1 | C | |
page 24), follow the steps below to install the receiver | |||
|
| ||
and the short jumper wire included with the chest pulse |
|
| |
sensor. |
|
| |
1. Make sure that the power cord is unplugged. Remove |
|
| |
the indicated screws from the Console Back (A). |
|
| |
Important: The screws may be different lengths. Keep |
| A | |
track of which screws were removed from which holes. |
| ||
| Screws | ||
Remove the Console Back. |
|
| |
2. Peel the paper off the pad on the bottom of the Receiver | 2 |
| |
|
| ||
(B). Turn the Receiver so the cylinder is on the side |
|
| |
shown, and press the Receiver into the bottom of the |
| B | |
Console Base (D) in the indicated location. |
|
| |
|
| Cylinder | |
|
| D | |
3. Connect the included Short Jumper Wire (E) to the wire on | 3 | C | |
the Receiver (B). Connect the other end of the Short | |||
|
| ||
Jumper Wire to the PLS2 jack on the back of the Console |
| PLS2 | |
(C). If there is a wire already plugged into the PLS2 jack, |
| ||
| Jack | ||
unplug it. Note: The other wires included with the receiver |
| ||
|
| ||
may be discarded. The Wire Tie can be used to tie wires, if |
|
| |
needed. |
|
| |
Make sure that no wires are pinched. See step 1. |
|
| |
Reattach the Console (C) with the screws. Important: If |
|
| |
the screws are not put back into the same holes from |
|
| |
which they were removed, the Console will be dam- |
| E | |
aged. |
| ||
| B |
7