Explorer 721US / 721EU
Important Safety Information
Contents
Send and Receive DSC Calls
Industry Canada
Features
How to Display and Navigate Menus
General Information
Customize your Northstar VHF Radio
Normal Menu Mode Edit Mode Push Space
How to Enter or Change Alphanumeric Data
LCD Symbols and Meanings
Symbol
How the Microphone and Optional Handset Work Together
Basic Operation and Key Functions
CH2 or CH3 symbol disappears off the LCD
Weather alert mode is on
Menu see and the DSC set up menu see Section
Then push to backup
Power transmission setting is incorrect
Complete listing of channel charts
Matically exits you from menu mode and stops scanning
You must release PTT to receive a signal
Radio Menu Options Menu
Show Weather, SNR or Happy Fish on Handset Info Data
Edit an Entry
Maintain Your Buddy List Buddy List
Add an Entry
Local or Distance Sensitivity LOCAL/DIST
Set Distance Sensitivity
Set Local Sensitivity
Backlighting Backlight and Contrast Contrast
Set the Backlighting Level
Set the Contrast Level
GPS Data and Time GPS/DATA
Manually Enter Position and UTC Time Manual
Time Offset
GPS/DATA Manual Setting
Local Time Time Offset
Select GPS/DATA, then Setting Select LL Display
Time Display Options Time Display
Position Display Options LL display
Course & Speed Display Options COG/SOG
Reset to Factory Defaults Reset
GPS Alert Options Alert
GPS Simulator GPS SIM
Select GPS SIM, then select on or OFF as desired
Select the Channel Bank UIC
Radio Setup Menu Radio Setup
Radio Setup Menu Options Radio Setup
Internal Speaker Connections INT Speaker
Ring and Beep Volume Ring Volume and KEY Beep
Change Channel Names CH Name
Set the Priority Channel Watch Mode
Select Radio SETUP, then WX Alert
Weather Alert WX Alert
Nmea or Navbus protocol COM Port
Select Radio SETUP, then COM Port Select Baro & Temp
Barometric Displays Baro Sensor
Switch the Barometric Display on or OFF Baro Disply
Temperature Display Temperature
Set the Temperature Units Units
Calibrate the Temperature Reading CAL
DSC Setup Menu
DSC Setup Menu Options
Maintain Your Groups Group Setup
Create a Group Group Setup
Edit Group Name or Group Mmsid
Response to Individual Calls Indiv Reply
Enter or Edit Your Atis Mmsid
Enable Atis Functionality Atis Func
Atis Mmsid & Atis Functionality
Select DSC SETUP, then LL Reply
DSC Functionality DSC Func
Response Type to LL Polling Calls LL Reply
Push the rotary knob to confirm
DSC Call Menu Options
What is DSC?
Send and Receive DSC Calls
Distress only when there’s a distress situation
Call an Individual Individual
Retry a Routine Call
Acknowledge an Individual Incoming Call
Call the Most Recent Caller Last Call
Call a Group Group
Call All Ships ALL Ships
This facility is useful and used frequently
Set the channel and continue as explained in Section
Call using the Call Log Call LOG
Call using the Distress Log Dist LOG
Request the LL Position of a Buddy LL Request
Track Your Buddy Track Buddy
DSC Call Call LOG Dist LOG LL Request
SET Buddy BUDDY1 On OFF
Receive an All Ships Call RCV ALL Ship
Receive an Individual Call RCV Indiv
Receive a Polled Position Call Rcvposition
Receive a Group Call RCV Group
Receive a Geographic Call RCV Geograph
Distress Calls
Send a Distress Call
Receive a Distress Acknowledgement Distress ACK
Open the red cover labelled Distress
Relay a Distress Call from the Distress Log Relay
Receive a Distress Call RCV Distress
Receive a Distress Relay RCV Distress Relay
Appendix a Technical Specifications
Northstar Explorer 721US and 721EU
GPS/NMEA input Yes Comm. port Baud NMEA, 38400 baud Navbus
Rotary channel selector Yes
Channel Naming Yes
Transmitter
Appendix B Troubleshooting
Appendix C VHF Marine Channel Charts
International EU-DSC on
Special Notes on International Channel Useage
Page
USA Channel Chart
Send Receive Traffic Type Ship Name TAG
Wx01 RX Only 162.550
Wx02 RX Only 162.400
Wx03 RX Only 162.475
Wx04 RX Only 162.425
Canada Channel Chart
28B RX Only 162.000 Public Correspondence, RX Only
156.025 160.625 Public Correspondence, Duplex Yes
62A 156.125 Canadian Coast Guard Yes
156.225 160.825 Public Correspondence, Duplex Yes
Weather
EU Inland Waterway Channels Country Specific
Digital selective calling for distress
AIS
156.85
162
Page
Appendix D Mmsid and License Information
Install the Explorer
Installation Options
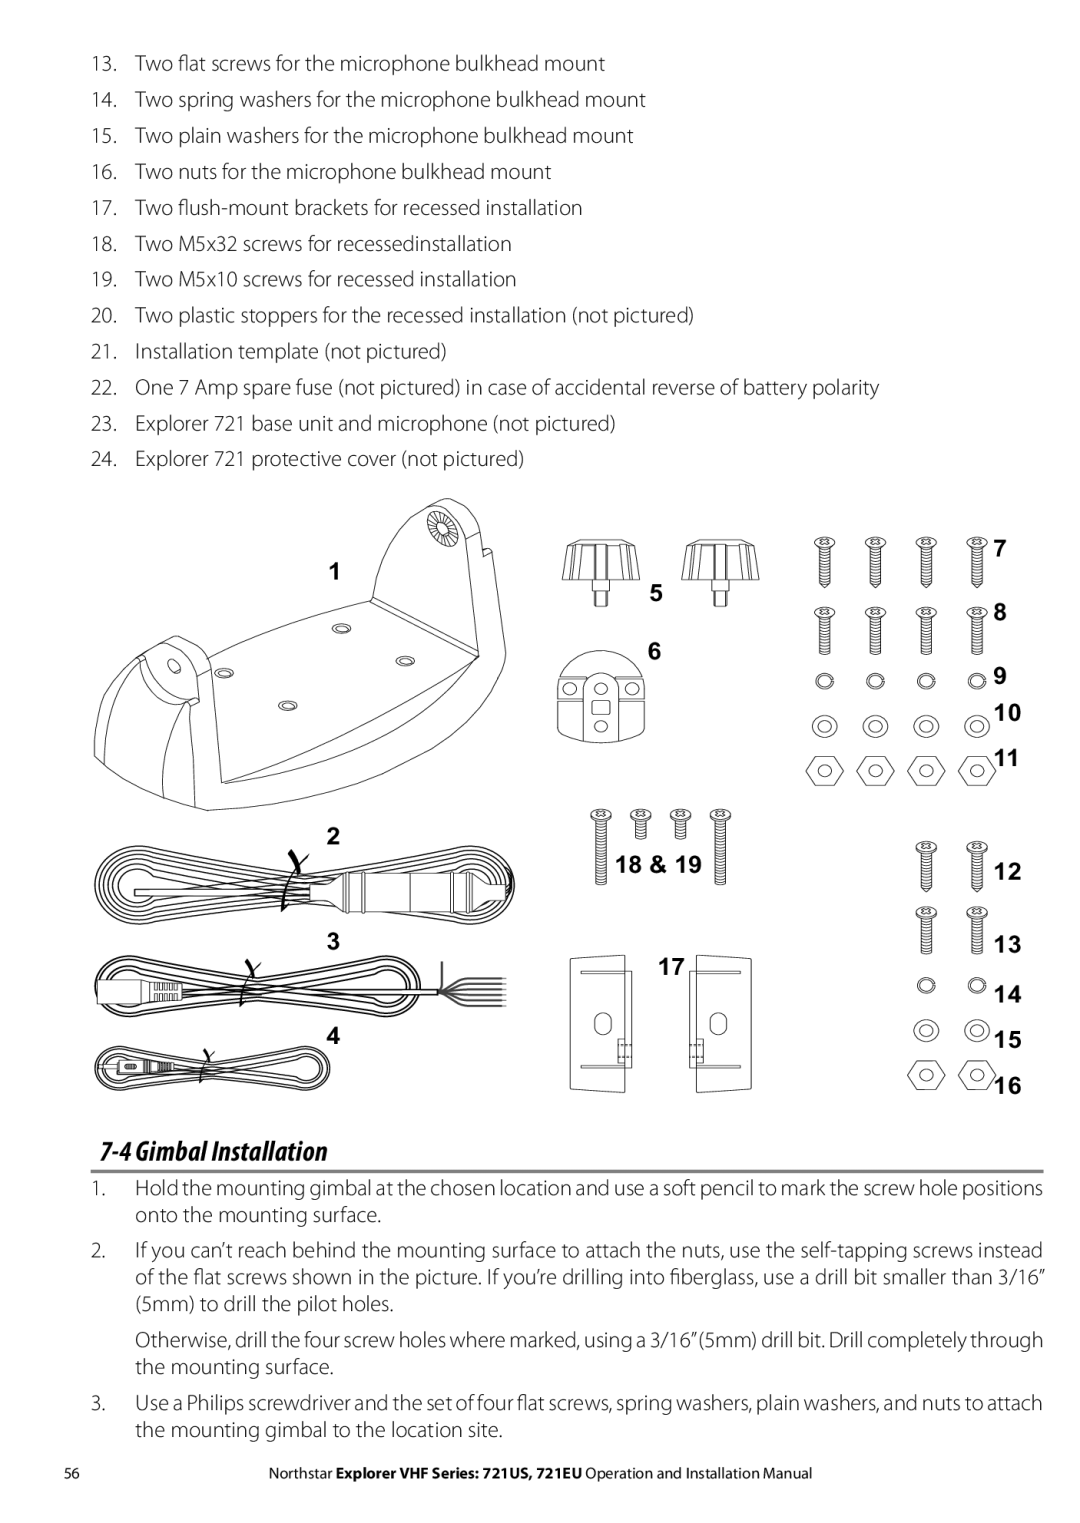
Checklist
There are two ways to install the radio. You can choose
Gimbal Installation
Recessed Installation
Change the Viewing Angle
Install the Microphone Bulkhead Mount
Drill the two pilot screw holes where marked
Connectors are on the rear of the base unit, as follows
Connect the Radio Cables
Set Up the Radio
Mmsid Store Cancel User Mmsid Input Again
Enter Your User Mmsid
GND. a ground connection is not usually required
Completed Installation with Optional Handset
0560