T572InstDS-150-E.Q33J1999/4/260:57PM y [ W 10
BEFORE RECORDING
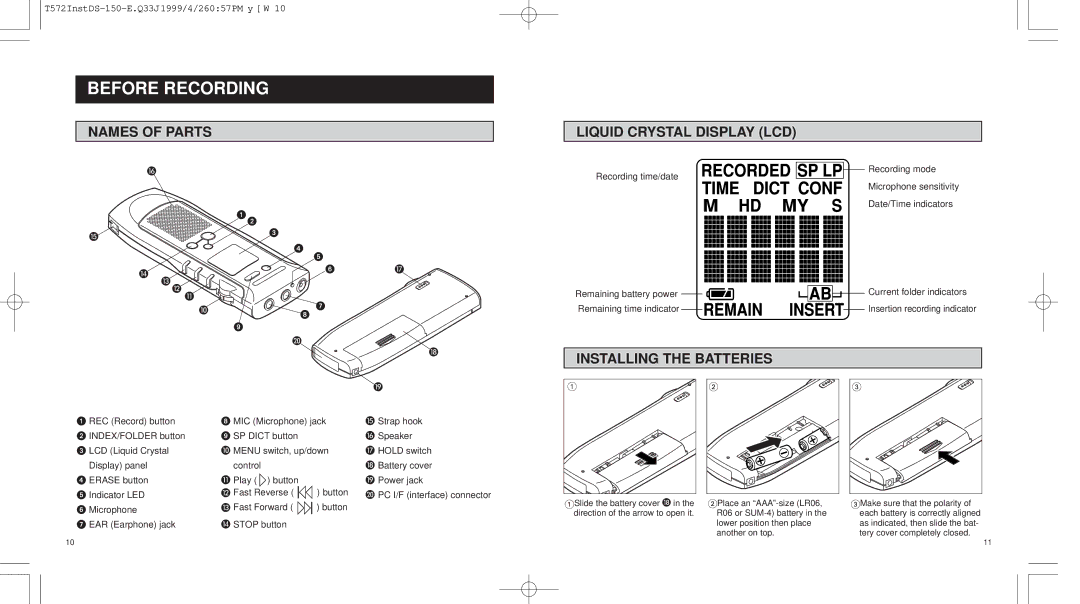
NAMES OF PARTS
P |
|
|
| 12 |
|
O | 3 |
|
|
| |
| 4 |
|
| 5 |
|
N | 6 | Q |
M L |
|
K
J8 7
9
T
R |
LIQUID CRYSTAL DISPLAY (LCD)
Recording mode
Recording time/date
Microphone sensitivity
Date/Time indicators
Remaining battery power |
|
|
|
|
|
|
| Current folder indicators |
|
|
|
|
|
|
| ||
Remaining time indicator |
|
|
|
|
|
|
| Insertion recording indicator |
|
|
|
|
|
|
| ||
|
|
|
|
|
| |||
|
|
|
|
|
|
|
|
|
INSTALLING THE BATTERIES
|
|
|
|
| S |
1 REC (Record) button | 8 MIC (Microphone) jack | O Strap hook | |||
2 INDEX/FOLDER button | 9 SP DICT button |
|
| P Speaker | |
3 LCD (Liquid Crystal | J MENU switch, up/down | Q HOLD switch | |||
Display) panel | control |
|
| R Battery cover | |
4 ERASE button | K Play ( ) button |
|
| S Power jack | |
5 Indicator LED | L Fast Reverse ( |
|
| ) button | T PC I/F (interface) connector |
6 Microphone | M Fast Forward ( |
| ) button |
| |
|
| ||||
7 EAR (Earphone) jack | N STOP button |
|
|
| |
1 |
1Slide the battery cover R in the direction of the arrow to open it.
2 |
2Place an
R06 or
3 |
3Make sure that the polarity of each battery is correctly aligned as indicated, then slide the bat- tery cover completely closed.
10 | 11 |