TG-320
Contents
Using the Direct Buttons
Left Right
Arrow pad
Function menu
To select the shooting mode
Shooting
To select the function menu
Press the mbutton
Setup menu
Menu Index
Menus for Playback, Editing, and Printing Functions
Camera unit
Names of Parts
Attaching the camera strap
10 EN
Monitor
Shooting mode display
12 EN
Playback mode display
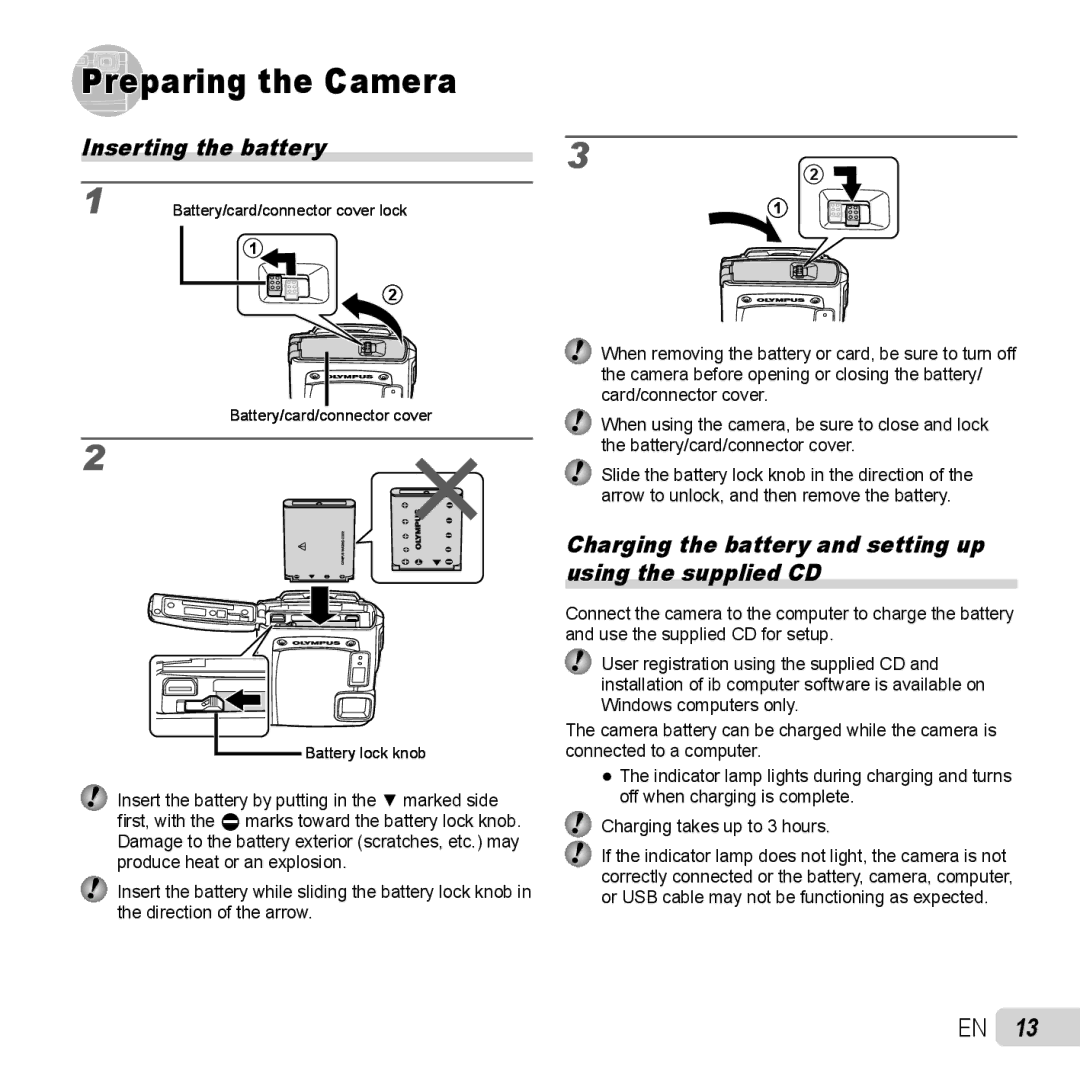
Charging the battery and setting up using the supplied CD
Inserting the battery
Battery/card/connector cover lock
Preparing the Camera
14 EN
Connecting the camera
Windows
Install the camera manual
Install Olympus Viewer 2 and ib computer software
Install Olympus Viewer
Macintosh
Example USB-AC adapter with an AC cable
16 EN
Copy the camera manual
Date, time, time zone, and language
When to charge the batteries
To remove the SD/SDHC/SDXC memory card and Eye-Fi card
18 EN
Use Fghi to select your language and press the a button
Hold the camera and compose the shot
Shooting, Playback, and Erasing
Shooting movies
20 EN
To view images during shooting
Press the movie record button to start recording
Changing the shooting information display
Using the zoom
To take larger images Digital Zoom
On selected for Digital Zoom Image size Zoom bar
Viewing images
22 EN
Reading a histogram
To play back movies
To play sound recordings
Operations during movie playback
Operations while playback is paused
Index view and close-up view
24 EN
Press FG to select Erase, and press Button
Playing back panorama images
Changing the image information display
Using the camera guide
Using the menu guide
26 EN
Playing back W images
Submenu Application
Use Fghi to select the desired item, and press the a button
Shooting with automatic settings Mmode
Using Shooting Modes
Using the best mode for the shooting scene smode
To change the shooting mode
Shooting with special effects Pmode
Set the shooting mode to P
To take underwater photos
To lock the focus distance for underwater shoots AF lock
Shooting mode Option
Creating panoramic images p mode
30 EN
Taking pictures with Manual
Taking pictures with Auto
Set the shooting mode to W
Shooting 3D images W mode
32 EN
Taking pictures with PC
Taking pictures with Auto
34 EN
Using the flash
Shooting closeups Macro shooting
Select the flash option in the shooting function menu
To cancel the self-timer after it starts
Using the self-timer
Select the self-timer option in the shooting function menu
Select the ISO setting option in the shooting function menu
Adjusting to a natural color scheme White balance
36 EN
Selecting the ISO sensitivity
Select the drive option in the shooting function menu
Sequential shooting Drive
Menus for Shooting Functions
IShooting menu 1 X Reset
38 EN
Movie menu X Image Size/Image Quality
IShooting menu 1 X Image Size/Compression
Selecting the focusing area AF Mode
Brightening the subject against backlight Shadow Adjust
40 EN
Selecting the method for measuring the brightness ESP/n
IShooting menu 1 X Digital Zoom
Viewing the image immediately after shooting Rec View
JShooting menu 2 X Rec View
42 EN
Recording sound when shooting movies R
Displaying icon guides Icon Guide
Imprinting the date of recording Date Stamp
Playback menu X Slideshow
Playing back pictures automatically Slideshow
Playback menu X Photo Surfing
To start Photo Surfing
Changing the image size Q
44 EN
Cropping image P
Adding sound to still images R
Retouching the skin and eyes Beauty Fix
When Clear Skin is selected
Retouching red eyes in flash shooting Redeye Fix
Erasing images Erase
46 EN
Saving print settings to the image data Print Order
Protecting images R
Rotating images y
Copying images in the internal memory to the card Backup
Menus for Other Camera Settings
Using an Eye-Fi card commercially available Eye-Fi
Erasing data completely Memory Format/Format
Saving the mode when the camera is turned off KeepzSettings
Turning on the camera with the q button q Power On
Choosing the opening screen display Pw On Setup
48 EN
Resetting the file names of pictures File Name
Selecting the camera sound and its volume Sound Settings
SSettings 2 X Sound Settings
SSettings 2 X File Name
To adjust the CCD and the image processing function
Adjusting the brightness of the monitor s
To adjust the monitor brightness
50 EN
To play back camera images on a TV
To operate images with the TV remote control
Saving battery power between shots Power Save
To resume standby mode
52 EN
Choosing home and alternate time zones World Time
Setting the date and time
Restoring data in the camera Data Repair
To select the date display order
54 EN
Printing
Direct printing PictBridge*1
Display the image to be printed on the monitor
Use FG to select Size Submenu 3, and press
To cancel printing
To make the detailed printer settings
56 EN
To crop an image P
Print Reservations DPOF*1
Resetting all print reservation data
Single-frame print reservations
Reserving one print each of all images on the card U
58 EN
Resetting the print reservation data for selected images
Usage Tips
Troubleshooting
60 EN
Error message
Taking a picture of subjects where autofocus is difficult
Focusing
Shooting tips
Camera shake
Exposure brightness
62 EN
Color hue
Image quality
Batteries
Set Power Save p to On
Playback/Editing tips
Editing
Appendix
Battery and USB-AC adapter
64 EN
Camera care
Using your charger and USB-AC adapter abroad
Using a separately sold charger
SD/SDHC/SDXC memory card write- protect switch
Eye-Fi card commercially available
Current memory indicator
Using a new card
66 EN
Checking the image saving location
Still pictures
Increasing the number of pictures that can be taken
68 EN
Before Use
Movies
Storage and Maintenance
Closing Battery/card/connector cover
After Use
70 EN
General Precautions
Handling the Camera
Do not use the camera near flammable or explosive gases
Be careful with the strap
Battery Handling Precautions
72 EN
Disclaimer of Warranty
LCD Monitor
Legal and Other Notices
FCC Notice
Copyright Notice
For customers in North and South America
For customers in USA
74 EN
Olympus Worldwide Limited Warranty Imaging Products
For customers in Europe
What to do When Service is Needed
Provisions of Guarantee
Provisions of warranty
76 EN
For customers in Asia
78 EN
Disclaimer of Warranty
Trademarks
Camera
Specifications
Using in low temperatures
Lithium ion battery LI-42B
Olympus lithium ion battery
80 EN
Page
VM289101


 Preparing the Camera