Omega Vehicle Security LVCN700 Series warranty Programming, Calibration, Step Six, Step Seven

Models: LVCN700 Series

1 10
Download 10 pages 37.14 Kb
Page 5
Image 5
Step Six

CALIBRATION

Step Six

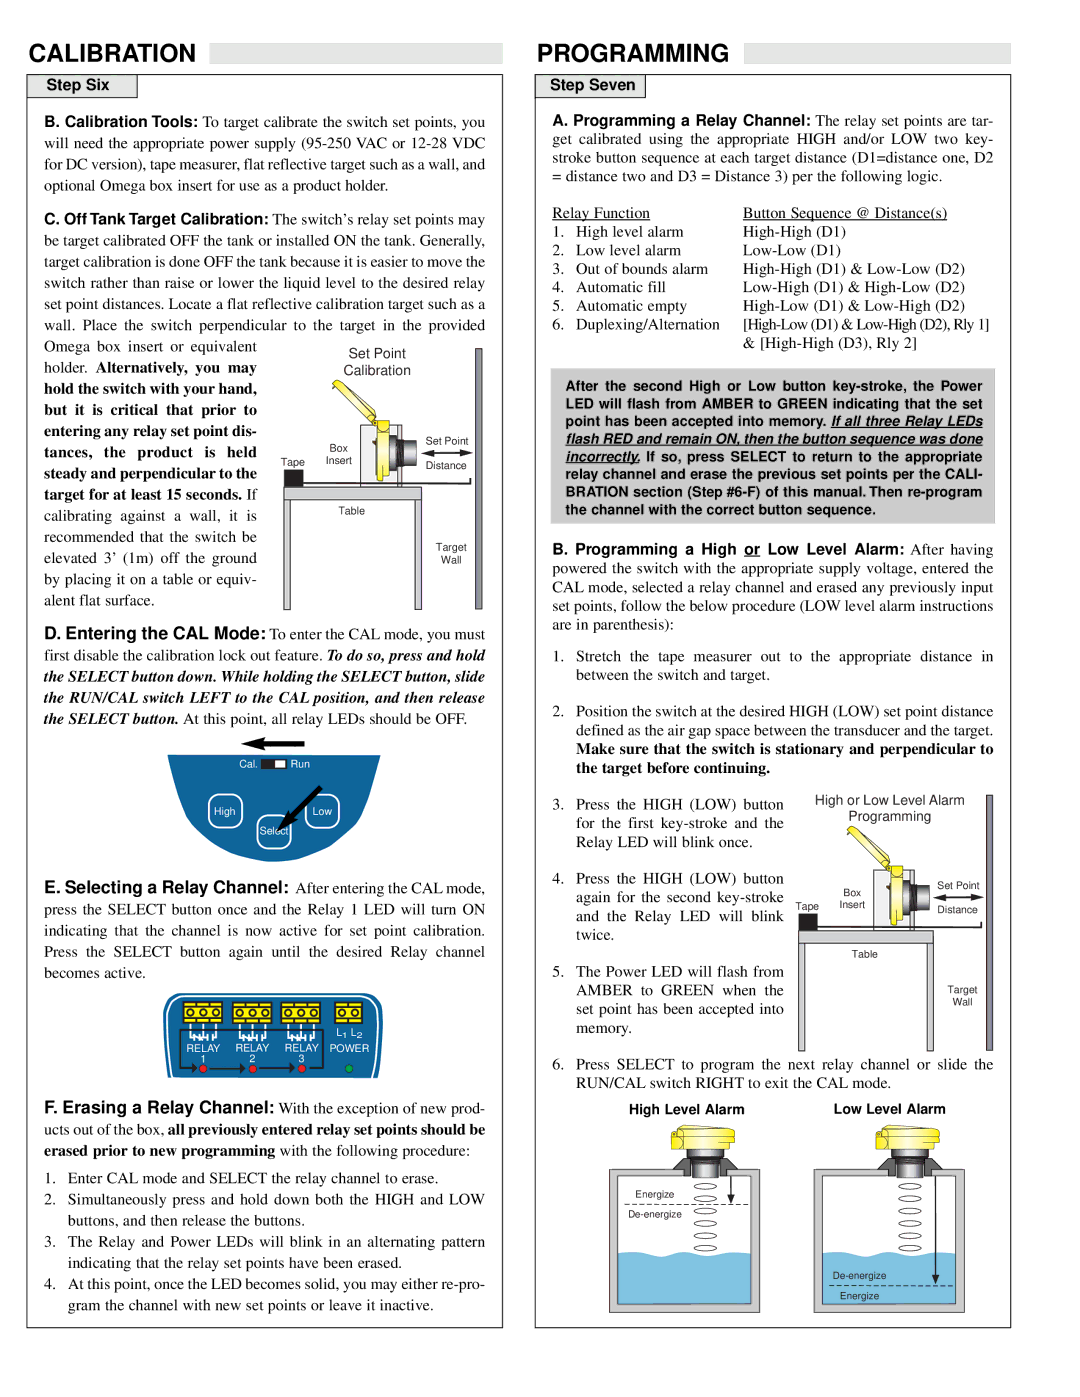
B. Calibration Tools: To target calibrate the switch set points, you will need the appropriate power supply (95-250 VAC or 12-28 VDC for DC version), tape measurer, flat reflective target such as a wall, and optional Omega box insert for use as a product holder.

C. Off Tank Target Calibration: The switch’s relay set points may

be target calibrated OFF the tank or installed ON the tank. Generally,

target calibration is done OFF the tank because it is easier to move the

switch rather than raise or lower the liquid level to the desired relay

set point distances. Locate a flat reflective calibration target such as a

wall. Place the switch perpendicular to the target in the provided

Omega box insert or equivalent

Set Point


holder. Alternatively, you may


Calibration


hold the switch with your hand,


but it is critical that prior to


entering any relay set point dis-


Set Point

tances, the product is held

Box


Insert


Tape

Distance

steady and perpendicular to the


target for at least 15 seconds. If


calibrating against a wall, it is

Table


recommended that the switch be


Target

elevated 3’ (1m) off the ground


Wall

by placing it on a table or equiv-


alent flat surface.


D. Entering the CAL Mode: To enter the CAL mode, you must

first disable the calibration lock out feature. To do so, press and hold the SELECT button down. While holding the SELECT button, slide the RUN/CAL switch LEFT to the CAL position, and then release the SELECT button. At this point, all relay LEDs should be OFF.

Cal. holder. Alternatively, you may Run

HighLow

Select

PROGRAMMING

Step Seven

A. Programming a Relay Channel: The relay set points are tar- get calibrated using the appropriate HIGH and/or LOW two key- stroke button sequence at each target distance (D1=distance one, D2 = distance two and D3 = Distance 3) per the following logic.

Relay Function

Button Sequence @ Distance(s)

1.

High level alarm

High-High (D1)

2.

Low level alarm

Low-Low (D1)

3.

Out of bounds alarm

High-High (D1) & Low-Low (D2)

4.

Automatic fill

Low-High (D1) & High-Low (D2)

5.

Automatic empty

High-Low (D1) & Low-High (D2)

6.

Duplexing/Alternation

[High-Low (D1) & Low-High (D2), Rly 1]


& [High-High (D3), Rly 2]

After the second High or Low button key-stroke, the Power LED will flash from AMBER to GREEN indicating that the set point has been accepted into memory. If all three Relay LEDs flash RED and remain ON, then the button sequence was done incorrectly. If so, press SELECT to return to the appropriate relay channel and erase the previous set points per the CALI- BRATION section (Step #6-F) of this manual. Then re-program the channel with the correct button sequence.

B. Programming a High or Low Level Alarm: After having powered the switch with the appropriate supply voltage, entered the CAL mode, selected a relay channel and erased any previously input set points, follow the below procedure (LOW level alarm instructions are in parenthesis):

1.Stretch the tape measurer out to the appropriate distance in between the switch and target.

2.Position the switch at the desired HIGH (LOW) set point distance defined as the air gap space between the transducer and the target.

Make sure that the switch is stationary and perpendicular to the target before continuing.

3. Press the HIGH (LOW) button

High or Low Level Alarm

for the first key-stroke and the

Programming


Relay LED will blink once.


E. Selecting a Relay Channel: After entering the CAL mode, press the SELECT button once and the Relay 1 LED will turn ON indicating that the channel is now active for set point calibration. Press the SELECT button again until the desired Relay channel becomes active.


L1 L2

RELAY

RELAY

RELAY

POWER

4.Press the HIGH (LOW) button again for the second key-stroke and the Relay LED will blink twice.

5.The Power LED will flash from AMBER to GREEN when the set point has been accepted into memory.


Box

Set Point


Tape

Insert

Distance


Table

Target

Wall

1


2


3

F. Erasing a Relay Channel: With the exception of new prod-

ucts out of the box, all previously entered relay set points should be erased prior to new programming with the following procedure:

1.Enter CAL mode and SELECT the relay channel to erase.

2.Simultaneously press and hold down both the HIGH and LOW buttons, and then release the buttons.

3.The Relay and Power LEDs will blink in an alternating pattern indicating that the relay set points have been erased.

4.At this point, once the LED becomes solid, you may either re-pro- gram the channel with new set points or leave it inactive.

6.Press SELECT to program the next relay channel or slide the RUN/CAL switch RIGHT to exit the CAL mode.

High Level Alarm

Low Level Alarm


Energize

De-energize

De-energize

Energize

Page 5
Image 5
Omega Vehicle Security LVCN700 Series Programming, Calibration, Step Six, holder. Alternatively, you may, Step Seven