CR-515 CR-315
Important Safety Instructions
Avis
Installing this Unit
Precautions
Power
Supplied Accessories
Precautions
Using the Remote Controller
Before Using the CD Receiver
Installing the Batteries
Features
Amplifier
CD Player
Tuner & Other
Contents
CR-515 CR-315
Getting to Know the CD Receiver
Front Panel
Getting to Know the CD Receiver
Display
Rear Panel
RC-660S
Remote Controller
RC-662S
Timer button 26, 47, 48, 50
Volume / buttons 27
STANDBY/ON button 27
Sleep button
Disc Notes
Supported Discs
Disc Notes
MP3
Connecting Antennas
Connecting the Indoor FM Antenna
Connecting the AM Loop Antenna
Attach the FM antenna, as shown North American Model
Connecting Antennas
Connecting an Outdoor FM Antenna
Connecting an Outdoor AM Antenna
Using a TV/FM Antenna Splitter
Connecting Speakers
Connecting Your Speakers
Terminal posts
Push-type terminals
Connecting Other Components
Connecting a Subwoofer
About Connections
Cables and Jacks
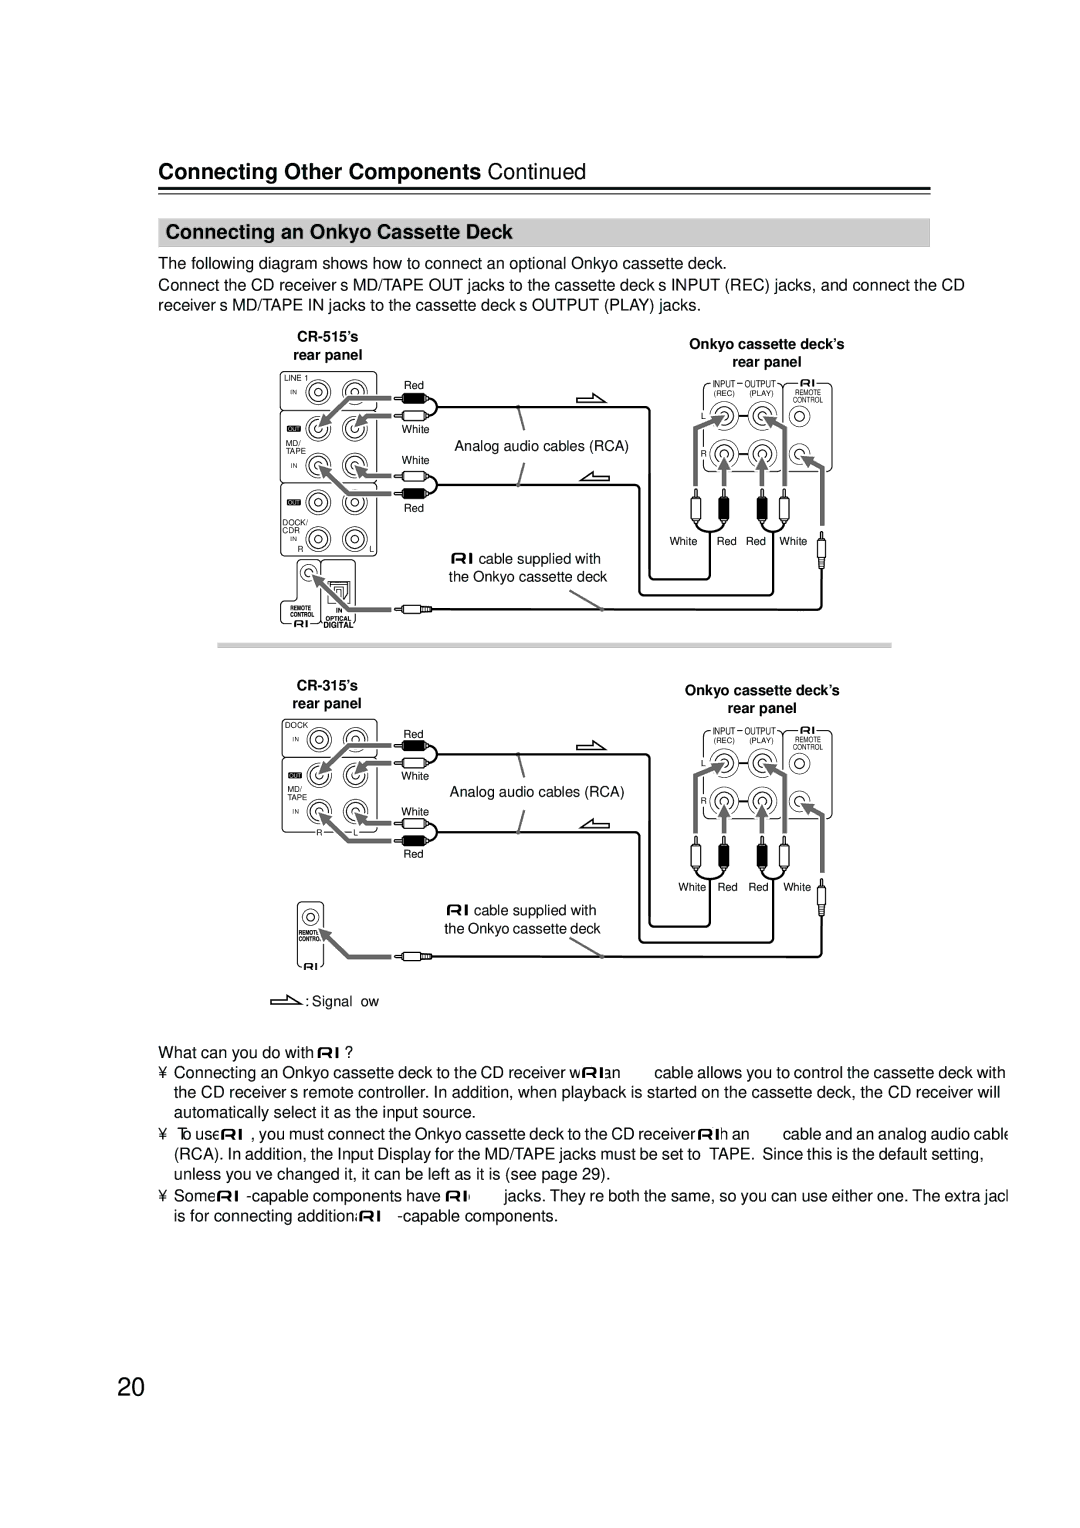
What can you do with
Connecting Other Components
Connecting an Onkyo Cassette Deck
Connecting an Onkyo MD recorder
CR-515’s Onkyo MD recorder’s Rear panel
CR-515’s Rear panel
Connecting an Onkyo CD Recorder CR-515
Connecting a Portable Audio Device
Connecting an Onkyo Component with a Digital Audio Output
What can you do with ?
Hint
Connecting the Power Cord
Connecting a TV
First Time Setup European Model Only
Turning Off the AccuClock Function
Adjusting the Volume
Using Headphones
Basic Operation
Turning On the CD Receiver
Adjusting the Bass and Treble
Using the Super Bass Function
Using the Direct Function
Basic Operation
Changing the Input Display
Input Source Name Abbreviations
Selecting Tracks CR-315
Playing CDs
Selecting Tracks CR-515
Playing CDs
Displaying CD Information
Selecting MP3 Files in Navigation Mode
Selecting MP3 Files in All Folder Mode
Playing the MP3 Files in Only One Folder
Memory Playback
DOM indicator appears
Random Playback
Repeat Playback
Press the YES/MODE/SHUFFLE
Preferences
Hide Number? Disable/Enable
Folder Key? All Folder/Navigation
Tuning into Radio Stations
Adjusting the Antennas
Tuning into weak stereo FM stations
Listening to the Radio
Listening to the Radio
Presetting FM Stations Automatically Auto Preset
After Storing Presets You Can
Presetting AM/FM Stations Manually
Selecting Preset Stations
Preset
Use the Band or Input
Buttons to select AM or FM
Receiving RDS
What is RDS?
Displaying Radio Information
Naming Presets
Available Characters
Copying Presets
Erasing a Preset’s Name
Erasing Presets
Setting the Clock
Setting the Clock
Setting the Clock Manually
Using the 12- or 24-hour Format
Displaying the Time in Standby Mode
Using the Timers
About the Timers
Using the Timers
Programming the Timers
Edly to select timer 1, 2, 3, or 4, and then press Enter
You must set the clock before you can program
If you selected Once, use the Pre
If you selected Every, use the Pre
If you selected Days Set, use
Press the STANDBY/ON button to
Turning Timers On and Off
Checking Timer Settings
All of the timer’s settings
Press Enter repeatedly to see
Checking the Remaining Sleep Time
Using the Sleep Timer
Canceling the Sleep Timer
Troubleshooting
Power
Audio
CD Playback
Troubleshooting
Remote Controller
Tuner
External Components
Timers
Specifications
General
Amplifier Section
Tuner Section
Memo
Memo
3 4 4 2 5 8 a