DR-90
Important Safeguards
Avis
If in any doubt, please consult a qualified electrician
Precautions
For British model
Warranty Claim
Power
Recording Copyright
AC Fuse
Table of Contents
Features
Digital Receiver Features
DVD/Audio CD Player Features
High Fidelity FM/AM Tuner Features
Supplied Accessories
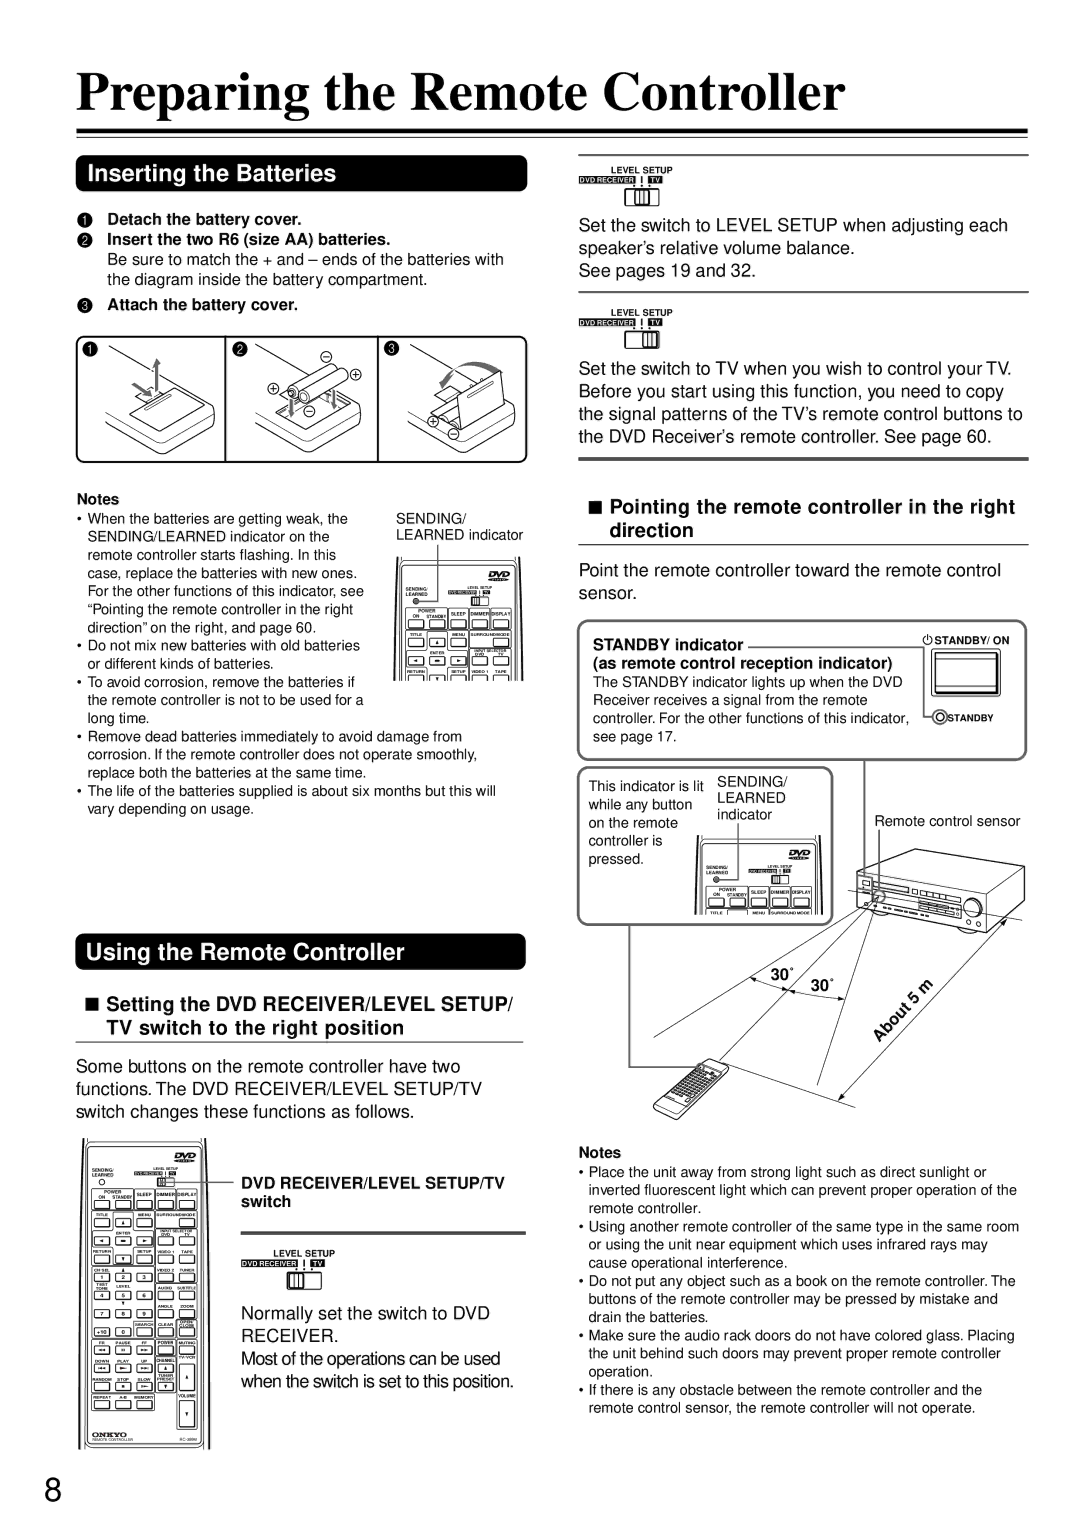
Preparing the Remote Controller
Using the Remote Controller
Pointing the remote controller in the right direction
Inserting the Batteries
On Storing Discs
On Cleaning Discs Playable Discs
On Handling Discs
Connecting to a TV
Before connecting
Connecting to a TV Using the Scart Cable TV / Monitor
If the TV is compatible with S video signals
About the Video 1 jacks/connectors
MD Recorder/DAT
Stereo cassette tape deck
Video Disc Player Video Cassette Player
Connecting Speakers
Front speakers
Center speaker Active subwoofer
Surround speakers
Positioning Speakers
Connecting the Supplied FM and AM Indoor Aerials
Adjusting the position of the FM indoor aerial
Adjusting the position of the AM indoor aerial
Making Aerial Connections
Directional Iinkage
Connecting FM Outdoor Aerial
Connecting an AM Outdoor Aerial
Label above the AC outlet
Before connecting
Another component
DVD Receiver turns on. The Standby indicator goes off
TV Shape according to the aspect ratio of the TV screen see
Pages 46
Press To select TV Shape, then press Enter
Speaker Setup
Adjusting Each Speakers Relative Volume Balance Test Tone
This section shows you the basics on how to play discs
Playing DVD Videos/Audio CDs
Basic Operation
Basic Playback
To stop playback
To pause playback still mode
To remove the disc
To play in fast reverse or fast forward
To play in slow-motion
Press FR Fast Reverse or FF Fast Forward during playback
Press Slow during playback
Locating a title using the title menu
Locating a Specific Title/Chapter/Track/Location
Locating a specific track directly
Locating a specific chapter or track
Consecutively
Locating a specific location by
Entering the time
Tuning Manually
Presetting Radio Stations
Tuning in a weak frequency only for FM stations
Listening to the Radio
Selecting Preset Stations Erasing a Preset Station
Selecting with the remote controller
Various Functions While Listening to Radio Programs
Selecting with the DVD Receiver
Operating with the remote controller About digital sound
Playing the Connected Source
Various Functions While Playing the Connected Source
Operating with the DVD Receiver
Adjusting the Volume
Listening Through Headphones
Using the Sleep Timer
Adjusting the Tone
Dolby PRO Logic Surround
Onkyos original sound effects -DSP Digital Signal Processor
Enjoying the Sound Effects
Press Surround Mode on the remote controller or DVD
Surround Mode
DSP indicator
Selecting the Sound Effect
Readjusting Each Speakers Relative Volume Balance
Using the Late NIGHT/FRONT Effect Function
Using the Re-EQ Function
Operating with the remote controller
Playing Repeatedly
Advanced DVD/Audio CD Operation
Repeating a Title, Chapter, or Track
Repeating a Specific Segment
Setting Titles, Chapters, or Tracks in a Favorite Order
To change or cancel the entered program
Playing in a Favorite Order
To program during playback
Playing Chapters in Random Order
Playing in Random Order
Playing Titles or Tracks in Random Order
Zooming a Picture
Zooming a Picture and Shifting the Zoom Point
Press Zoom during normal, slow
Or still playback
To disable the angle icon display on the TV
Selecting the Camera Angle
Changing the Camera Angle
To turn off the angle number display
To turn off the subtitle setting display
Selecting Subtitles Included on the DVD
Selecting a Subtitle Language
To turn subtitles on or off
About recording systems
Selecting a Playback Audio Setting
To turn off the audio setting display
Changing the Sound Signal Conversion Method
Changing the Sound Signal Conversion Method Temporarily
Sound from the speakers
Symbols in the tables
Output sound conversion tables
DVD video Audio CD
When the disc is inserted in the DVD Receiver
Press Display while the disc is stopped
DVD video e.g
Press Display during playback
Display
Customizing the Function Settings
Selecting a Setting Category
Press Setup while the disc is To select the category
Following on-screen display appears
TV Shape
Video Out Select
To select the video output corresponding to your TV system
Display on the TV screen
Language Setting
To select other languages
Press / to select the item, then press Enter
Select a preferred language by pressing
Press Setup
Select Others and press Enter
Obtain the abbreviation
Preferred language from the list see
Picture Setting
Select the aspect ratio of the TV screen
By pressing / , then press Enter
Select the black level by pressing
Select PAL or Auto according to
Color system of the TV by pressing
Select the item according to the type
TV or monitor by pressing / , then
Audio Setting
Select the output sound type by pressing
Audio Out Select
Bitstream
Extended Audio Features
Select On or Off by pressing
Dynamic Range Control
Off
Display Setting
Select the background color by pressing
ON-Screen Display
OSD Background Color
Screen saver is enabled
Screen saver is disabled
Setting menu disappears
Screen Saver
Operation Setting
Select Auto or Frame by pressing
Press the number buttons to create a
Personal 4-digit security code, then
To change the parental lock level
To change your 4-digit security code
Title Stop
Table of Languages
Table of Languages and Their Abbreviations
Additional Operation
Recording Using the Connected Equipment
Basic Recording Procedure
Played using the DVD Receiver
Analog recording from a DVD Video
Digital recording from a DVD video
Played by the DVD Receiver
Programming the Remote Controller
Erasing all the programmed functions
DVD
Troubleshooting
Symptoms Causes Remedies Pages
Symptoms Causes Remedies
Tuner Remote controller Recording
Specifications
Amplifier Section
DVD Section
Tuner Section
Index to Parts and Controls
Front panel
3 4 5 6 78 9 0 a BCD E FG
Display
Rear Panel
Remote controller
Onkyo U.S.A. Corporation
Onkyo Europe Electronics GmbH
Onkyo China Limited
SN 29342815A T9910-2