HT-S790
Important Safety Instructions
Avis
Precautions
Power
For models having a power cord with a polarized plug
FCC Information for User
Speaker Precautions
Placement
Using Close to a TV or Computer
Input Signal Warning
Enjoying Home Theater
Speaker Sets a and B
Speaker Set a Main Room
Speaker Set B Sub Room
Package Contents
Features
Getting Started in Five Easy Steps
Digital Input Input Display
Contents
Getting to Know the AV Receiver
Front Panel
Getting to Know the AV Receiver
Display
Rear Panel
Digital in Optical 1, 2, 3, and Coaxial
XM antenna on North American models
Front Speakers A, Surround SPEAKERS, Center SPEAKER,
Aiming the Remote Controller
Remote Controller
Installing the Batteries
RECEIVER/TAPE Mode
Remote Controller
Using the Remote Controller
Listening Mode buttons
Remote Mode buttons
Buttons used when the Tuner input is selected
Buttons used when the Tape input is selected
DVD Mode
CD/MD/CDR/HDD Mode
To select the input source, press
DISC/ALBUM +/- button
Arrow / and Enter buttons
Speakers
Subwoofer SKW-540
Connecting Your Speakers
Speaker Connection Precautions
Connecting Speaker Set a
Connecting Speaker Set B sold separately
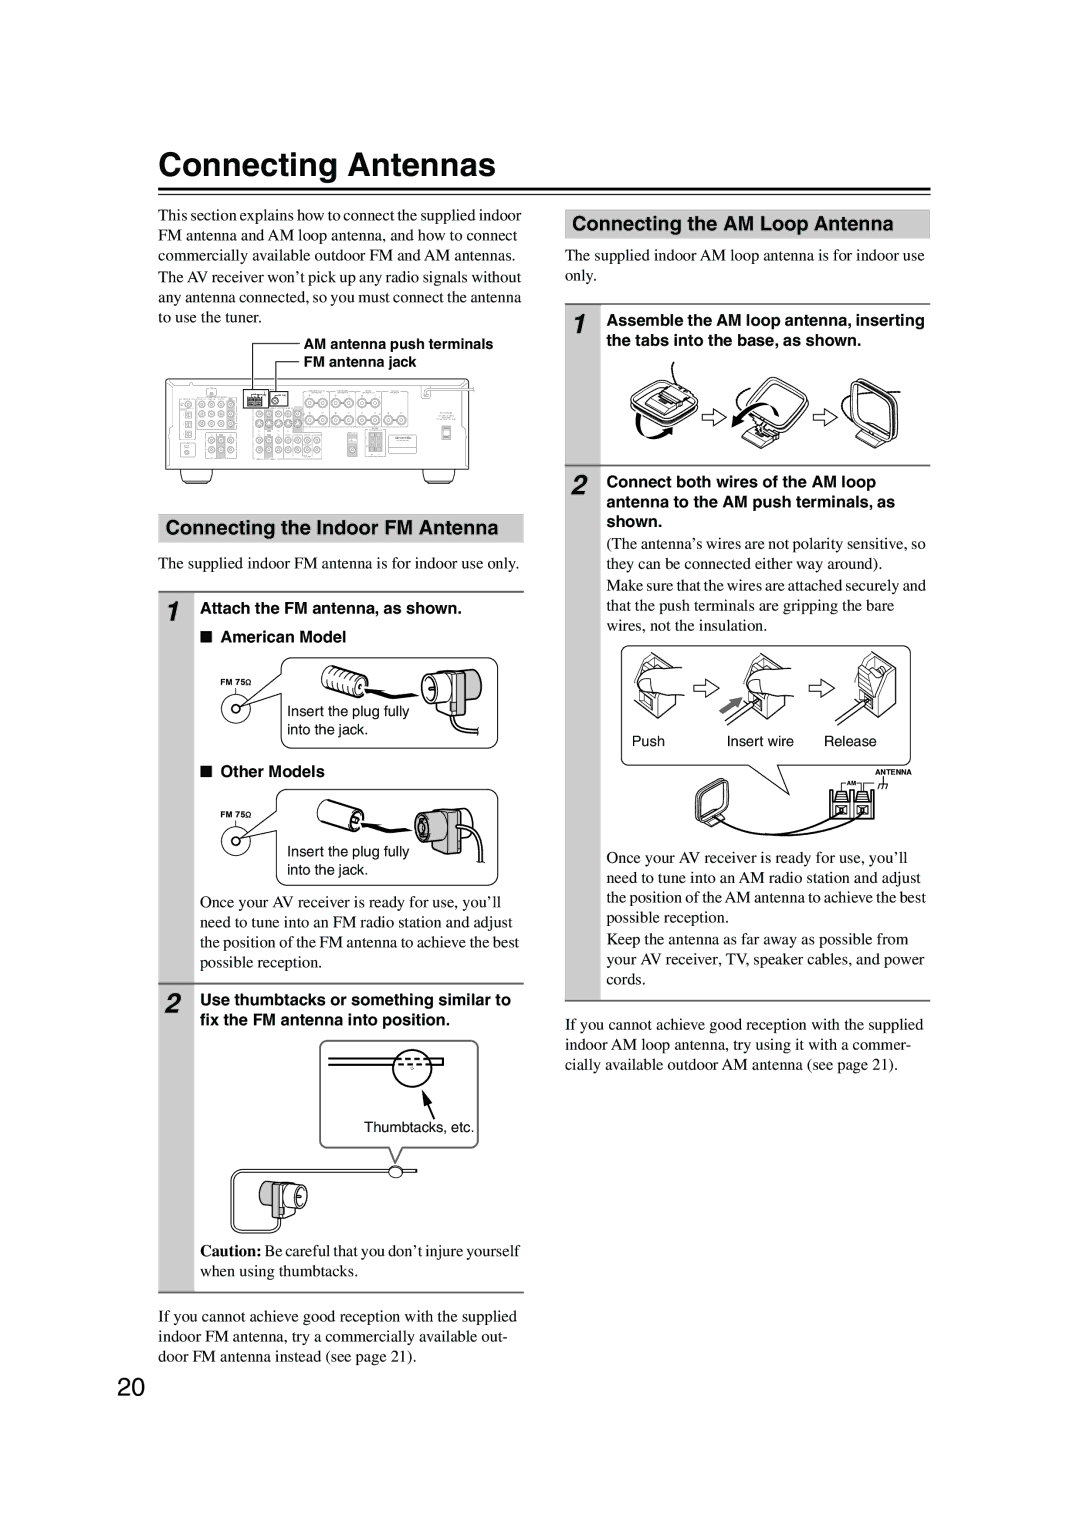
Connecting Antennas
Connecting the Indoor FM Antenna
Connecting the AM Loop Antenna
Attach the FM antenna, as shown American Model
Connecting Antennas
Connecting an Outdoor FM Antenna
Connecting an Outdoor AM Antenna
Using a TV/FM Antenna Splitter
Connecting Your Components
About AV Connections
Optical Digital Jacks
AV Connection Color Coding
Connecting Your Components
Connecting Audio and Video Signals to the AV Receiver
Which Connections Should I Use?
Video Connection Formats
Connecting a TV or Projector
Video Connection
Audio Connection
Hint
Connecting a DVD player
Hooking Up the Multichannel DVD Input
DVD recorder
Connecting a VCR or DVD Recorder for Playback
VCR
Connecting a VCR or DVD Recorder for Recording
Connecting a Camcorder, Games Console, or Other Device
Make the video connection a Make the audio connection a
Camcorder or console
Satellite, cable, set-top box, etc
Connecting a CD Player or Turntable
CD Player or Turntable MM with Built-in Phono Preamp Step
CD in L/R
Digital in Optical
Connecting an HDD-compatible Component
Receiver’s Video 2 in L/R jacks and Video 2 in S Jacks
Connecting a Cassette, CDR, MiniDisc, or DAT Recorder
Connecting the Power Cord of Another Component
See
Cassette recorder, CDR, etc
Connecting Onkyo Components
Connecting the Power Cord
Auto Power On/Standby
Remote Control
Testing the speakers
Turning On the AV Receiver
Turning On and Standby
Smooth Operation in a Few Easy Steps
Changing the Input Display
First Time Setup
Assigning Digital Inputs to Input Sources
Select a suitable listening mode and enjoy
See Using the Listening Modes on
Playing Your AV Components
Basic AV Receiver Operation
Displaying Source Information
Using the Multichannel DVD Input
Playing Your AV Components
Listening to AM/FM stations
Tuning into AM/FM Radio Stations
Listening to the Radio
Presetting AM/FM Stations and XM Channels
Listening to the Radio
Connecting the XM Passport System
Listening to XM Satellite Radio North American Models Only
Selecting XM Satellite Radio
Press the Tuner input selector
Signing Up for XM Satellite Radio
Selecting XM Radio Channels
Displaying XM Radio Information
XM Radio Messages
Positioning the XM Passport System
On the AV receiver, press
Buttons to select 5. ANT Aim
Adjusting the Bass and Treble
Setting the Display Brightness
Using the OptiResponse Equalizer
Common Functions
Using the Sleep Timer
Adjusting Speaker Levels
Using Headphones
Common Functions
Using the Listening Modes
Selecting with the Remote Controller
Selecting Listening Modes
Selecting on the AV Receiver
Using the Listening Modes
DVD
About the Listening Modes
DTS
Use this mode with any stereo movie e.g., TV, DVD, VHS
Onkyo Original DSP Modes
Using the Audio Adjust Settings
Using the Late Night Function Dolby Digital only
Using the CinemaFILTER
Input Channel Settings
Plii and PLIIx Music Mode Settings
DTS Neo6 Music Mode Setting
Dolby Digital EX Input Signal Setting
Speaker Distance
Advanced Setup
Advanced Speaker Settings
Advanced Setup
Speaker Levels
Speaker Configuration
Yes Select if a subwoofer is con
Nected
No Select if no subwoofer is con
Crossover Frequency
Double Bass
Use the Down button to
Left and Right / but- tons to select 2ch or 1ch
Digital Input Signal Formats
Correcting Sound and Picture Sync
Recording Audio and Video from Separate Sources
Recording
Recording the Input Source
Entering Remote Control Codes
Controlling Other Components
Remote Control Codes for Onkyo Components Connected via
Resetting Remote Mode Buttons
Resetting the Remote Controller
Controlling Other Components
CH +
ON/STANDBY, TV
TV VOL
Audio
Troubleshooting
Power
Troubleshooting
Video
Remote Controller
Tuner
Recording
Others
Video ATT0 default
Memory Backup
Video Attenuation
Video ATT2 Gain is reduced by 2 dB
Specifications
Amplifier Section
Video Section
Tuner Section
Specifications
Speaker
Memo
Onkyo U.S.A. Corporation
Onkyo Europe Electronics GmbH
Onkyo Europe UK Office
Onkyo China Limited
Manteniendo pulsado el botón Remote Mode
Mode intryckt och tryck samtidigt in knappen
Halten Sie die änderungsbedürftige Remote
DISPLAY-Taste 3 Sekunden lang betätigen
DVD Codes
TV/DVD Combination
CD/MD/CDR/HDD Codes CD
CD Recorder
MD Recorder
HDD Player
TV Codes
GEC
GPM
HCM
ICE
NEI
NTC
SBR
SEG
TMK
TVS
VCR Codes
ABS
HI-Q
MEI
TV/VCR Combination
DBS/PVR Combination
PVR
CABLE/SAT Codes
Cable Converter
Cable/PVR Combination
Satellite Receiver
HTS
QNS
TPS
UEC
3 4 4 1 8 8 a

