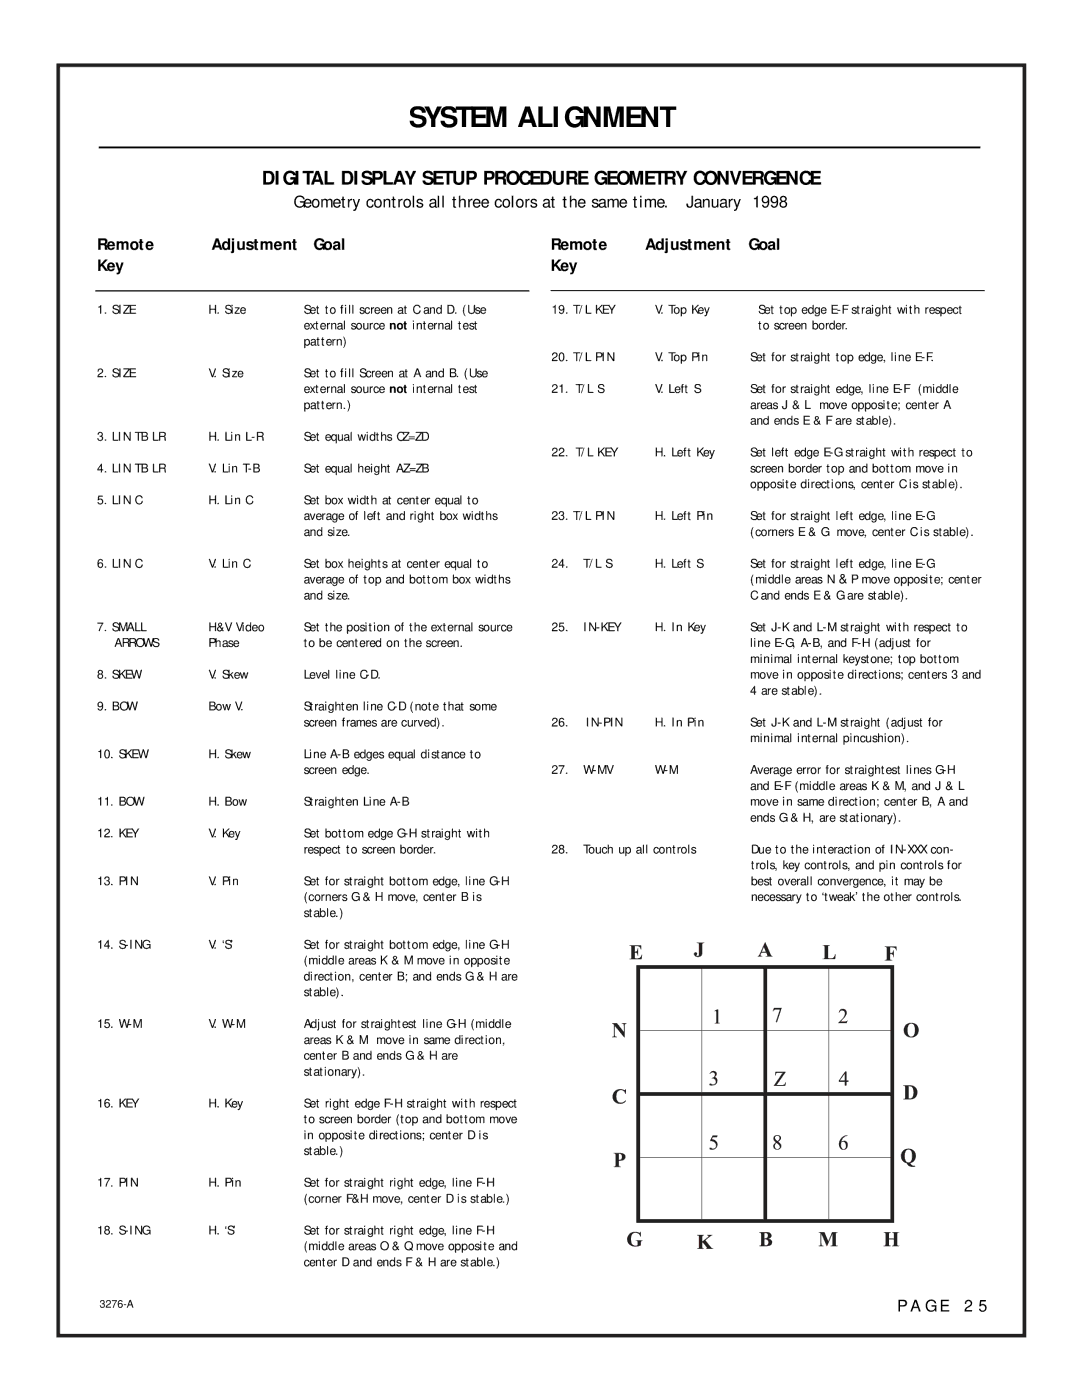
SYSTEM ALIGNMENT

DIGITAL DISPLAY SETUP PROCEDURE GEOMETRY CONVERGENCE

Geometry controls all three colors at the same time. January 1998

Remote

Adjustment

Goal

Remote

Adjustment

Goal

Key


Key


1. SIZE

H. Size

Set to fill screen at C and D. (Use


19. T/L KEY

V. Top Key

Set top edge E-F straight with respect


external source not internal test


to screen border.


pattern)


20. T/L PIN

V. Top Pin

Set for straight top edge, line E-F.

2. SIZE

V. Size

Set to fill Screen at A and B. (Use


external source not internal test

21.

T/L S

V. Left S

Set for straight edge, line E-F (middle


pattern.)


areas J & L move opposite; center A


and ends E & F are stable).

3. LIN TB LR

H. Lin L-R

Set equal widths CZ=ZD


22.

T/L KEY

H. Left Key

Set left edge E-G straight with respect to

4. LIN TB LR

V. Lin T-B

Set equal height AZ=ZB


screen border top and bottom move in


opposite directions, center C is stable).

5. LIN C

H. Lin C

Set box width at center equal to


average of left and right box widths


23. T/L PIN

H. Left Pin

Set for straight left edge, line E-G


and size.


(corners E & G move, center C is stable).

6. LIN C

V. Lin C

Set box heights at center equal to

24.

T/L S

H. Left S

Set for straight left edge, line E-G


average of top and bottom box widths


(middle areas N & P move opposite; center


and size.


C and ends E & G are stable).

7. SMALL

H&V Video

Set the position of the external source

25.

IN-KEY

H. In Key

Set J-K and L-M straight with respect to

ARROWS

Phase

to be centered on the screen.


line E-G, A-B, and F-H (adjust for


minimal internal keystone; top bottom

8. SKEW

V. Skew

Level line C-D.


move in opposite directions; centers 3 and


4 are stable).

9. BOW

Bow V.

Straighten line C-D (note that some


screen frames are curved).

26.

IN-PIN

H. In Pin

Set J-K and L-M straight (adjust for


minimal internal pincushion).

10. SKEW

H. Skew

Line A-B edges equal distance to


screen edge.

27.

W-MV

W-M

Average error for straightest lines G-H


and E-F (middle areas K & M, and J & L

11. BOW

H. Bow

Straighten Line A-B


move in same direction; center B, A and


ends G & H, are stationary).

12. KEY

V. Key

Set bottom edge G-H straight with


respect to screen border.

28.

Touch up all controls

Due to the interaction of IN-XXX con-


trols, key controls, and pin controls for

13. PIN

V. Pin

Set for straight bottom edge, line G-H


best overall convergence, it may be


(corners G & H move, center B is


necessary to ‘tweak’ the other controls.


stable.)


14. S-ING

V. ‘S’

Set for straight bottom edge, line G-H


(middle areas K & M move in opposite


direction, center B; and ends G & H are


stable).


15. W-M

V. W-M

Adjust for straightest line G-H (middle


areas K & M move in same direction,


center B and ends G & H are


stationary).


16. KEY

H. Key

Set right edge F-H straight with respect


to screen border (top and bottom move


in opposite directions; center D is


stable.)


17. PIN

H. Pin

Set for straight right edge, line F-H


(corner F&H move, center D is stable.)


18. S-ING

H. ‘S’

Set for straight right edge, line F-H


(middle areas O & Q move opposite and


center D and ends F & H are stable.)


3276-A

P A G E 2 5


Page 25
Image 25
OPPO Digital Model PRO900X setup guide Digital Display Setup Procedure Geometry Convergence, Goal Remote Adjustment Key

Model PRO900X specifications

OPPO Digital has made a name for itself in the world of high-fidelity audio equipment, and the new PRO900X model exemplifies their commitment to quality and innovation. Aimed at audiophiles and casual listeners alike, the PRO900X stands out for its exceptional sound performance, versatile connectivity options, and sleek design.

One of the primary features of the OPPO PRO900X is its advanced digital-to-analog converter (DAC). This device utilizes state-of-the-art technology to ensure that audio reproduction is as true to the original recording as possible. The PRO900X is equipped with a high-performance DAC that supports multiple audio formats, including PCM and DSD, allowing users to experience their favorite tracks in pristine quality.

Additionally, the PRO900X boasts a powerful amplifier unit that drives a wide range of headphones and speakers effortlessly. This ensures that users can enjoy rich, dynamic sound filled with detail and clarity, regardless of the audio source. The amplifier is designed to deliver high output impedance, which enhances the listening experience, especially when paired with high-impedance headphones.

Connectivity is another strong suit of the OPPO PRO900X. Featuring USB, optical, coaxial, and Bluetooth connections, this model caters to different user needs. It supports high-resolution audio streaming via Bluetooth, enabling users to wirelessly connect their smartphones or tablets without sacrificing sound quality. The PRO900X is compatible with a variety of devices, making it an ideal choice for both home and portable audio setups.

The design of the PRO900X reflects OPPO's aesthetic philosophy, combining elegant looks with functional ergonomics. The unit features a minimalist front panel with easily accessible controls, allowing users to navigate through different settings and inputs effortlessly. The robust build quality ensures longevity, making it a reliable addition to any audio setup.

Finally, the OPPO PRO900X comes with user-friendly software that facilitates firmware updates and customizable audio settings. This ensures that the device remains compatible with future technologies while allowing users to tailor their listening experience to their preferences. With its impressive features, advanced technologies, and sleek design, the OPPO Digital Model PRO900X is poised to be a game-changer in the high-end audio market.