OPPO Digital Model PRO900X setup guide Setup and Alignment Procedure, Procedure Overview

Models: Model PRO900X

1 28
Download 28 pages 56.17 Kb
Page 18
Image 18

SETUP AND ALIGNMENT PROCEDURE

PROCEDURE OVERVIEW

There are several situations to consider when performing the setup procedure for the PRO900X System. The setup procedure will vary depending on the required physical and signal configuration.

The simplest setup is that of a “factory configured” projector which will use the preset conditions. Factory configured means it has been aligned for ceiling/front projection and a 80” wide dis- play at a projected distance of 96 3/8”. In this case, using the customer’s signal source, only minor blanking, phase, and conver- gence touch up is required.

If the display size is changed, to other than 80” width or the unit is to be floor-mounted, completion of the full setup procedure is required.

Setup, after a hardware repair, is the other condition. Replacement of a CRT usually requires minor alignment steps (yoke, astigmatator, focus, and re-convergence only for that color). Replacement of modules, in the vertical, horizontal deflec- tion, or convergence systems, usually requires that most all align- ment steps are to be performed.

I. INSTALLATION PREREQUISITES

1.Mounting Configuration - Floor or Ceiling.

2.Projection Configuration - Front or Rear.

3.Determine Display Size and Aspect Ratio (Shape).

4.List All Signal Source(s) and Format(s).

5.Check Projection Installation Area - Before Installation.

6.Survey Installation Area For Power and Signal Source Requirements.

7.Test PRO900X system before modifying its configuration.

8.Modify, Install, and Set Up the PRO900X system.

II. SYSTEM CHECK AND PHYSICAL SETUP

1. PRO900X Check Out Before Changes to Configuration IMPORTANT Do Not Connect Power until you verify cor-

rect setup of the 120/230 VAC jumper on the 9-1500

power supply. Refer to the illustration at the right.

a.Connect all the customer’s RGB and Video Source(s) to the PRO900X jackpack.

b.Turn on the PRO900X and the Signal Source(s).

c.Verify that the PRO900X recognizes all the source signals.

d.Verify that the PRO900X operates correctly.

e.Turn the PRO900X off and disconnect the AC power.

2.Set Floor/Ceiling and Front/Rear Configuration. Refer to the figures on page 19.

a.Remove the PRO900X top cover.

b.9-1510 Module set vertical deflection and horizontal/vertical convergence connectors.

c.9-1505 module set horizontal deflection connectors.

d.9-1509 module set dynamic focus switch SW7001.

3.Set Red and Blue CRT Point Angles Set angles only if the setup is a non-factory configuration (other than 80” wide image.)

a.Remove the nylon rod shipping spacers (or shipping wedges).

b.Set Red CRT point angle according to the display width.

c.Set Blue CRT point angle according to the display width. Refer to the figures on page 20.

Note: The PRO900X unit is shipped with spacer shims between the CRT and lens assemblies, these must be removed to set up the “Scheimpflug (spring/edge)” focus. Refer to the figure on page 23 for the edge focus procedure.

4. Mount the projector system.

Mount the PRO900X system according to the prearranged plans agreed upon between the installer and end user. Verify the mount- ing point, hardware, signal connections, and power connections.

Note: It is recommended that preliminary setup be done on the floor before hanging a ceiling-configured system.

5.Projector/Display Surface Physical Setup

a.Set the projector to screen distance according to display width. Refer the figures on pages 20 and 21.

b.Set projector height according to display size. Refer to the figures on pages 20 and 21.

c.Adjust the projector’s position for no horizontal skew to the display screen.

d.Verify that the Green CRT center is centered to the screen horizontal center.

e.Stabilize the projector and screen mounting hardware.

f.Verify that the setup of steps “a” through “d” has not changed.

6.Set Up Signal Sources

a.Connect the RGB and/or Video Source(s) to the PRO900X jackpack.

b.Reconnect the AC power.

c.Turn on the PRO900X and the Signal Source(s).

d.Verify that the PRO900X recognizes all the source signals.

e.Set the “Ceiling/Floor” setup menu option.

P A G E 1 8

3276-A

Page 18
Image 18
OPPO Digital Model PRO900X setup guide Setup and Alignment Procedure, Procedure Overview

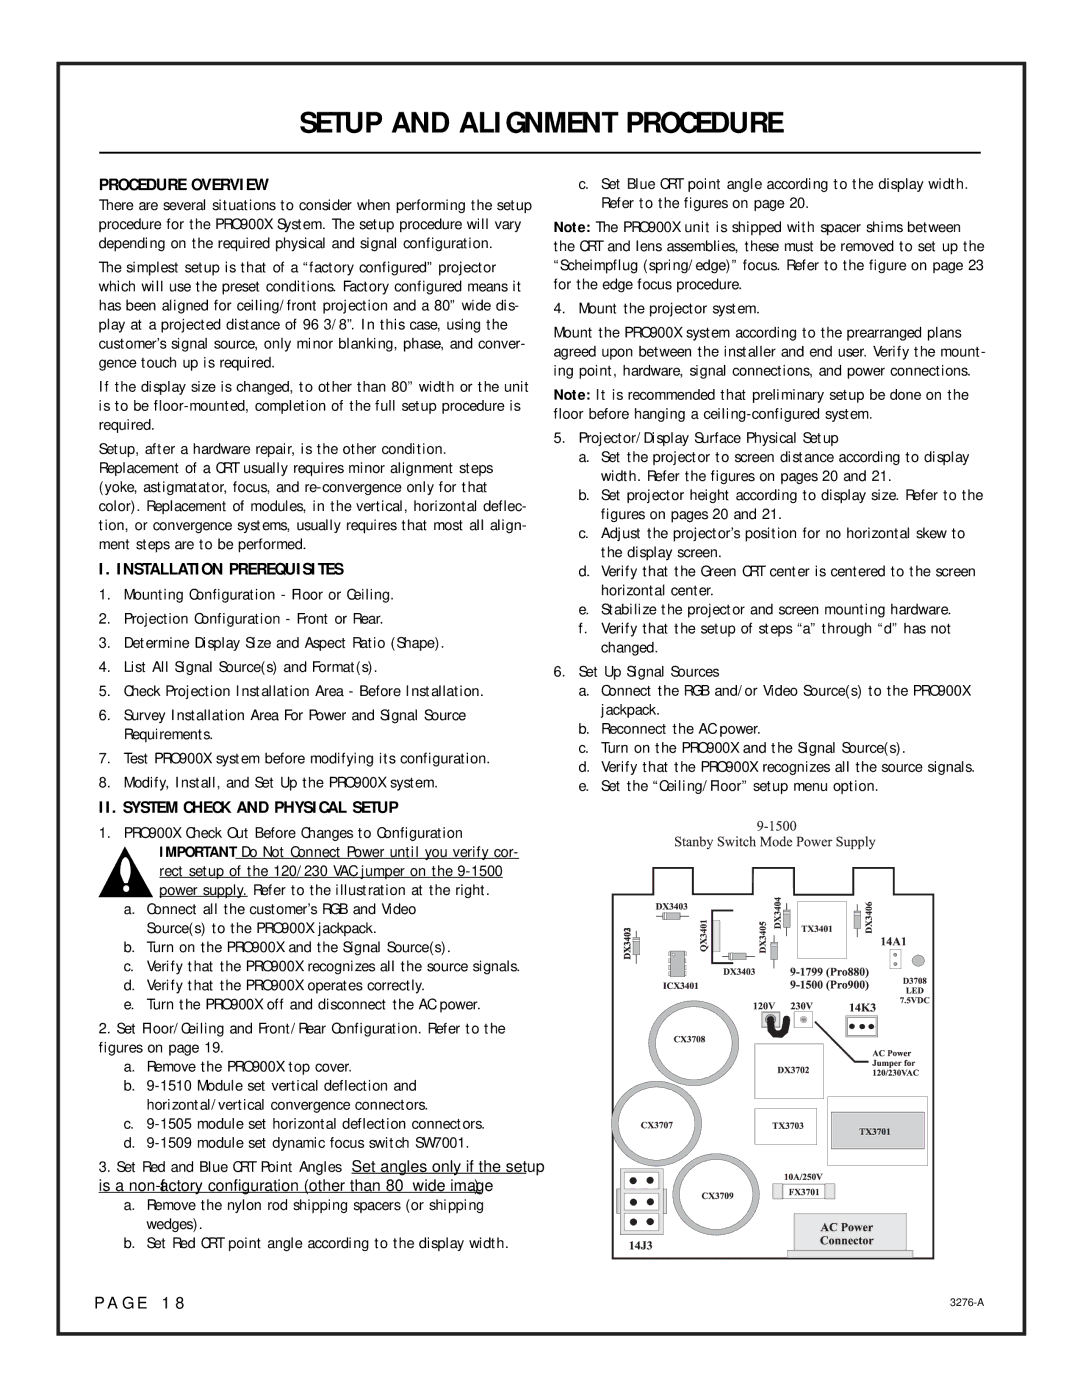
Model PRO900X specifications

OPPO Digital has made a name for itself in the world of high-fidelity audio equipment, and the new PRO900X model exemplifies their commitment to quality and innovation. Aimed at audiophiles and casual listeners alike, the PRO900X stands out for its exceptional sound performance, versatile connectivity options, and sleek design.

One of the primary features of the OPPO PRO900X is its advanced digital-to-analog converter (DAC). This device utilizes state-of-the-art technology to ensure that audio reproduction is as true to the original recording as possible. The PRO900X is equipped with a high-performance DAC that supports multiple audio formats, including PCM and DSD, allowing users to experience their favorite tracks in pristine quality.

Additionally, the PRO900X boasts a powerful amplifier unit that drives a wide range of headphones and speakers effortlessly. This ensures that users can enjoy rich, dynamic sound filled with detail and clarity, regardless of the audio source. The amplifier is designed to deliver high output impedance, which enhances the listening experience, especially when paired with high-impedance headphones.

Connectivity is another strong suit of the OPPO PRO900X. Featuring USB, optical, coaxial, and Bluetooth connections, this model caters to different user needs. It supports high-resolution audio streaming via Bluetooth, enabling users to wirelessly connect their smartphones or tablets without sacrificing sound quality. The PRO900X is compatible with a variety of devices, making it an ideal choice for both home and portable audio setups.

The design of the PRO900X reflects OPPO's aesthetic philosophy, combining elegant looks with functional ergonomics. The unit features a minimalist front panel with easily accessible controls, allowing users to navigate through different settings and inputs effortlessly. The robust build quality ensures longevity, making it a reliable addition to any audio setup.

Finally, the OPPO PRO900X comes with user-friendly software that facilitates firmware updates and customizable audio settings. This ensures that the device remains compatible with future technologies while allowing users to tailor their listening experience to their preferences. With its impressive features, advanced technologies, and sleek design, the OPPO Digital Model PRO900X is poised to be a game-changer in the high-end audio market.