| Size: A4 | |
| ||
|
|
|
WIRELESS THERMO CLOCK
MODEL IWA-80055
USER’S INSTRUCTIONS
Thank you for your purchase of this wireless
thermo clock. The utmost care has gone into the design and manufacture of your clock. Please read the instructions carefully and keep the manual for future reference.
The receiver unit has a clear,
The 433 MHz technology means no wire installation is required and you can place the sensor anywhere you like.
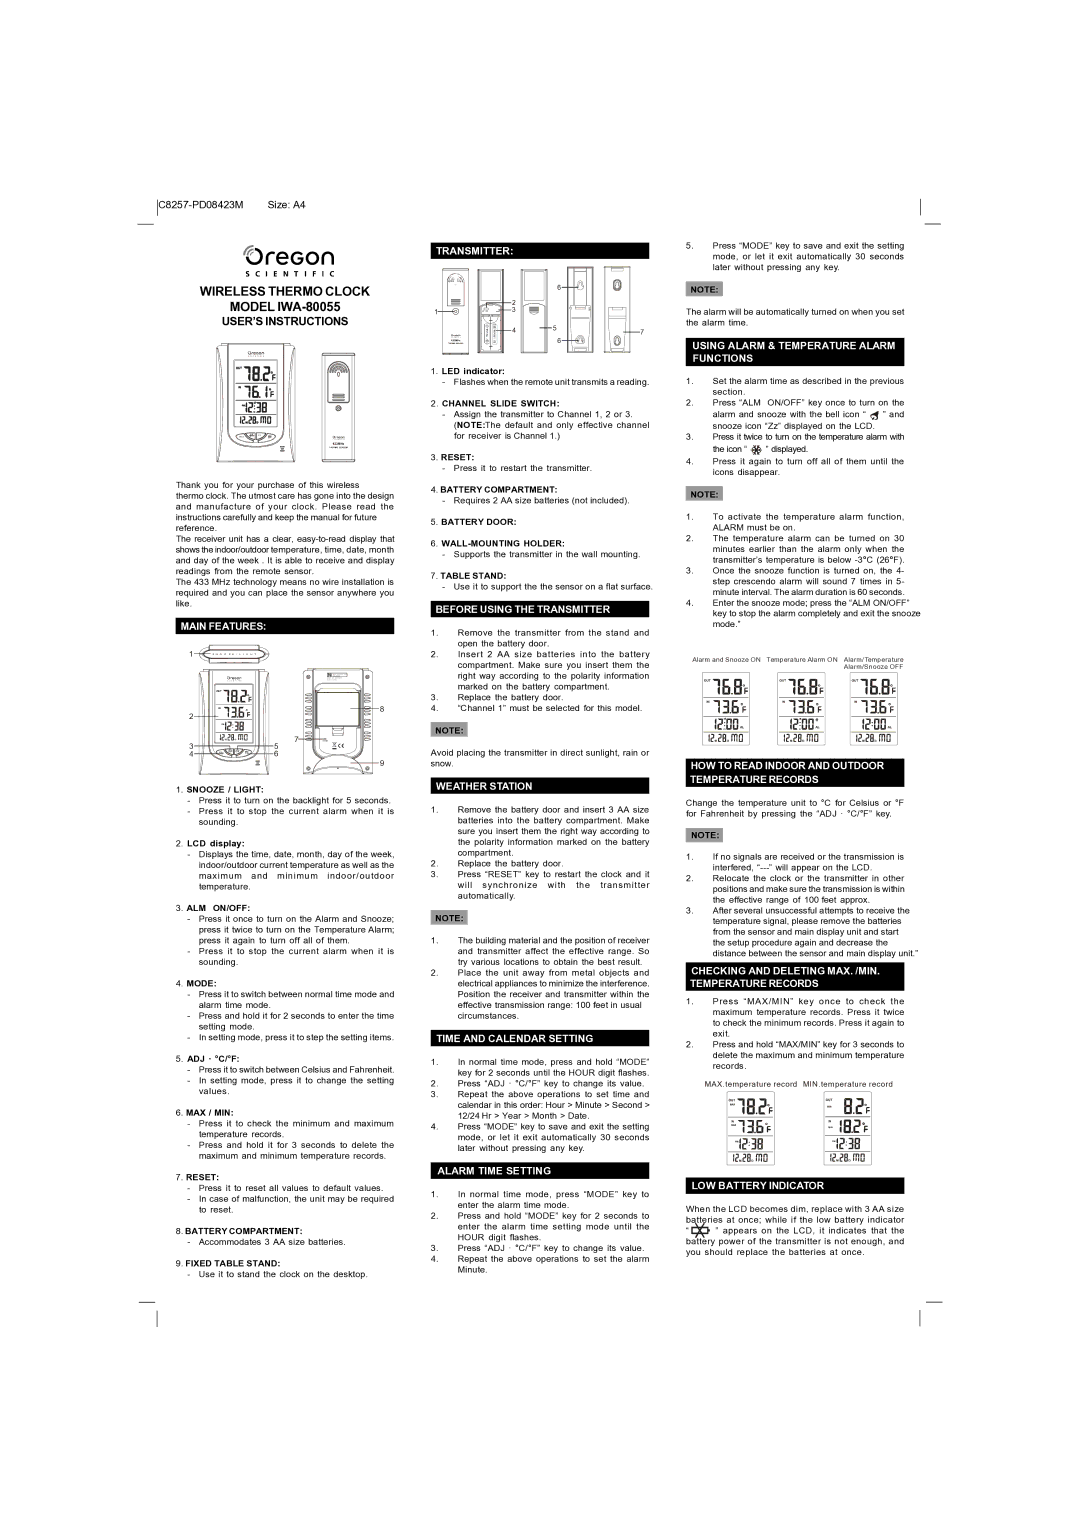
MAIN FEATURES:
TRANSMITTER: |
|
| |
|
|
| 6 |
| 2 |
|
|
1 | 3 |
|
|
| 4 | 5 | 7 |
|
| ||
|
|
| 6 |
1.LED indicator:
-Flashes when the remote unit transmits a reading.
2.CHANNEL SLIDE SWITCH:
-Assign the transmitter to Channel 1, 2 or 3.
(NOTE:The default and only effective channel for receiver is Channel 1.)
3.RESET:
-Press it to restart the transmitter.
4.BATTERY COMPARTMENT:
-Requires 2 AA size batteries (not included).
5.BATTERY DOOR:
6.
-Supports the transmitter in the wall mounting.
7.TABLE STAND:
-Use it to support the the sensor on a flat surface.
BEFORE USING THE TRANSMITTER
1. | Remove the transmitter from the stand and |
| open the battery door. |
5.Press “MODE” key to save and exit the setting mode, or let it exit automatically 30 seconds later without pressing any key.
NOTE:
The alarm will be automatically turned on when you set the alarm time.
USING ALARM & TEMPERATURE ALARM FUNCTIONS
1.Set the alarm time as described in the previous section.
2.Press “ALM ON/OFF” key once to turn on the alarm and snooze with the bell icon “ ![]() ” and snooze icon “Zz” displayed on the LCD.
” and snooze icon “Zz” displayed on the LCD.
3.Press it twice to turn on the temperature alarm with
the icon “ ![]() ” displayed.
” displayed.
4.Press it again to turn off all of them until the icons disappear.
NOTE:
1.To activate the temperature alarm function, ALARM must be on.
2.The temperature alarm can be turned on 30 minutes earlier than the alarm only when the transmitter’s temperature is below
3.Once the snooze function is turned on, the 4- step crescendo alarm will sound 7 times in 5- minute interval. The alarm duration is 60 seconds.
4.Enter the snooze mode; press the “ALM ON/OFF” key to stop the alarm completely and exit the snooze mode.”
1
2
3
4
S N O O Z E / L I G H T |
C/ F |
|
| Rem o t e Th er m o Cl o c k |
|
| IWA - 80055 |
| MO DEL NO: IWA | |
| MA DE | IN CHINA |
|
| 8 |
7 | RESET |
|
5 |
|
|
6 |
| 9 |
|
| |
2. | Insert 2 AA size batteries into the battery |
| compartment. Make sure you insert them the |
| right way according to the polarity information |
| marked on the battery compartment. |
3. | Replace the battery door. |
4. | “Channel 1” must be selected for this model. |
NOTE:
Avoid placing the transmitter in direct sunlight, rain or snow.
Alarm and Snooze ON Temperature Alarm ON Alarm/Temperature
Alarm/Snooze OFF
HOW TO READ INDOOR AND OUTDOOR TEMPERATURE RECORDS
1.SNOOZE / LIGHT:
-Press it to turn on the backlight for 5 seconds.
-Press it to stop the current alarm when it is sounding.
2.LCD display:
-Displays the time, date, month, day of the week, indoor/outdoor current temperature as well as the maximum and minimum indoor/outdoor temperature.
3.ALM ON/OFF:
-Press it once to turn on the Alarm and Snooze; press it twice to turn on the Temperature Alarm; press it again to turn off all of them.
-Press it to stop the current alarm when it is sounding.
4.MODE:
-Press it to switch between normal time mode and alarm time mode.
-Press and hold it for 2 seconds to enter the time setting mode.
-In setting mode, press it to step the setting items.
5.ADJ · °C/°F:
-Press it to switch between Celsius and Fahrenheit.
-In setting mode, press it to change the setting values.
6.MAX / MIN:
-Press it to check the minimum and maximum temperature records.
-Press and hold it for 3 seconds to delete the maximum and minimum temperature records.
7.RESET:
-Press it to reset all values to default values.
-In case of malfunction, the unit may be required to reset.
8.BATTERY COMPARTMENT:
-Accommodates 3 AA size batteries.
9.FIXED TABLE STAND:
-Use it to stand the clock on the desktop.
WEATHER STATION
1.Remove the battery door and insert 3 AA size batteries into the battery compartment. Make sure you insert them the right way according to the polarity information marked on the battery compartment.
2.Replace the battery door.
3.Press “RESET” key to restart the clock and it will synchronize with the transmitter automatically.
NOTE:
1.The building material and the position of receiver and transmitter affect the effective range. So try various locations to obtain the best result.
2.Place the unit away from metal objects and electrical appliances to minimize the interference. Position the receiver and transmitter within the effective transmission range: 100 feet in usual circumstances.
TIME AND CALENDAR SETTING
1.In normal time mode, press and hold “MODE” key for 2 seconds until the HOUR digit flashes.
2.Press “ADJ · °C/°F” key to change its value.
3.Repeat the above operations to set time and calendar in this order: Hour > Minute > Second > 12/24 Hr > Year > Month > Date.
4.Press “MODE” key to save and exit the setting mode, or let it exit automatically 30 seconds later without pressing any key.
ALARM TIME SETTING
1.In normal time mode, press “MODE” key to enter the alarm time mode.
2.Press and hold “MODE” key for 2 seconds to enter the alarm time setting mode until the HOUR digit flashes.
3.Press “ADJ · °C/°F” key to change its value.
4.Repeat the above operations to set the alarm Minute.
Change the temperature unit to °C for Celsius or °F for Fahrenheit by pressing the “ADJ · °C/°F” key.
NOTE:
1.If no signals are received or the transmission is interfered,
2.Relocate the clock or the transmitter in other positions and make sure the transmission is within the effective range of 100 feet approx.
3.After several unsuccessful attempts to receive the temperature signal, please remove the batteries from the sensor and main display unit and start the setup procedure again and decrease the distance between the sensor and main display unit.”
CHECKING AND DELETING MAX. /MIN. TEMPERATURE RECORDS
1.Press “MAX/MIN” key once to check the maximum temperature records. Press it twice to check the minimum records. Press it again to exit.
2.Press and hold “MAX/MIN” key for 3 seconds to delete the maximum and minimum temperature records.
MAX.temperature record MIN.temperature record
LOW BATTERY INDICATOR
When the LCD becomes dim, replace with 3 AA size batteries at once; while if the low battery indicator
“” appears on the LCD, it indicates that the battery power of the transmitter is not enough, and you should replace the batteries at once.