drawtube
Reflection of primary mirror clip
Reflective surface | Primary mirror |
of collimation | center mark |
cap |
|
Center
b.ring onc. primary mirror
a. |
|
|
|
d. |
| e. | |
|
|
|
|
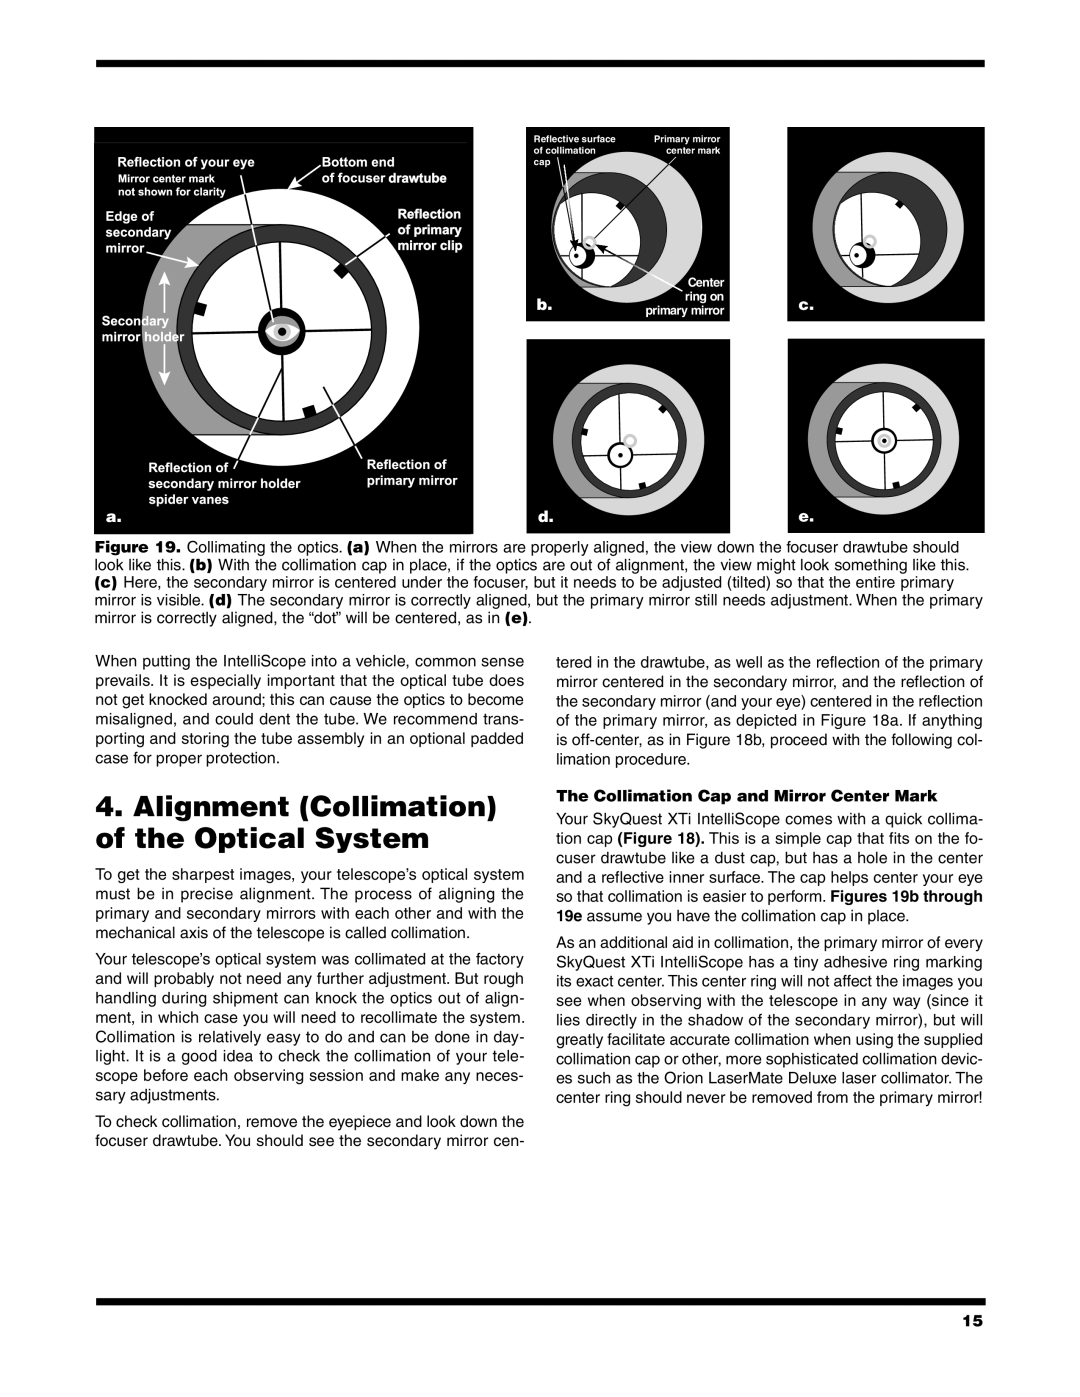
Figure 19. Collimating the optics. (a) When the mirrors are properly aligned, the view down the focuser drawtube should look like this. (b) With the collimation cap in place, if the optics are out of alignment, the view might look something like this.
(c)Here, the secondary mirror is centered under the focuser, but it needs to be adjusted (tilted) so that the entire primary
mirror is visible. (d) The secondary mirror is correctly aligned, but the primary mirror still needs adjustment. When the primary mirror is correctly aligned, the “dot” will be centered, as in (e).
When putting the IntelliScope into a vehicle, common sense prevails. It is especially important that the optical tube does not get knocked around; this can cause the optics to become misaligned, and could dent the tube. We recommend trans- porting and storing the tube assembly in an optional padded case for proper protection.
4.Alignment (Collimation) of the Optical System
To get the sharpest images, your telescope’s optical system must be in precise alignment. The process of aligning the primary and secondary mirrors with each other and with the mechanical axis of the telescope is called collimation.
Your telescope’s optical system was collimated at the factory and will probably not need any further adjustment. But rough handling during shipment can knock the optics out of align- ment, in which case you will need to recollimate the system. Collimation is relatively easy to do and can be done in day- light. It is a good idea to check the collimation of your tele- scope before each observing session and make any neces- sary adjustments.
To check collimation, remove the eyepiece and look down the focuser drawtube. You should see the secondary mirror cen-
tered in the drawtube, as well as the reflection of the primary mirror centered in the secondary mirror, and the reflection of the secondary mirror (and your eye) centered in the reflection of the primary mirror, as depicted in Figure 18a. If anything is
The Collimation Cap and Mirror Center Mark
Your SkyQuest XTi IntelliScope comes with a quick collima- tion cap (Figure 18). This is a simple cap that fits on the fo- cuser drawtube like a dust cap, but has a hole in the center and a reflective inner surface. The cap helps center your eye so that collimation is easier to perform. Figures 19b through 19e assume you have the collimation cap in place.
As an additional aid in collimation, the primary mirror of every SkyQuest XTi IntelliScope has a tiny adhesive ring marking its exact center. This center ring will not affect the images you see when observing with the telescope in any way (since it lies directly in the shadow of the secondary mirror), but will greatly facilitate accurate collimation when using the supplied collimation cap or other, more sophisticated collimation devic- es such as the Orion LaserMate Deluxe laser collimator. The center ring should never be removed from the primary mirror!
15