|
|
| Nylon | Eyepiece | |
|
|
| alignment |
|
|
|
|
|
|
| |
Objective | Finder | thumbscrew |
|
| |
(2) |
|
| |||
lens cell | scope |
|
| ||
|
|
| |||
|
| bracket |
|
|
|
|
|
|
|
| |
|
|
|
|
|
|
|
|
|
|
|
|
|
|
|
| ||
Focusing | prism housing | ||
lock ring | Tensioner | ||
|
| ||
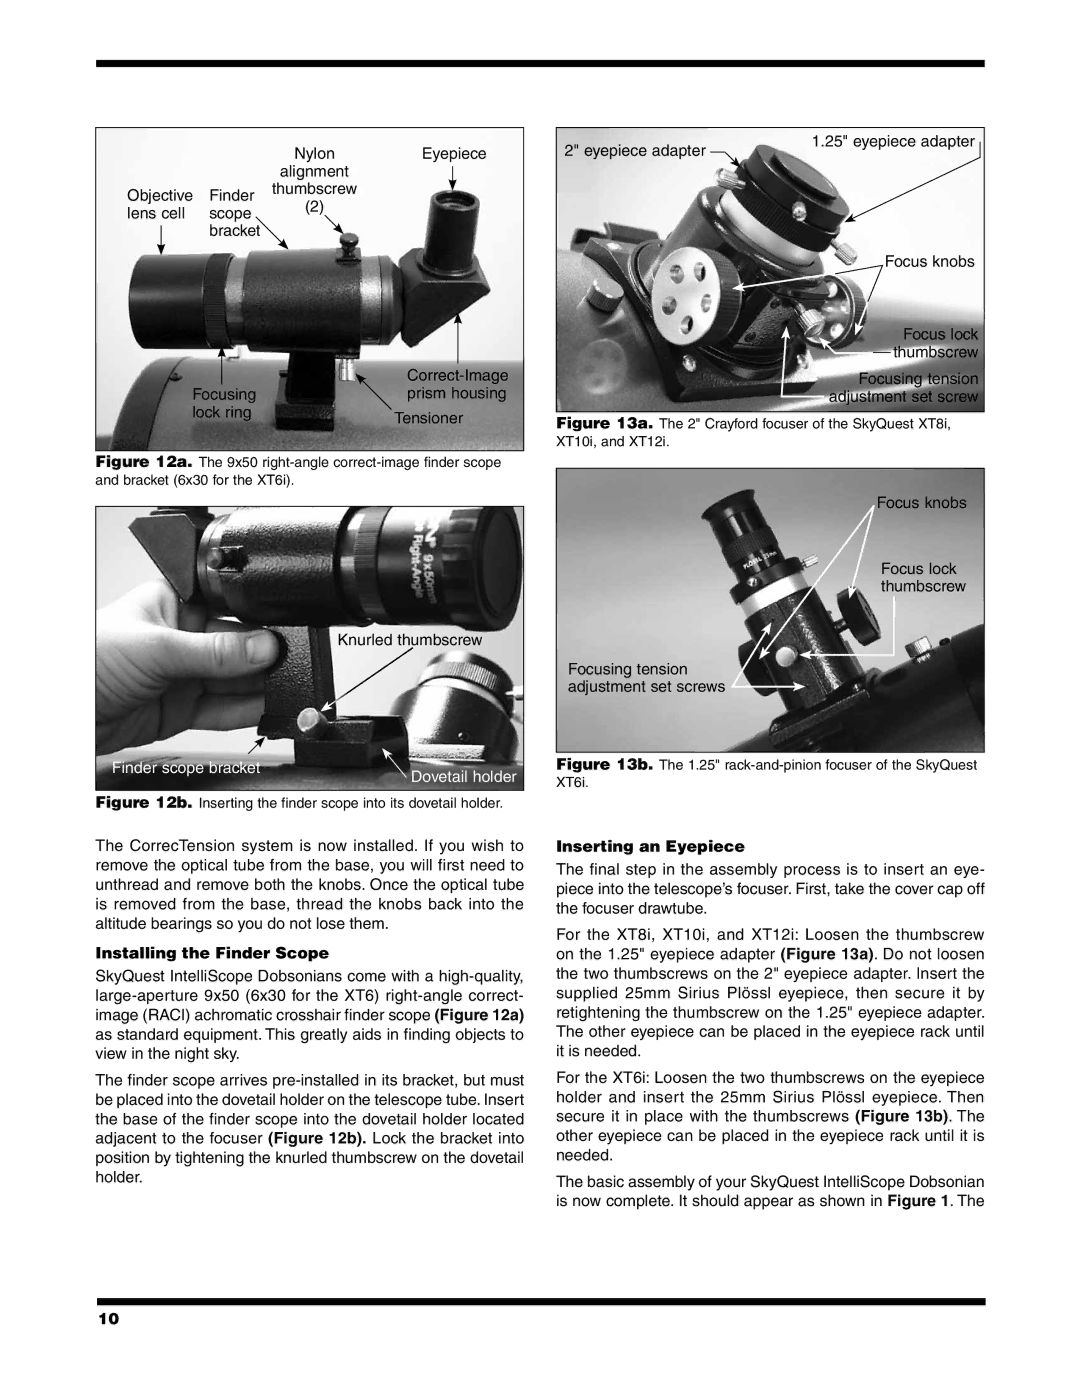
Figure 12a. The 9x50 right-angle correct-image finder scope and bracket (6x30 for the XT6i).
Knurled thumbscrew
Finder scope bracket | Dovetail holder |
|
Figure 12b. Inserting the finder scope into its dovetail holder.
The CorrecTension system is now installed. If you wish to remove the optical tube from the base, you will first need to unthread and remove both the knobs. Once the optical tube is removed from the base, thread the knobs back into the altitude bearings so you do not lose them.
Installing the Finder Scope
SkyQuest IntelliScope Dobsonians come with a
The finder scope arrives
2" eyepiece adapter | 1.25" eyepiece adapter |
|
Focus knobs
Focus lock
![]() thumbscrew
thumbscrew
Focusing tension adjustment set screw
Figure 13a. The 2" Crayford focuser of the SkyQuest XT8i, XT10i, and XT12i.
Focus knobs
Focus lock thumbscrew
Focusing tension adjustment set screws
Figure 13b. The 1.25" rack-and-pinion focuser of the SkyQuest XT6i.
Inserting an Eyepiece
The final step in the assembly process is to insert an eye- piece into the telescope’s focuser. First, take the cover cap off the focuser drawtube.
For the XT8i, XT10i, and XT12i: Loosen the thumbscrew on the 1.25" eyepiece adapter (Figure 13a). Do not loosen the two thumbscrews on the 2" eyepiece adapter. Insert the supplied 25mm Sirius Plössl eyepiece, then secure it by retightening the thumbscrew on the 1.25" eyepiece adapter. The other eyepiece can be placed in the eyepiece rack until it is needed.
For the XT6i: Loosen the two thumbscrews on the eyepiece holder and insert the 25mm Sirius Plössl eyepiece. Then secure it in place with the thumbscrews (Figure 13b). The other eyepiece can be placed in the eyepiece rack until it is needed.
The basic assembly of your SkyQuest IntelliScope Dobsonian is now complete. It should appear as shown in Figure 1. The
10
