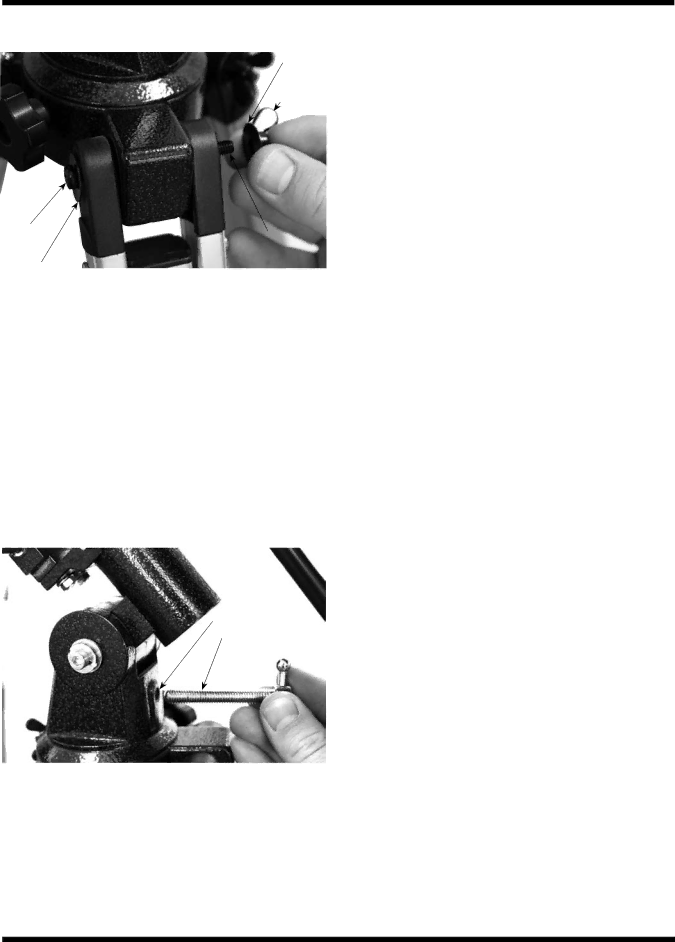
Washer
Wingnut
Screw head
Screw end
Washer
Figure 2. Attach the tripod legs to the mount with the screws that come installed in the tops of the tripod legs. One washer should go between the screw head and tripod leg and the other washer should go between the wingnut and tripod leg.
3.Stand the tripod and mount upright and spread the tripod legs apart as far as they will go, until the accessory tray bracket is taut. Connect the accessory tray to the acces- sory tray bracket with the three wing screws already installed in the tray. Do this by pushing the wing screws up through the holes in the accessory tray bracket and threading them into the holes in the accessory tray.
4.Next, tighten the screws at the tops of the tripod legs, so the legs are securely fastened to the mount. Use the Phillips head screwdriver and your fingers to do this.
5.Install the latitude adjustment
Threaded hole
Latitude adjustment
Figure 3. The latitude adjustment T-bolt goes into the threaded hole in the rear of the mount.
6.Orient the equatorial mount as it appears in Figure 1b. To do this, first loosen the latitude lock T-bolt, and turn the lati- tude adjustment T-bolt until the latitude scale pointer and the “40” on the latitude scale line up. Then retighten the latitude lock T-bolt. The declination (Dec.) and right ascen-
sion (R.A.) axes will need re-positioning (rotation) as well. Be sure to loosen the R.A. and Dec. lock knobs before doing this. Retighten the R.A. and Dec. lock knobs once the equatorial mount is oriented as shown in Figure 1b.
7.Thread the counterweight shaft into the equatorial mount at the base of the declination axis until tight.
8.Remove the screw and washer on the bottom of the coun- terweight shaft and slide the counterweight onto the shaft. Make sure the counterweight lock knob is adequately loosened to allow the counterweight shaft to pass through the hole. Position the counterweight about halfway up the shaft and tighten the lock knob. Replace the screw and washer on the end of the shaft.
9.Attach the two tube rings to the equatorial mount using the hex head screws that come installed in the rings. Remove the screws, then push them, with the washers still attached, up through the holes in the tube ring mount- ing plate (on the top of the equatorial mount) and rethread them into the bottom of the tube rings. Tighten the screws securely with the included wrench. Open the tube rings by loosening their knurled ring clamps.
10.Attach the two
11.Loosen and remove the reflex sight securing thumbnuts from the optical tube assembly. Place the holes in the base of the EZ Finder’s bracket over the two threaded shafts coming out of the optical tube. Replace the thumbnuts to secure the reflex sight to the optical tube. Refer to Figure 1a for the proper orientation of the EZ Finder II.
13.Remove the cap from the focuser and insert the 15mm Expanse eyepiece into the focuser drawtube. Secure it in place with the thumbscrews on the end of the drawtube.
Your StarBlast 4.5 EQ is now fully assembled and should resem- ble Figure 1a. Leave the dust cover on the front of the optical tube when it is not in use.
4. Getting Started
Now that the StarBlast 4.5 is assembled, the next things to do are to balance the telescope about its axes of motion, and to align the reflex sight with the telescope.
Balancing the Telescope
To insure smooth movement of the telescope on both axes of the equatorial mount, it is imperative that the optical tube be properly balanced. First balance the telescope with respect to the R.A. axis, then the Dec. axis.
4 | 4 |
