of astronomical objects, thereby keeping them from drifting out of the telescope’s field of view while you’re observing.
This is accomplished by slowly rotating the telescope on its right ascension (R.A.) axis, using only the R.A.
Polar Alignment
For Northern Hemisphere observers, approximate polar align- ment is achieved by pointing the mount’s right ascension axis at the North Star (Polaris). It lies within 1° of the north celestial pole (NCP), which is an extension of the Earth’s rotational axis out into space. Stars in the Northern Hemisphere appear to revolve around the NCP.
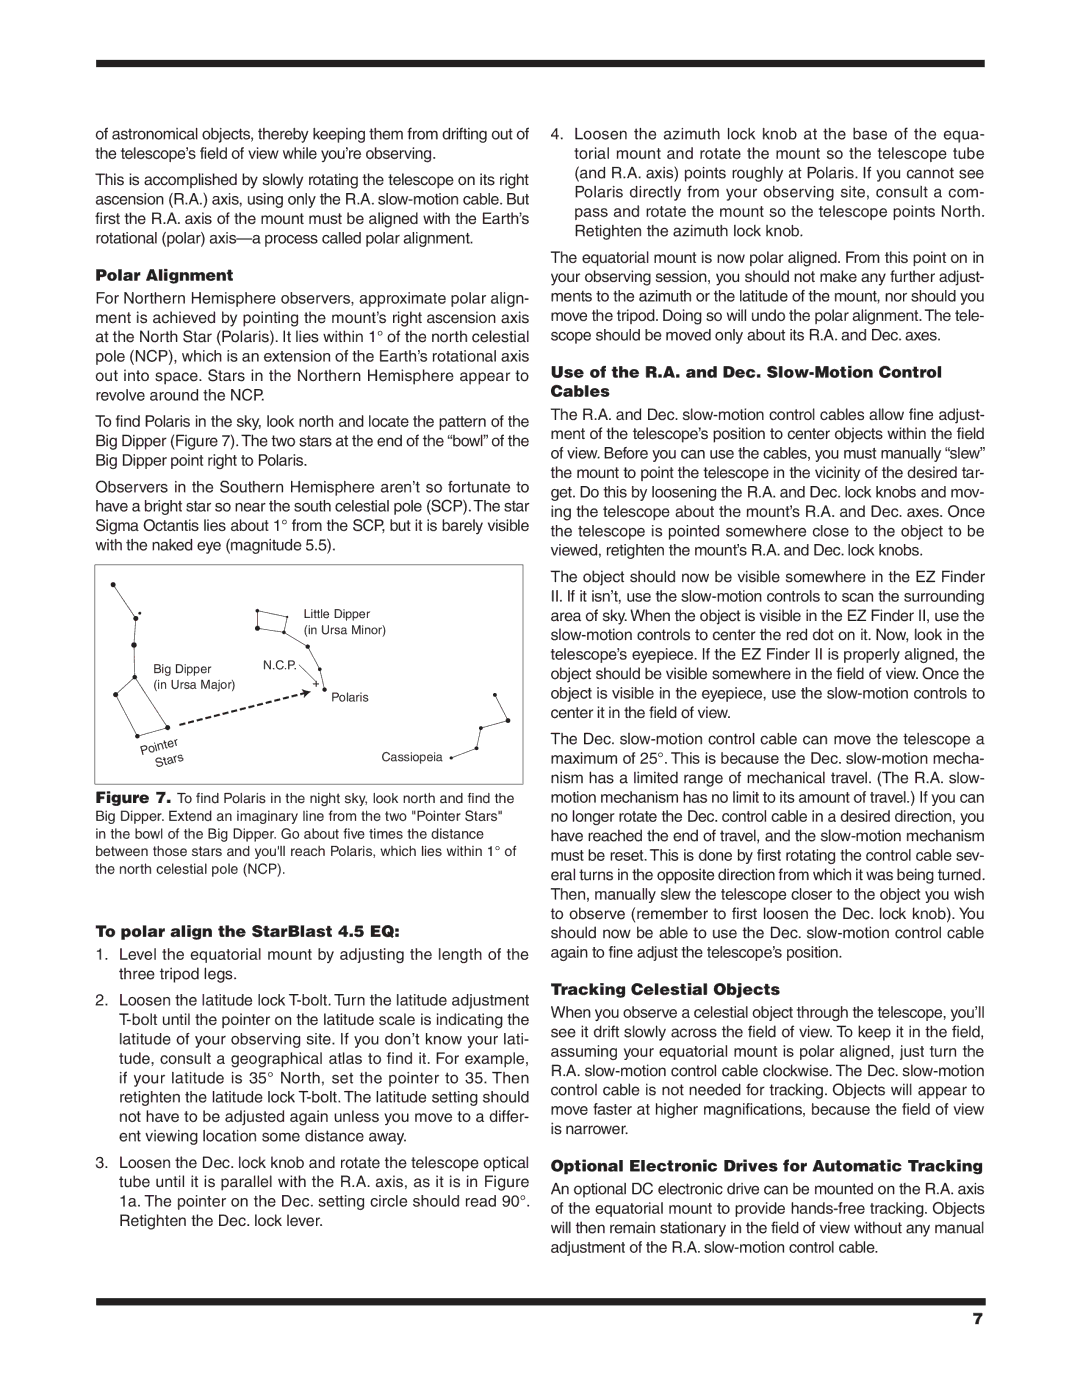
To find Polaris in the sky, look north and locate the pattern of the Big Dipper (Figure 7). The two stars at the end of the “bowl” of the Big Dipper point right to Polaris.
Observers in the Southern Hemisphere aren’t so fortunate to have a bright star so near the south celestial pole (SCP). The star Sigma Octantis lies about 1° from the SCP, but it is barely visible with the naked eye (magnitude 5.5).
| Little Dipper | |||
| (in Ursa Minor) | |||
Big Dipper | N.C.P. | |||
|
|
|
| |
(in Ursa Major) |
|
|
| Polaris |
|
|
| ||
|
|
|
| |
Pointer |
|
|
| Cassiopeia |
Stars |
|
|
| |
|
|
|
| |
Figure 7. To find Polaris in the night sky, look north and find the Big Dipper. Extend an imaginary line from the two "Pointer Stars" in the bowl of the Big Dipper. Go about five times the distance between those stars and you'll reach Polaris, which lies within 1° of the north celestial pole (NCP).
To polar align the StarBlast 4.5 EQ:
1.Level the equatorial mount by adjusting the length of the three tripod legs.
2.Loosen the latitude lock
3.Loosen the Dec. lock knob and rotate the telescope optical tube until it is parallel with the R.A. axis, as it is in Figure 1a. The pointer on the Dec. setting circle should read 90°.
Retighten the Dec. lock lever.
4.Loosen the azimuth lock knob at the base of the equa- torial mount and rotate the mount so the telescope tube (and R.A. axis) points roughly at Polaris. If you cannot see Polaris directly from your observing site, consult a com- pass and rotate the mount so the telescope points North. Retighten the azimuth lock knob.
The equatorial mount is now polar aligned. From this point on in your observing session, you should not make any further adjust- ments to the azimuth or the latitude of the mount, nor should you move the tripod. Doing so will undo the polar alignment. The tele- scope should be moved only about its R.A. and Dec. axes.
Use of the R.A. and Dec. Slow-Motion Control Cables
The R.A. and Dec.
The object should now be visible somewhere in the EZ Finder
II.If it isn’t, use the
The Dec.
Tracking Celestial Objects
When you observe a celestial object through the telescope, you’ll see it drift slowly across the field of view. To keep it in the field, assuming your equatorial mount is polar aligned, just turn the R.A.
Optional Electronic Drives for Automatic Tracking
An optional DC electronic drive can be mounted on the R.A. axis of the equatorial mount to provide
7