Once the secondary mirror is centered in the focuser drawtube, and the primary mirror reflection is centered in the secondary mirror, the secondary mirror is properly aligned, and no further adjustments to it should be needed.
Aligning the Primary Mirror
The final adjustment is made to the primary mirror. It will need adjustment if, as in Figure 9d, the secondary mirror is centered in the focuser drawtube and the reflection of the primary mir- ror is centered in the secondary mirror, but the small reflection of the secondary mirror (with the “dot” of the collimating cap) is
The tilt of the primary mirror is adjusted with the three large knurled thumbscrews on the rear end of the optical tube (back of the mirror cell) (Figure 13). The small thumbscrews (with slots in them) serve to lock the mirror in place. Start by loosening each of these smaller thumbscrews a few turns. Use a screwdriver in the slots, if necessary. Now adjust the tilt of the primary mirror by turning one of the large thumbscrews either clockwise or coun- terclockwise. Look into the focuser and see if the secondary mir- ror reflection has moved closer to the center of the primary mirror reflection. You can determine this easily with the collimating cap and primary mirror center mark by simply watching to see if the “dot” of the collimating cap is moving closer or farther away from the “ring” on the primary mirror. If it isn’t getting closer, try turning the thumbscrew in the opposite direction. Repeat this process for the other two large thumbscrews, if necessary. It will take a little
When you have the dot centered as much as possible in the ring, your primary mirror is aligned. The view through the col- limating cap should resemble Figure 9e. Make sure the smaller thumbscrews on the back of the mirror cell are tightened to lock the primary mirror in position.
A simple star test will tell you whether the optics are, in fact, accurately aligned.
Figure 13. The tilt of the primary mirror is adjusted by turning the three larger thumbscrews.
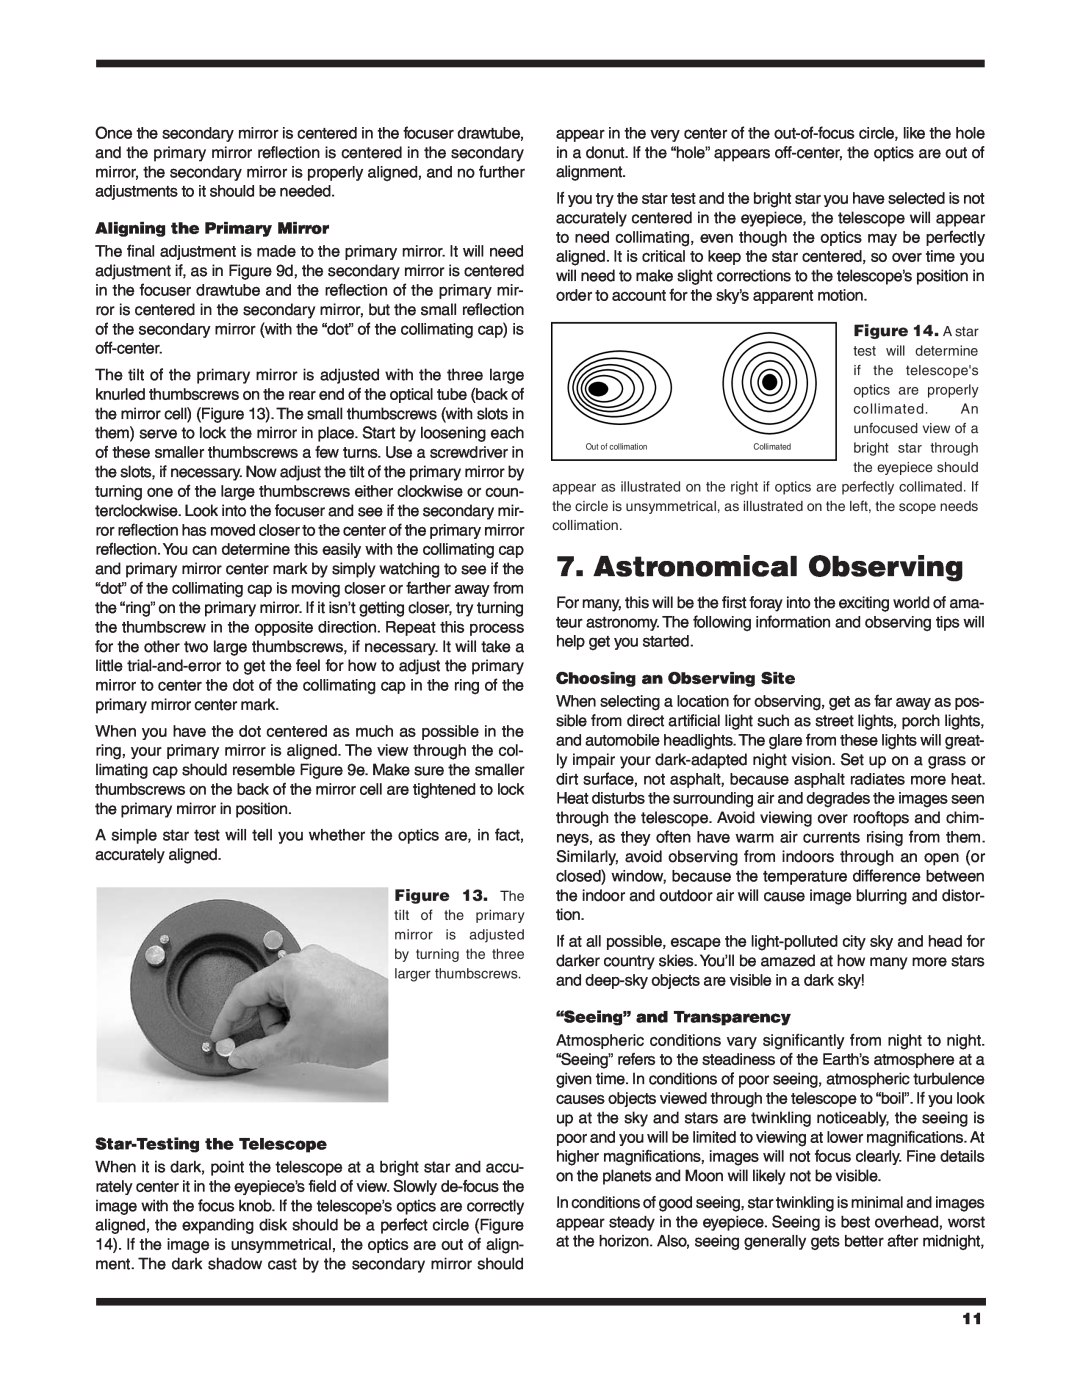
Star-Testing the Telescope
When it is dark, point the telescope at a bright star and accu- rately center it in the eyepiece’s field of view. Slowly
appear in the very center of the
If you try the star test and the bright star you have selected is not accurately centered in the eyepiece, the telescope will appear to need collimating, even though the optics may be perfectly aligned. It is critical to keep the star centered, so over time you will need to make slight corrections to the telescope’s position in order to account for the sky’s apparent motion.
|
| Figure 14. A star | ||
|
| test will determine | ||
|
| if the | telescope's | |
|
| optics | are properly | |
|
| collimated. | An | |
|
| unfocused view of a | ||
Out of collimation | Collimated | bright | star | through |
|
| the eyepiece should | ||
appear as illustrated on the right if optics are perfectly collimated. If the circle is unsymmetrical, as illustrated on the left, the scope needs collimation.
7. Astronomical Observing
For many, this will be the first foray into the exciting world of ama- teur astronomy. The following information and observing tips will help get you started.
Choosing an Observing Site
When selecting a location for observing, get as far away as pos- sible from direct artificial light such as street lights, porch lights, and automobile headlights.The glare from these lights will great- ly impair your
If at all possible, escape the
“Seeing” and Transparency
Atmospheric conditions vary significantly from night to night. “Seeing” refers to the steadiness of the Earth’s atmosphere at a given time. In conditions of poor seeing, atmospheric turbulence causes objects viewed through the telescope to “boil”. If you look up at the sky and stars are twinkling noticeably, the seeing is poor and you will be limited to viewing at lower magnifications. At higher magnifications, images will not focus clearly. Fine details on the planets and Moon will likely not be visible.
In conditions of good seeing, star twinkling is minimal and images appear steady in the eyepiece. Seeing is best overhead, worst at the horizon. Also, seeing generally gets better after midnight,
11