turning the power knob. For best results when stargazing, use the dimmest possible setting that allows you to see the dot without difficulty. Typically, a dim setting is used under dark skies and a bright setting is used under
At the end of your observing session, be sure to turn the power knob counterclockwise until it clicks off. When the two white dots on the EZ Finder II’s rail and power knob are lined up, the EZ Finder II is turned off.
Aligning the EZ Finder II
When the EZ Finder II is properly aligned with the telescope, an object that is centered on the EZ Finder II’s red dot should also appear in the center of the field of view of the telescope’s eyepiece. Alignment of the EZ Finder II is easiest during day- light, before observing at night. Aim the telescope at a dis- tant object at least 1/4 mile away, such as a telephone pole or chimney and center it in the telescope’s eyepiece. Now, turn the EZ Finder II on and look through it. The object will appear in the field of view near the red dot.
Note: The image in the eyepiece of the telescope will be
Without moving the telescope, use the EZ Finder II’s azimuth (left/right) and altitude (up/down) adjustment knobs to position the red dot on the object in the eyepiece.
When the red dot is centered on the distant object, check to make sure that the object is still centered in the telescope’s field of view. If not, recenter it and adjust the EZ Finder II’s alignment again. When the object is centered in the eyepiece and on the red dot, the EZ Finder II is properly aligned with the telescope.
Once aligned, EZ Finder II will usually hold its alignment even after being removed from its bracket. If the EZ Finder II’s bracket is removed entirely from the optical tube then realign- ment will be needed.
5.Setting up and Using the Equatorial Mount
When you look at the night sky, you no doubt have noticed that the stars appear to move slowly from east to west over time. That apparent motion is caused by the Earth’s rotation (from west to east). An equatorial mount (Figure 2) is designed to compensate for that motion, allowing you to easily “track” the movement of astronomical objects, thereby keeping them from drifting out of the telescope’s field of view while you’re observing.
This is accomplished by slowly rotating the telescope on its right ascension (R.A.) axis, using only the R.A.
| Little Dipper |
Big Dipper | (in Ursa Minor) |
| |
(in Ursa |
|
Major) | N.C.P. |
Polaris
Cassiopeia![]()
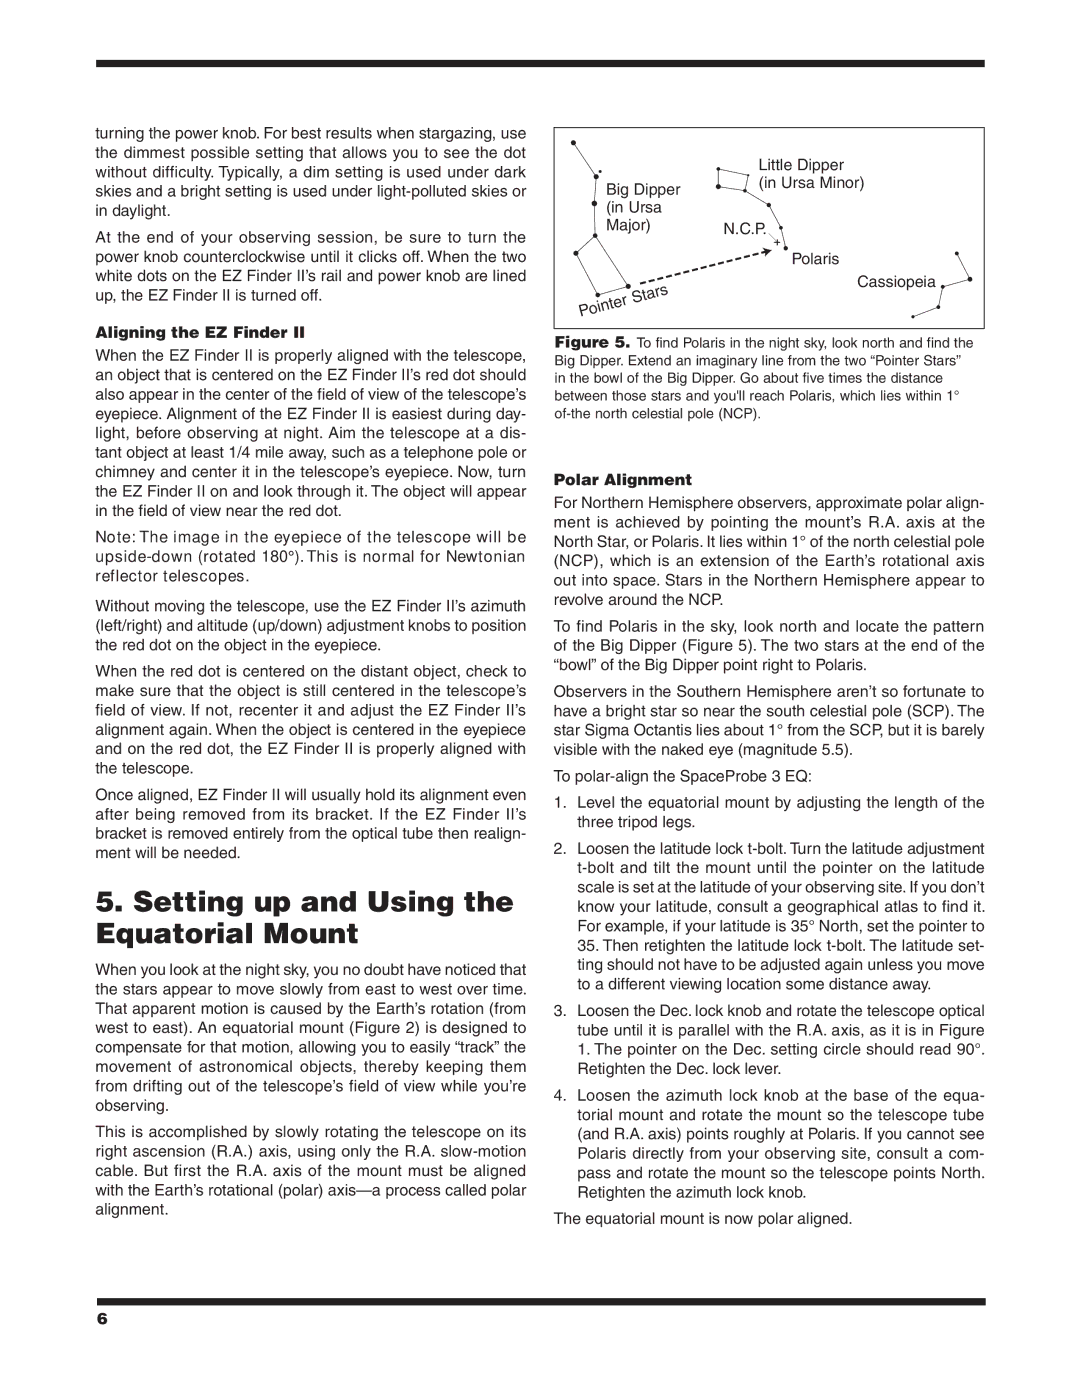
Figure 5. To find Polaris in the night sky, look north and find the Big Dipper. Extend an imaginary line from the two “Pointer Stars” in the bowl of the Big Dipper. Go about five times the distance between those stars and you'll reach Polaris, which lies within 1° of‑the north celestial pole (NCP).
Polar Alignment
For Northern Hemisphere observers, approximate polar align- ment is achieved by pointing the mount’s R.A. axis at the North Star, or Polaris. It lies within 1° of the north celestial pole (NCP), which is an extension of the Earth’s rotational axis out into space. Stars in the Northern Hemisphere appear to revolve around the NCP.
To find Polaris in the sky, look north and locate the pattern of the Big Dipper (Figure 5). The two stars at the end of the “bowl” of the Big Dipper point right to Polaris.
Observers in the Southern Hemisphere aren’t so fortunate to have a bright star so near the south celestial pole (SCP). The star Sigma Octantis lies about 1° from the SCP, but it is barely visible with the naked eye (magnitude 5.5).
To
1.Level the equatorial mount by adjusting the length of the three tripod legs.
2.Loosen the latitude lock
35.Then retighten the latitude lock
3.Loosen the Dec. lock knob and rotate the telescope optical tube until it is parallel with the R.A. axis, as it is in Figure
1.The pointer on the Dec. setting circle should read 90°. Retighten the Dec. lock lever.
4.Loosen the azimuth lock knob at the base of the equa- torial mount and rotate the mount so the telescope tube (and R.A. axis) points roughly at Polaris. If you cannot see Polaris directly from your observing site, consult a com- pass and rotate the mount so the telescope points North. Retighten the azimuth lock knob.
The equatorial mount is now polar aligned.
6