Note: The following appendices apply to the Sirius EQ-G with GoTo hand controller only.

Appendix A: Enhancing the Pointing Accuracy

The Sirius EQ-G produces pointing accuracy adequate for most applications. If higher accuracy is required, “cone error” calibration may be necessary.

Cone Error Calibration

“Cone error” is found in all German equatorial mounted telescopes. Cone error results from the optical axis of the tele- scope not being aligned to the R.A. axis of the mount. This affects the pointing accuracy of the Sirius EQ-G. Three-star alignment automatically compensates for some of the cone error, but pointing accuracy will be optimized by mechanically minimizing the cone error. The following calibration procedure should be performed before the initial use of the telescope and periodically thereafter to ensure peak accuracy.

Testing for Cone Error

This test is performed at night using two bright stars located on opposite hemispheres of the night sky. Confirm the telescope is properly polar-aligned using the polar axis finder scope. Perform the one-star alignment using an eastern star as the alignment star (see “One-Star Alignment”). After completing the star alignment, choose a bright star in the western sky from the Sirius EQ-G object database and press ENTER to slew the telescope to the star. If the optical axis is perfectly aligned to the R.A. axis, the telescope will accurately put the star in the center of the eyepiece. This shows that there is no significant cone error in your telescope setup and you will not need to perform the calibration. It is acceptable if the star is slightly off- center as long as it appears in the eyepiece field of view and reasonable close to the center. Many factors determine the pointing accuracy of the Sirius EQ-G. Incorrect star alignment, loose R.A. or Dec. lock-knobs, or cone error. If the Sirius EQ-G puts the star outside the eyepiece field of view, you need to determine which of these factors is causing the pointing inac- curacy. To determine if the inaccuracy is caused by cone error, simply move the telescope about the R.A. axis by pressing the Left or Right direction button. If the star can be moved into the eyepiece field of view without adjusting the Dec. axis, it is likely that cone error exists in your telescope setup.

Cone Error Calibration Procedure

1.Insert an illuminated reticle eyepiece (not supplied) into the focuser (or diagonal) of the telescope. Confirm the tele- scope is properly set up and balanced, and the finderscope is aligned with the optical tube of the telescope. The mount also needs to be accurately polar aligned.

Note: Steps 2 to 4 are to identify R.A. and DEC movements in the reticle eyepiece. If you are already familiar with the move- ments, proceed to step 5.

2.Find a bright star and position the telescope so the star is centered in the eyepiece field of view.

3.Look into the eyepiece. Move the telescope about the R.A. axis using the R.A. direction buttons on the hand controller while carefully observing the movement of the star.

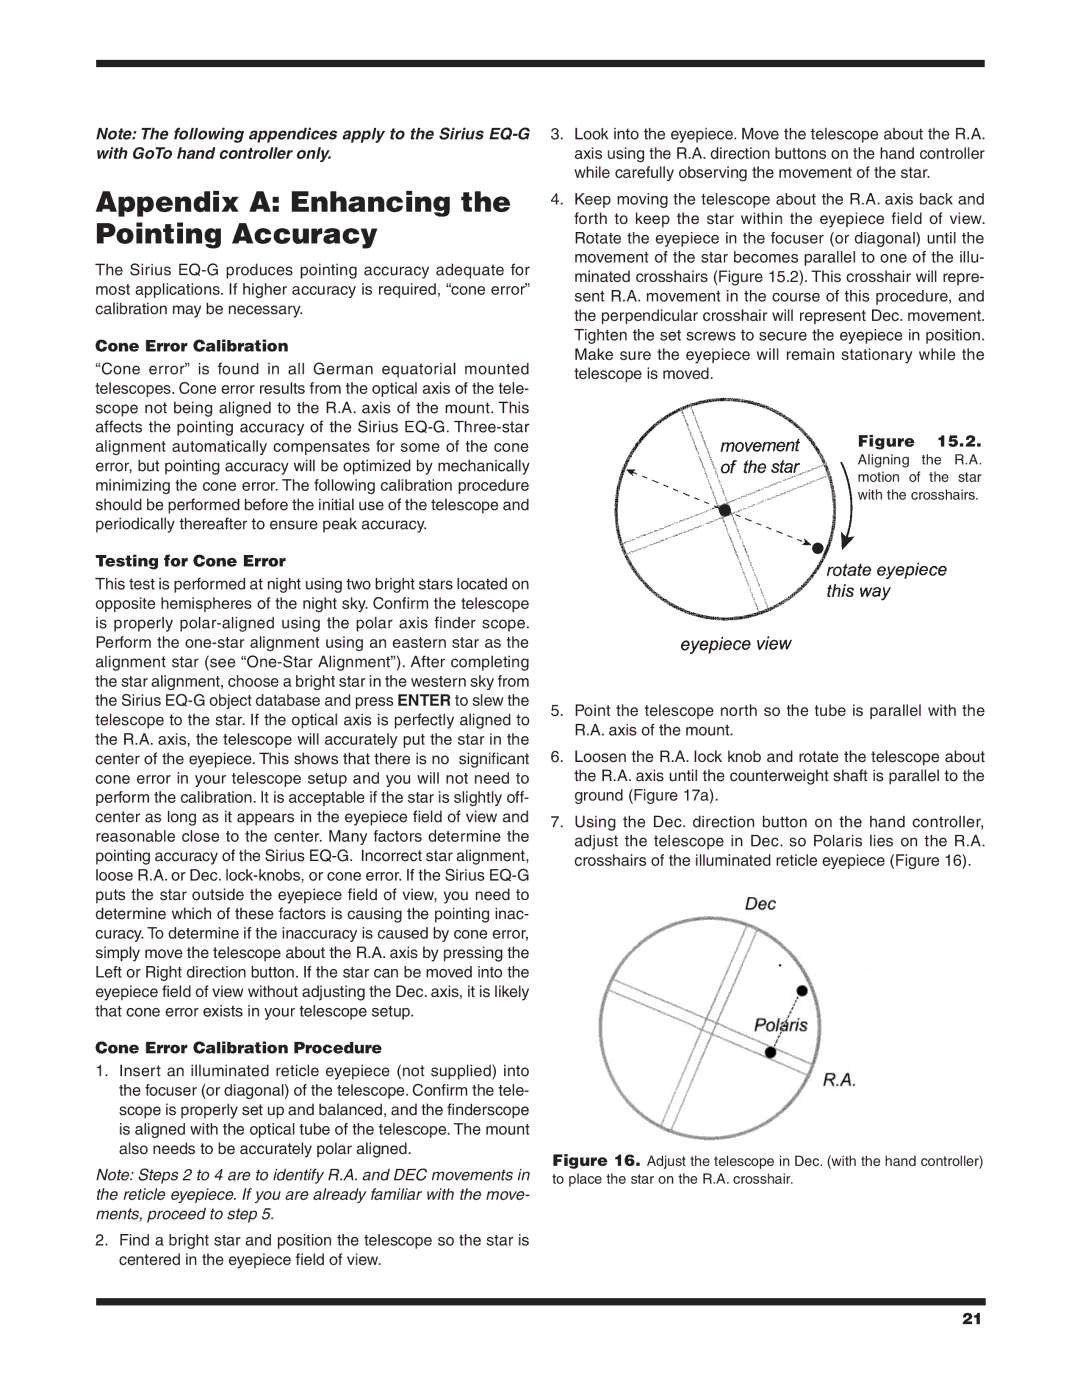
4.Keep moving the telescope about the R.A. axis back and forth to keep the star within the eyepiece field of view. Rotate the eyepiece in the focuser (or diagonal) until the movement of the star becomes parallel to one of the illu- minated crosshairs (Figure 15.2). This crosshair will repre- sent R.A. movement in the course of this procedure, and the perpendicular crosshair will represent Dec. movement. Tighten the set screws to secure the eyepiece in position. Make sure the eyepiece will remain stationary while the telescope is moved.

Figure 15.2.

Aligning the R.A. motion of the star with the crosshairs.

5.Point the telescope north so the tube is parallel with the R.A. axis of the mount.

6.Loosen the R.A. lock knob and rotate the telescope about the R.A. axis until the counterweight shaft is parallel to the ground (Figure 17a).

7.Using the Dec. direction button on the hand controller, adjust the telescope in Dec. so Polaris lies on the R.A. crosshairs of the illuminated reticle eyepiece (Figure 16).

.

Figure 16. Adjust the telescope in Dec. (with the hand controller) to place the star on the R.A. crosshair.

21

Page 21
Image 21
Orion 9995 instruction manual Appendix a Enhancing the Pointing Accuracy, Cone Error Calibration, Testing for Cone Error

9995 specifications

The Orion 9995 is a standout model in the realm of modern technology, delivering exceptional performance and innovative features tailored to meet the demands of today’s users. This high-end device represents a perfect blend of cutting-edge engineering and user-centric design.

At the heart of the Orion 9995 is its powerful processor, which ensures seamless multitasking and efficient performance across various applications. Users can tackle complex tasks, from gaming to professional software, without any noticeable lag. This capability is further enhanced by the device's generous RAM, allowing for smooth operation even when running multiple applications simultaneously.

One of the hallmark features of the Orion 9995 is its high-resolution display. The screen boasts vibrant colors and sharp images, creating an immersive viewing experience whether you are watching videos, playing games, or working on graphic design projects. The display also supports advanced touch technology, making navigation intuitive and responsive.

The device incorporates state-of-the-art graphics technology that enhances visual performance. This enables users to enjoy high-quality gaming experiences and allows for efficient handling of graphic-intensive applications. The integration of advanced GPUs sets the Orion 9995 apart in its class, making it a preferred choice for gamers and creative professionals alike.

Robust connectivity options are another defining characteristic of the Orion 9995. It supports a range of wireless technologies, including the latest Bluetooth and Wi-Fi standards, ensuring users remain connected with minimal interruptions. Additionally, multiple USB ports and expansion slots provide versatility for various peripherals and accessories.

In terms of battery life, the Orion 9995 excels with a long-lasting power source that ensures users can stay productive throughout the day without constantly seeking a power outlet. Fast charging technology also means that when the battery does run low, users can quickly recharge and return to their tasks.

The build quality of the Orion 9995 is impressive, featuring a sleek and durable design that combines aesthetics with functionality. Its ergonomic design ensures comfort during extended use, making it suitable for both professional and casual users.

In summary, the Orion 9995 is a powerhouse of technology, boasting advanced performance capabilities, a stunning display, robust graphics, extensive connectivity options, and impressive battery life. These features make it an ideal choice for anyone seeking a reliable and high-performance device.