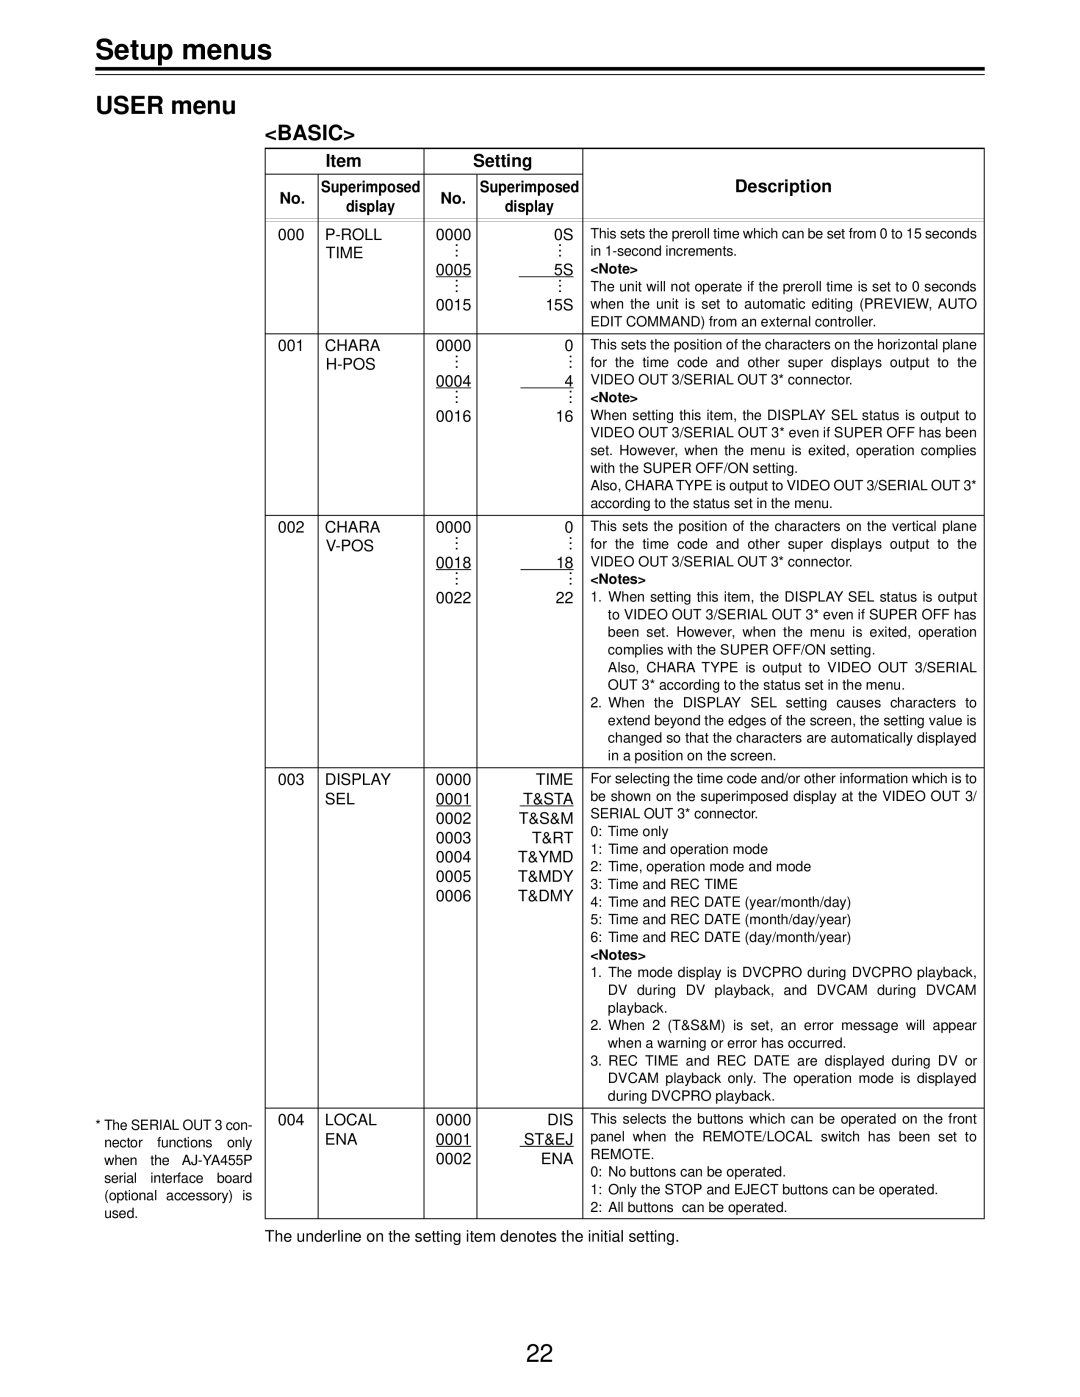
Setup menus
USER menu
*The SERIAL OUT 3 con- nector functions only when the
<BASIC>
| Item |
| Setting |
| ||
|
|
|
|
|
| Description |
No. | Superimposed | No. |
| Superimposed | ||
display |
| display |
| |||
|
|
|
| |||
|
|
|
|
|
|
|
|
|
|
|
|
|
|
000 | 0000 |
|
| 0S | This sets the preroll time which can be set from 0 to 15 seconds | |
|
| . |
| . |
| |
| TIME | . |
| . | in | |
| . |
| . | |||
|
| 0005 |
|
| 5S | <Note> |
|
| . |
| . |
| |
|
| . |
| . | The unit will not operate if the preroll time is set to 0 seconds | |
|
| . |
| . | ||
|
| 0015 |
|
| 15S | when the unit is set to automatic editing (PREVIEW, AUTO |
|
|
|
|
|
| EDIT COMMAND) from an external controller. |
|
|
|
|
|
|
|
001 | CHARA | 0000 |
| 0 | This sets the position of the characters on the horizontal plane | |
|
| . |
| . |
| |
|
| . |
| . | for the time code and other super displays output to the | |
| . |
| . | |||
|
| 0004 |
| 4 | VIDEO OUT 3/SERIAL OUT 3* connector. | |
|
| . |
|
| . |
|
|
| . |
| . | <Note> | |
|
| . |
| . | ||
|
| 0016 |
| 16 | When setting this item, the DISPLAY SEL status is output to | |
|
|
|
|
|
| VIDEO OUT 3/SERIAL OUT 3* even if SUPER OFF has been |
|
|
|
|
|
| set. However, when the menu is exited, operation complies |
|
|
|
|
|
| with the SUPER OFF/ON setting. |
|
|
|
|
|
| Also, CHARA TYPE is output to VIDEO OUT 3/SERIAL OUT 3* |
|
|
|
|
|
| according to the status set in the menu. |
|
|
|
|
|
| |
002 | CHARA | 0000 |
| 0 | This sets the position of the characters on the vertical plane | |
|
| . |
| . |
| |
| . |
| . | for the time code and other super displays output to the | ||
| . |
|
| . | ||
|
| 0018 |
| 18 | VIDEO OUT 3/SERIAL OUT 3* connector. | |
|
| . |
|
| . |
|
|
| . |
| . | <Notes> | |
|
| . |
| . | ||
|
| 0022 |
| 22 | 1. When setting this item, the DISPLAY SEL status is output | |
|
|
|
|
|
| to VIDEO OUT 3/SERIAL OUT 3* even if SUPER OFF has |
|
|
|
|
|
| been set. However, when the menu is exited, operation |
|
|
|
|
|
| complies with the SUPER OFF/ON setting. |
|
|
|
|
|
| Also, CHARA TYPE is output to VIDEO OUT 3/SERIAL |
|
|
|
|
|
| OUT 3* according to the status set in the menu. |
|
|
|
|
|
| 2. When the DISPLAY SEL setting causes characters to |
|
|
|
|
|
| extend beyond the edges of the screen, the setting value is |
|
|
|
|
|
| changed so that the characters are automatically displayed |
|
|
|
|
|
| in a position on the screen. |
|
|
|
|
|
|
|
003 | DISPLAY | 0000 |
|
| TIME | For selecting the time code and/or other information which is to |
| SEL | 0001 |
|
| T&STA | be shown on the superimposed display at the VIDEO OUT 3/ |
|
| 0002 |
| T&S&M | SERIAL OUT 3* connector. | |
|
| 0003 |
|
| T&RT | 0: Time only |
|
|
|
| 1: Time and operation mode | ||
|
| 0004 |
| T&YMD | ||
|
|
| 2: Time, operation mode and mode | |||
|
| 0005 |
| T&MDY | ||
|
|
| 3: Time and REC TIME | |||
|
| 0006 |
| T&DMY | ||
|
|
| 4: Time and REC DATE (year/month/day) | |||
|
|
|
|
|
| |
|
|
|
|
|
| 5: Time and REC DATE (month/day/year) |
|
|
|
|
|
| 6: Time and REC DATE (day/month/year) |
|
|
|
|
|
| <Notes> |
|
|
|
|
|
| 1. The mode display is DVCPRO during DVCPRO playback, |
|
|
|
|
|
| DV during DV playback, and DVCAM during DVCAM |
|
|
|
|
|
| playback. |
|
|
|
|
|
| 2. When 2 (T&S&M) is set, an error message will appear |
|
|
|
|
|
| when a warning or error has occurred. |
|
|
|
|
|
| 3. REC TIME and REC DATE are displayed during DV or |
|
|
|
|
|
| DVCAM playback only. The operation mode is displayed |
|
|
|
|
|
| during DVCPRO playback. |
|
|
|
|
|
|
|
004 | LOCAL | 0000 |
|
| DIS | This selects the buttons which can be operated on the front |
| ENA | 0001 |
|
| ST&EJ | panel when the REMOTE/LOCAL switch has been set to |
|
| 0002 |
|
| ENA | REMOTE. |
|
|
|
|
|
| 0: No buttons can be operated. |
|
|
|
|
|
| 1: Only the STOP and EJECT buttons can be operated. |
|
|
|
|
|
| 2: All buttons can be operated. |
|
|
|
|
|
|
|
The underline on the setting item denotes the initial setting.
22