2 | Make a hole for a cable. |
|
| Hole for a cable | • Make a 25 mm hole |
| 25 mm | |
|
| where is 65 mm away |
|
| from the center in the |
| 65 mm | plate. |
3 | Attach the rubbers and dents on the camera to the Ceiling |
Plate A and attach them firmly. |
Fit the four rubbers in place.
Fit the two dents in place.
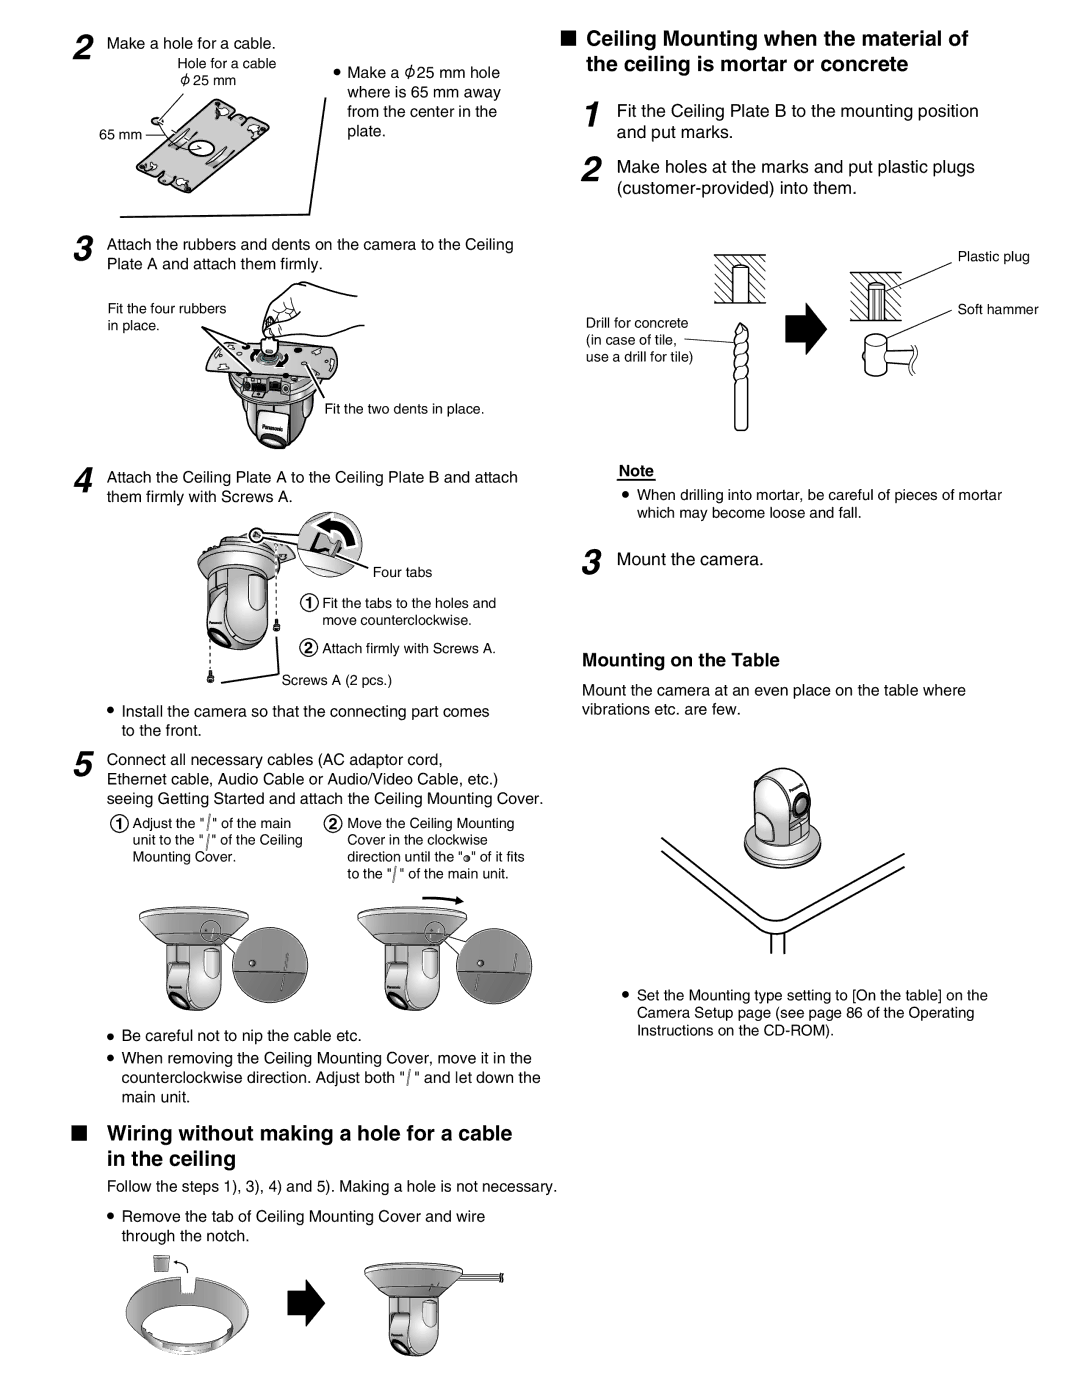
![]() Ceiling Mounting when the material of the ceiling is mortar or concrete
Ceiling Mounting when the material of the ceiling is mortar or concrete
1 | Fit the Ceiling Plate B to the mounting position |
| and put marks. |
2 | Make holes at the marks and put plastic plugs |
|
|
Plastic plug
Soft hammer
Drill for concrete (in case of tile, ![]() use a drill for tile)
use a drill for tile)
4 | Attach the Ceiling Plate A to the Ceiling Plate B and attach |
| them firmly with Screws A. |
| Four tabs |
| 1 Fit the tabs to the holes and |
| move counterclockwise. |
| 2 Attach firmly with Screws A. |
![]()
![]() Screws A (2 pcs.)
Screws A (2 pcs.)
•Install the camera so that the connecting part comes to the front.
5 | Connect all necessary cables (AC adaptor cord, |
Ethernet cable, Audio Cable or Audio/Video Cable, etc.) | |
| seeing Getting Started and attach the Ceiling Mounting Cover. |
1 Adjust the " | " of the main | 2 Move the Ceiling Mounting |
unit to the " | " of the Ceiling | Cover in the clockwise |
Mounting Cover. | direction until the " " of it fits | |
|
| to the " " of the main unit. |
•Be careful not to nip the cable etc.
•When removing the Ceiling Mounting Cover, move it in the counterclockwise direction. Adjust both "![]() " and let down the main unit.
" and let down the main unit.
Wiring without making a hole for a cable in the ceiling
Follow the steps 1), 3), 4) and 5). Making a hole is not necessary.
•Remove the tab of Ceiling Mounting Cover and wire through the notch.
Note
•When drilling into mortar, be careful of pieces of mortar which may become loose and fall.
3 Mount the camera.
Mounting on the Table
Mount the camera at an even place on the table where vibrations etc. are few.
•Set the Mounting type setting to [On the table] on the Camera Setup page (see page 86 of the Operating Instructions on the