Connect the LAN cable to the camera and the router. Connect the AC adaptor cord to the DC IN jack.

Connections

Before proceeding, confirm that your PC is connected to your router and can access the Internet. Also confirm that your router’s UPnPfeature is enabled. (Most routers have UPnPturned off by default.) Refer to the operating instructions included with your router or to the Panasonic Network Camera website (http:// panasonic.co.jp/pcc/products/en/netwkcam/) for more information.

When connecting the camera using PoE (Power over Ethernet)

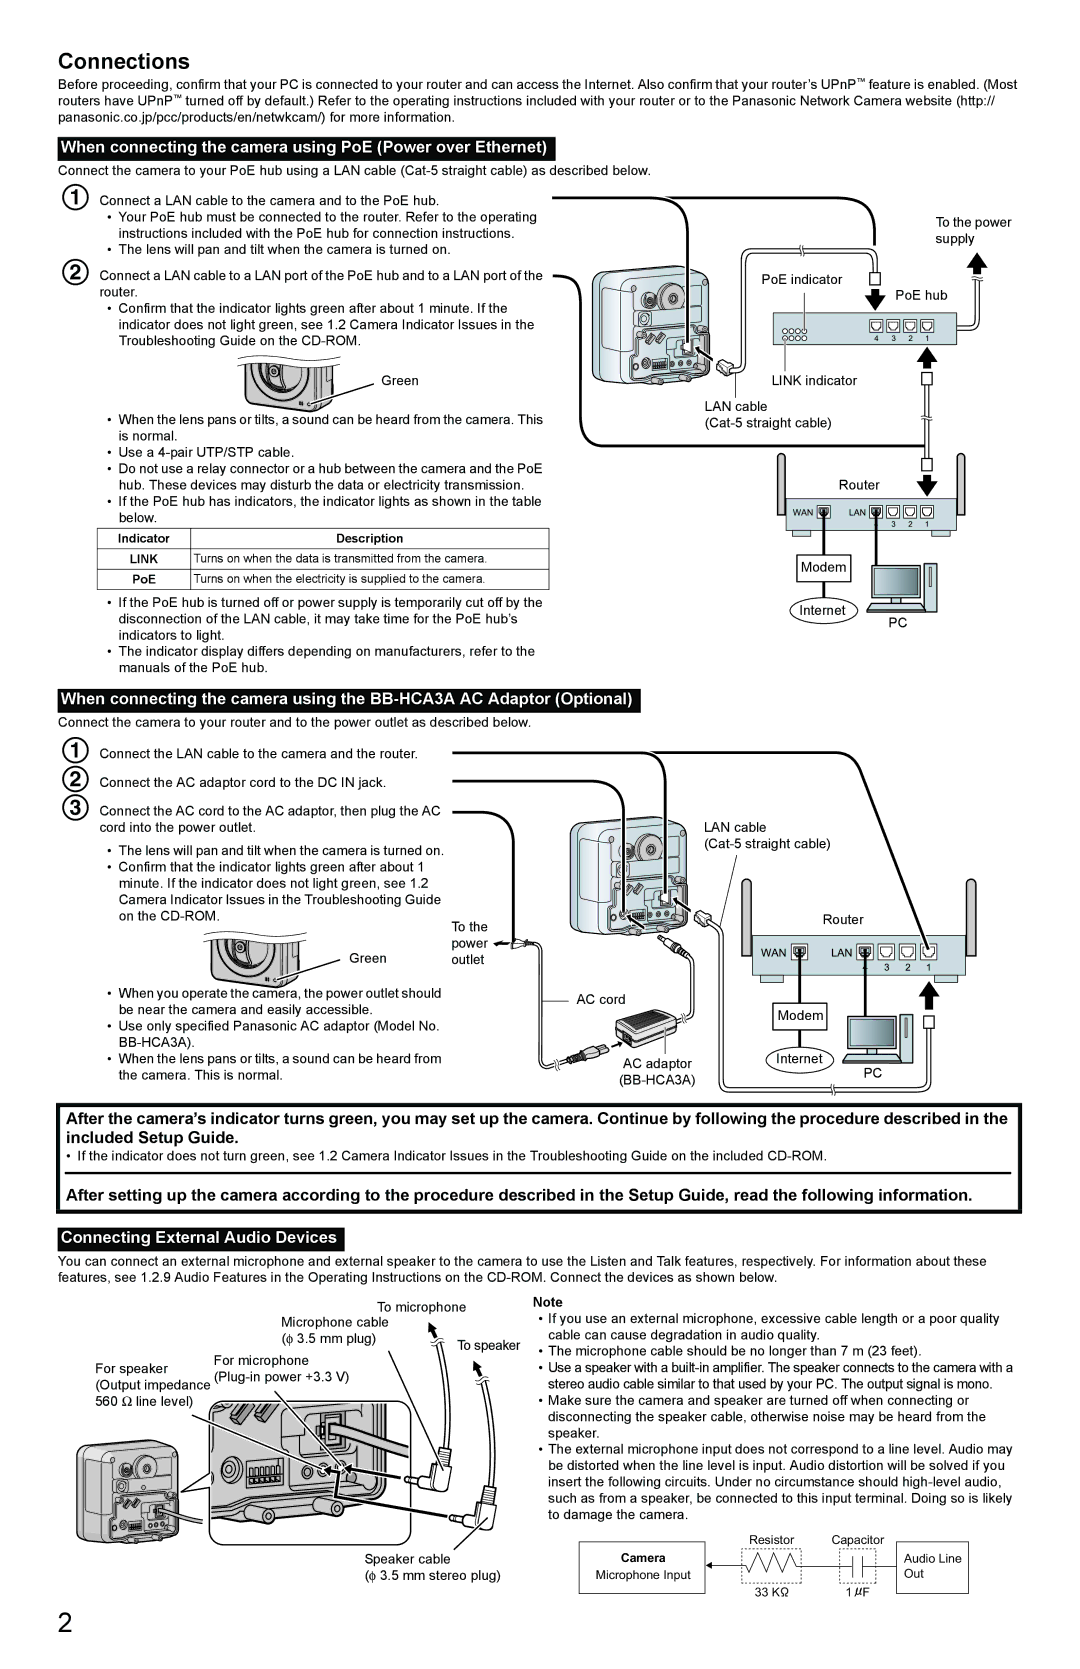
Connect the camera to your PoE hub using a LAN cable (Cat-5 straight cable) as described below.

1 Connect a LAN cable to the camera and to the PoE hub.


• Your PoE hub must be connected to the router. Refer to the operating

To the power

instructions included with the PoE hub for connection instructions.

supply

• The lens will pan and tilt when the camera is turned on.


2 Connect a LAN cable to a LAN port of the PoE hub and to a LAN port of the

PoE indicator

router.

PoE hub

• Confirm that the indicator lights green after about 1 minute. If the


indicator does not light green, see 1.2 Camera Indicator Issues in the


Troubleshooting Guide on the CD-ROM.


Green

When the lens pans or tilts, a sound can be heard from the camera. This is normal.

Use a 4-pair UTP/STP cable.

Do not use a relay connector or a hub between the camera and the PoE hub. These devices may disturb the data or electricity transmission.

If the PoE hub has indicators, the indicator lights as shown in the table below.

Indicator

Description

LINK

Turns on when the data is transmitted from the camera.

PoE

Turns on when the electricity is supplied to the camera.

If the PoE hub is turned off or power supply is temporarily cut off by the disconnection of the LAN cable, it may take time for the PoE hub’s indicators to light.

The indicator display differs depending on manufacturers, refer to the manuals of the PoE hub.

LINK indicator

LAN cable

(Cat-5 straight cable)

Router

Modem

Internet

PC

When connecting the camera using the BB-HCA3A AC Adaptor (Optional)

Connect the camera to your router and to the power outlet as described below.

1

2

3 Connect the AC cord to the AC adaptor, then plug the AC cord into the power outlet.

The lens will pan and tilt when the camera is turned on.

Confirm that the indicator lights green after about 1 minute. If the indicator does not light green, see 1.2 Camera Indicator Issues in the Troubleshooting Guide on the CD-ROM.

Green

When you operate the camera, the power outlet should be near the camera and easily accessible.

Use only specified Panasonic AC adaptor (Model No. BB-HCA3A).

When the lens pans or tilts, a sound can be heard from the camera. This is normal.

LAN cable

(Cat-5 straight cable)

To the


Router


power


outlet


AC cord

Modem


AC adaptor

Internet


PC


(BB-HCA3A)


After the camera’s indicator turns green, you may set up the camera. Continue by following the procedure described in the included Setup Guide.

• If the indicator does not turn green, see 1.2 Camera Indicator Issues in the Troubleshooting Guide on the included CD-ROM.

After setting up the camera according to the procedure described in the Setup Guide, read the following information.

Connecting External Audio Devices

You can connect an external microphone and external speaker to the camera to use the Listen and Talk features, respectively. For information about these features, see 1.2.9 Audio Features in the Operating Instructions on the CD-ROM. Connect the devices as shown below.

To microphone

Microphone cable


(φ 3.5 mm plug)

To speaker


For speaker

For microphone

(Plug-in power +3.3 V)

(Output impedance

560 line level)


Speaker cable

(φ 3.5 mm stereo plug)

Note

If you use an external microphone, excessive cable length or a poor quality cable can cause degradation in audio quality.

The microphone cable should be no longer than 7 m (23 feet).

Use a speaker with a built-in amplifier. The speaker connects to the camera with a stereo audio cable similar to that used by your PC. The output signal is mono.

Make sure the camera and speaker are turned off when connecting or disconnecting the speaker cable, otherwise noise may be heard from the speaker.

The external microphone input does not correspond to a line level. Audio may be distorted when the line level is input. Audio distortion will be solved if you insert the following circuits. Under no circumstance should high-level audio, such as from a speaker, be connected to this input terminal. Doing so is likely to damage the camera.

Resistor

Capacitor

Camera

Audio Line

Microphone Input

Out

33 K

1 F

2

Page 2
Image 2
Panasonic BB-HCM511A setup guide Use a 4-pair UTP/STP cable, Router Modem Internet, Power Outlet AC cord Modem

BB-HCM511A specifications

The Panasonic BB-HCM511A is a robust and versatile network camera that has earned a reputation for its exceptional performance in both home and business environments. Designed for reliable surveillance, this model showcases a blend of advanced imaging technologies and user-friendly features.

One of the standout characteristics of the BB-HCM511A is its high-resolution video capabilities. With a maximum resolution of 640x480 pixels, the camera provides clear and detailed images, essential for monitoring activities in various settings. The device captures video at up to 30 frames per second, ensuring smooth motion playback, which is critical for identifying subjects in dynamic environments.

The BB-HCM511A is equipped with a 1/4-inch VGA CCD sensor, which improves image quality and enhances low-light performance. This ensures that the camera can deliver clear images even under challenging lighting conditions. Additionally, the built-in IR filter helps in producing natural colors during the day while also enhancing night vision capabilities.

This network camera is designed with advanced audio-visual technology. It features two-way audio communication, allowing users to listen and speak through the camera using a compatible PC or mobile device. This feature adds an interactive quality to surveillance, making it ideal for applications such as remote monitoring of vulnerable individuals or homes.

One of the key technologies featured in the BB-HCM511A is its Motion Detector function. This intelligent feature can differentiate between human movement and other types of movement, minimizing false alarms and only providing notifications for significant activities. The camera also supports email alerts, enabling prompt responses to security breaches.

Panasonic has also included features focused on ease of use and installation. The BB-HCM511A is compatible with a range of remote monitoring software, allowing users to view live footage from anywhere with an internet connection. The camera supports Power over Ethernet (PoE), simplifying installation by eliminating the need for separate power cables.

Additionally, security is a priority for Panasonic, and the BB-HCM511A includes built-in encryption for data protection. Users can set up access controls to ensure that only authorized individuals can view the camera feed.

In summary, the Panasonic BB-HCM511A combines high-quality video surveillance features, advanced audio capabilities, and user-friendly technologies that make it a reliable choice for anyone looking to enhance their security measures, whether at home or in a professional setting.