Operating Instructions for advanced features
Model No. DMC-FP3
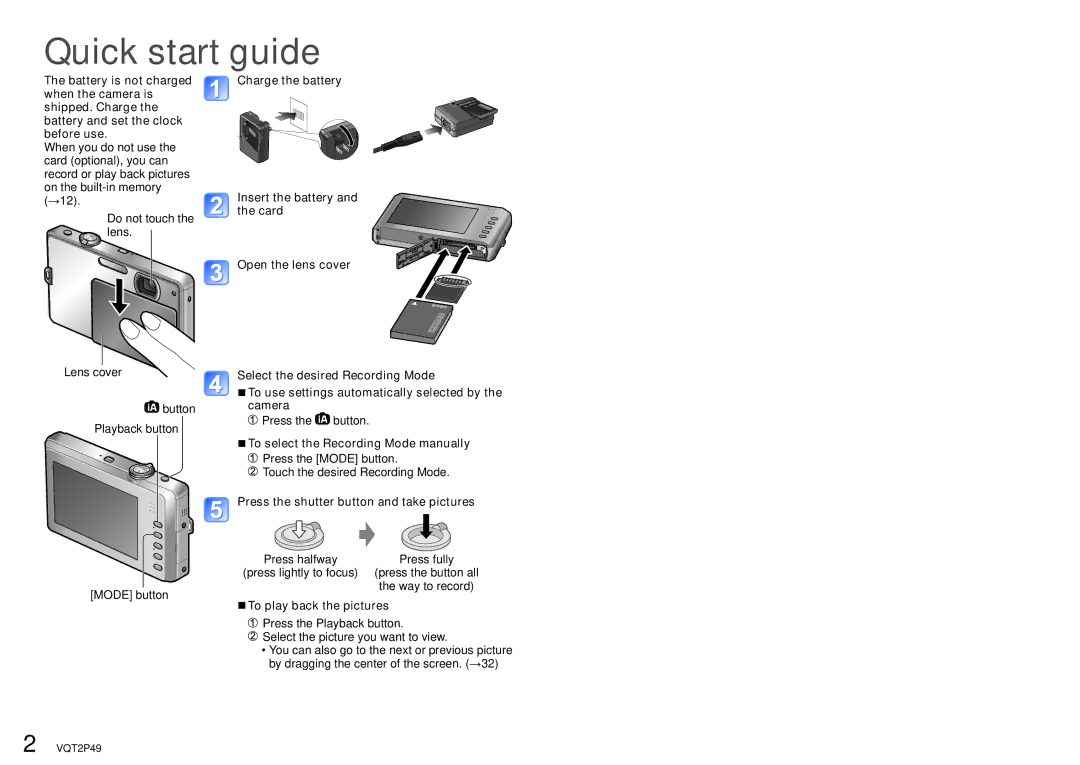
Press the button
To select the Recording Mode manually
Press the Mode button Touch the desired Recording Mode
Press the shutter button and take pictures
Contents
Contents
To prevent damage Malfunctions, and faults
Read first
Before use
Standard Accessories
Following do not indicate mechanical problems
AV OUT/DIGITAL socket
Names of parts
Menu →17 /delete button →33
DC in socket →78
Touch
Using theTouch Panel
Touch operations
Drag
Connect the charger to
Charging battery
Detach the battery after charging is completed
Electrical outlet
Approx pictures Approx min By Cipa standard
Recording conditions by Cipa standard
Close lid
Inserting and removing the card optional/ the battery
Completely insert battery and card
To remove
When in operation
Battery
Remaining battery and memory capacity
Picture save destination cards and built-in memory
Open the lens cover
Setting the clock
Touch Clock SET Setting date and time and display format
Touch Language SET Touch the language you wish to set
To set local time at travel destination
To change time setting
Touch SET
World Time →54
Power is turned on
Setting the menu
Select Normal Picture Mode
Mode
Touch a menu item
Touch the settings you wish to change
To reset default settings
Touch Exit
Recording Mode, display Quick menu
Using Quick menu
Touch a menu item Touch the settings you wish to change
Recording menu items can be called up easily
Using Setup menu
Power LCD
LCD Mode
Auto Power LCD
High Angle
OFF/2 MIN./5 MIN./10 MIN
Auto Review
USB Mode Select on Connection
Reset Reset REC. SETTINGS?
Reset Setup PARAMETERS?
Version Disp
NTSC/PAL
TV Aspect
Format
OFF/ON
Demo Mode
Language
Sequence of Recording
Select the desired Recording Mode and record
Scene Mode
Press the Playback button and view pictures →32
With the lens cover opened and the power off
Convenient ways to turn the power on
To turn the power on in Playback Mode
Holding the camera
Focus display when focus aligned flashing → illuminated
Select Intelligent Auto Mode
Recording Mode
Take pictures
To use flash
Touch on the Quick menu →17
Touch
You can also set by touching Flash in the REC menu
→41
To take close-up pictures →38 To adjust coloring
To adjust picture brightness
→61
Return to desired composition
First adjust focus according to subject
Align focus for desired composition
Direction detection function
Zoom In/Out
Adjust the focus after adjusting the zoom
Taking pictures with zoom
Maximum zoom ratios by picture size
Touch Digital Zoom Touch Exit
Enlarging further Digital Zoom
Display REC menu →15 Touch on
Zoom 4 times further than Optical/Extended Optical Zoom
Scroll through pictures
Viewing your pictures Normal Play
Press the Playback button
To enlarge Playback zoom
Touch Delete Multi
Deleting pictures
To delete multiple up to 50 or all pictures
Touch pictures to be deleted
Guide lines
Changing recording information display
Press to change display
Recording information No display Guide lines
Touch the time to be set
Taking pictures with self-timer
You can also set by touching Selftimer in the REC menu
Type, operations Uses
Taking pictures with flash
Touch the type of flash
Available types in each mode Available, Not available
Focus range according to ISO sensitivity and zoom
38 VQT2P49
Touch Macro Zoom
Adjust the Digital Zoom magnification with the zoom lever
Taking pictures at even closer range Macro Zoom
Taking pictures with the Touched Area in Focus
Touch the subject
You can also set by touching Exposure in the REC menu
If you are not going to use exposure compensation, select
When the description is
Registering commonly used scenes
Portrait Tips
Changing the selected Scene Mode
Scene Uses, Tips
Soft
Scenery
Self
Portrait
Sports
Party
How to select a scene →42 Using flash in Scene Modes →37
Food
Candle
Sunset
Baby
PET
Burst
High
Sens
SKY
Flash
Starry
Aerial
Beach
Snow
Photo
Press the Mode button Touch MY Scene Mode
Taking pictures in registered Scene Mode
Changing registered Scene Mode
→65
End recording
Playing back motion pictures
For information on the available recording time →96
Wvga
REC Quality
169
QVGA∗
Touch Cancel
Useful features for travel
Touch Travel Setup
Travel Date Record travel date and destination
Touch Home
Recording Mode ∗
Press Menu → Setup menu → Touch World Time
Touch to set your home area Touch SET
Labeled destination during playback
Upon your return
Perform steps , and →54 and return clock to home
Flash
Using REC menu
Selftimer
Picture Size
Smaller picture size∗2
Setting guide
Sensitivity
1600
AF Mode
White Balance
Macro Mode
Setting White Balance manually
Mode
Exposure
Mode SettingsOFF
Mode Settings OFF/ON
Burst
Set color effects
Color Mode
Stabilizer
Automatically detects and prevents jitter
AF Assist Lamp
Illuminates lamp when dark to facilitate focus alignment
Set the clock. Same function as that in Setup menu →13
RED-EYE Removal
Touch the character icon to input
Entering Text
Touch to select the type of characters
To correct input characters
Turn to T side
To restore
Press the Playback button Set to multiple screen display
Touch a picture
Press the Playback button Display the motion picture
When playback comes to the end, it automatically finishes
Watching motion pictures
Deleting →33
Calendar playback
Different playback methods Playback Mode
Multi playback
Touch Start
Slide Show
Set playback effects
Select music and effects according to picture Atmosphere
Different playback methods Playback Mode
Operations during Slide Show
View pictures
Category Play
Touch a category
Favorite Play
Text Stamp
Using Playback menu
Touch an item to switch between on and OFF and touch SET
Touch Single or Multi Select a still picture
Select a still picture Touch YES Touch SET
Resize
Touch Single
Select the size after Shrinking
To cancel → Touch Cancel
Touch Multi in step Select a still picture →71
Touch OK up to 50 pictures
Enlarge your still pictures and crop unwanted areas
Cropping
Touch SET Touch YES
Set-up Press MENU→ Playback menu → Touch Cropping
Select a picture and touch
Rotate Disp
Favorite
Set number of pictures by touching , and then touch SET
Print SET
Touch Single or Multi Select picture
Set-up Press MENU→ Playback menu → Touch Print SET
Protect
Touch Single or Multi Select picture and make setting
To cancel while releasing all Touch Cancel
Set-up Press MENU→ Playback menu → Touch Protect
Set-up Press Menu → Playback menu → Touch Copy
Copy
Select copy method direction
Touch PC on the camera
Using with your PC
To cancel connection
Operate with your computer
Playing motion pictures on your computer
When using Windows XP, Windows Vista, Windows 7, or Mac OS
Folder and file names on computer
Touch PictBridge PTP on the camera
To cancel print
Printing
Remaining sheets display may differ from set number
Printing multiple pictures
Print with date and text
With Text Stamp
Make settings before selecting Print Start
Select setting
Connect camera to TV Turn on TV
When using TVs with an SD card slot
Viewing on TV screen
Turn on camera Press the Playback button
List of LCD monitor displays
Recording
Playback
Press the Display button to change display →7
Message displays
No Additional Selections can be Made
Insert SD Card Again TRY Another Card
Cannot record pictures
Camera does not work even if power is turned on
Power cuts off during use
Cannot record to cards
Pictures appear dark or have poor coloring
Try checking these items →88 93 first
Recorded pictures appear coarse, or there is interference
Motion picture recording stops midway
Brightness is unstable
Monitor sometimes shuts off even though power is on
LCD monitor dims during motion picture recording
Monitor flickers indoors
Thumbnail is Displayed is shown on the screen
Folder/file number displayed as -. Picture is black
Incorrect date displayed in Calendar playback
Blackened red areas in recorded pictures
No pictures appears on TV. Pictures blurred or not colored
Cannot print when connecting to printer
Edges cut off pictures when printing
TV screen display different to LCD monitor
Cannot set Auto Review
Menu not displayed in desired language
Camera rattles if shaken
AF assist lamp is not illuminated
When in use
Usage cautions and notes
Memory cards
Memory
Recording picture/time capacity
Picture aspect
Card
24 GB 38 min 9 min 19 min 12 h 27 min