Operating Instructions
Dear Customer
Information for Your Safety
Before Use
About the Lens
If you will not be using the camera for a long time
About indications in these operating instructions
About These Operating Instructions
About illustrations in these operating instructions
About illustrations of the cursor button
Contents
Extra Flash Burst Mode
Audio Recording Audio REC Metering Mode
AF Assist Lamp
Conversion Lens
RP-SD032B CGR-S006E
Standard Accessories
DE-994A K2CJ2DA00008 K1HA08CD0007 K1HA08CD0008 VFC4124
VYK1P30
Lens P4
Self-timer Indicator P52
AF Assist Lamp P87
Flash P48
Tripod is stable with the camera attached to it
21 22 23 24 25 26 27 29 30
Charging the Battery with the Charger
About the Battery Charging/number of recordable pictures
Check that the camera is turned off Close the flash
Inserting/Removing the Battery
Card may be damaged if it is not fully inserted
Inserting/Removing the Card
Slide the card door to open it
About the Card
Pinch the lens cap and remove it
Removing the Lens Cap/Attaching the Strap
Strap Eyelet
Pass the strap through the stopper and fasten the strap
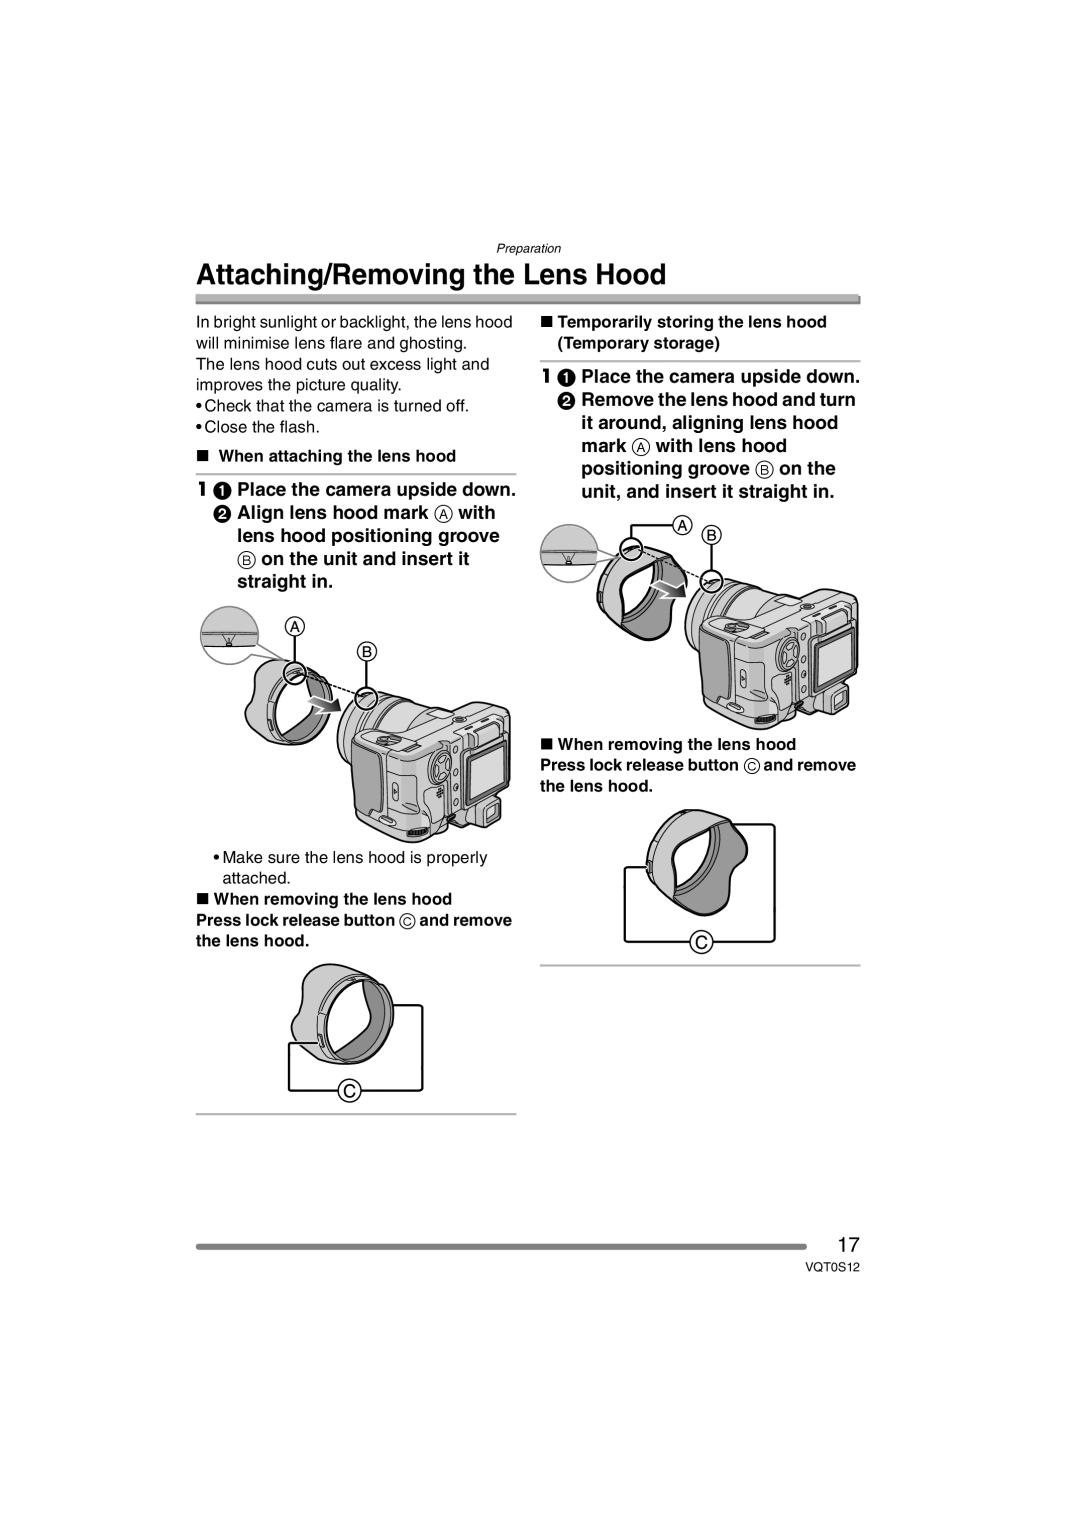
Make sure the lens hood is properly attached
When attaching the lens hood
Attaching/Removing the Lens Hood
Ensure that the lens cap is firmly attached
Attach the lens cap
Initial setting
Setting Date/Time Clock Set
Changing the clock setting
Set date and time
About the Setup Menu
MONITOR/VIEWFINDER
Setup menu Refer to P20 for the setting method
Auto Review
Play on LCD
NO.RESET
Volume
Beep
Shutter
Language
Highlight
Video OUT
About the LCD Monitor/Viewfinder
Switching the LCD monitor/ Viewfinder
Recording mode P36
You can switch between the LCD monitor and the Viewfinder
Playback mode P58
LCD Monitor
Taking pictures at a normal angle
About the Viewfinder
You can use the LCD monitor only
LCD monitor rotation direction
Direction detection function
Out-of-frame display
Diopter adjustment
Recording guide line
Highlight display
Under Exposed B Properly Exposed C Over Exposed ¢Histogram
Histogram
Example of histogram
Quality
Approximate number of recordable pictures and the size
5M EZ
About the zoom
Using the Optical Zoom
Indicated zoom magnification is an approximation
Zoom ring
Using the Extra Optical Zoom EZ
Using the Digital Zoom
Optical zoom Digital zoom
Digital zoom and optical zoom Can be used together
Extra optical zoom mechanism
Picture size and maximum zoom magnification
± Available, Not available
SCN
Mode Dial
Taking Pictures
Turn the camera on Set the mode dial to programme AE mode
Take a picture
Programme AE
Focusing
When the subject is focused, the focus indication lights
Press the shutter button fully
Please do not rotate the zoom ring during auto focus
Jitter camera shake
Starry SKY P76 When you set to a slower shutter speed P63
Party P74
Programme shift
AE Lock Button
Example of Programme shift
Exposure
Auto Mode Settings
Taking Pictures in Auto Mode
AE Lock
Flash Output Adjustment Zoom
Press 4 REV
Checking the Recorded Picture Review
Enlarge and shift the picture
1k4k8k 8k4k1k
Focus range
Set the focus switch to AF Macro
Taking Close-up Pictures AF Macro
MF assistance appears on the centre of the screen
Taking Pictures with Manual Focus
MF Assist
When pressing the shutter button halfway
Technique for Manual focus
One shot AF
Changing the zoom area
Prefocus
Taking Pictures using the Built-in Flash
Cm to 7.0 m Cm to 5.3 m
Available flash settings by recording mode
30 to 1/2000
Adjusting flash output
Do not stare at the photo flash from close proximity
Take the picture
Taking Pictures with the Self-timer
Select the self-timer mode
Under exposed
Compensating the Exposure
Compensate the exposure toward positive
Properly exposed Over exposed
Taking Pictures using Auto Bracket
Optical Image Stabilizer
Select the burst mode
Taking Pictures using Burst Mode
Number of pictures recorded in burst mode
When the burst mode setting is set to Unlimited
Recording pictures basic
Select the picture
Playing Back Pictures
Examples of 16 screens and 25 screens
Select the pictures
To return to the normal playback
To delete a picture during a multi playback
Rotate the front dial towards Right to enlarge the picture
Using the Playback Zoom
Shift the picture
Zoom
Play back the previous picture Play back the next picture
Delete the picture
Delete the pictures
Select the pictures to be deleted
Aperture-priority AE
Using the Mode Dial
Set the aperture value and take the picture
Shutter-priority AE
Set the aperture value and the shutter speed
Manual exposure
Press the shutter button halfway
Aperture value Shutter speed
Manual Exposure Assistance
Manual exposure
Aperture Value and Shutter Speed Aperture-priority AE
This mode allows you to record motion pictures with audio
Motion picture mode
When the subject is focused, the focus indication a lights
Select PICT.MODE
VGA Qvga
Available recording time seconds
Night Portrait P71 Night Scenery P72
Scene mode
Rotate the zoom ring to Tele as far as possible
Technique for Sports mode
Technique for Night portrait mode Use the flash. P48
Food mode
Age display setting
Technique for Night scenery mode
Soft skin mode
Technique for Party mode Open the flash. P48
Technique for Candle light mode
Fireworks mode
Press 3/4 to select the exposure time and press
Technique for Starry sky mode
Setting the shutter speed
Technique for Panning mode
Panning mode
EX.FLASH Burst P96 Displayed when an extra flash is attached
Using the REC mode menu
Auto White Balance
REC mode menu Refer to P78 for the setting method
White Balance W.BALANCE
About the white balance fine adjustment
Setting the White Balance manually White set
About the white balance
Is insufficient
ISO sensitivity 400
ISO Sensitivity Sensitivity
Use in bright Not Places Suitable Outdoors Use in dark
Fast
Picture Size PICT.SIZE
When the aspect ratio is
Audio DUB Resize Trimming
Quality Quality
Audio Recording Audio REC
Metering Mode
High speed AF H mode
AF Mode AF Mode
Area-focusing Camera focuses on any
Selecting the AF area
When selecting 1-area-focusing or
Set the Focus switch to AF or
Continuous AF CONT.AF
Auto mode , the CONT.AF setting is fixed to OFF
AF Assist Lamp
AF assist lamp does not turn
Colour Effect COL.EFFECT
Digital Zoom D.ZOOM
Picture Adjustment PICT.ADJ Flip Animation Flip Anim
Select Create Motion
Select Flip Anim Capture images for flip animation
Select Picture Capture
Select Create Motion Picture and create a flip animation
Select Frame Rate and set the number of frames
5fps
10fps
Conversion
Conversion Lens
Set to or
Rotate the lens slowly and carefully OFF
Set to Tele or Wide
Recordable range when using the conversion lens
Time required for focusing may become longer than usual
Extra Flash EXT.FLASH
Switch the extra flash forced off setting
Icon Setting
Manual
Settings on the extra flash
Extra Flash Burst Mode EX.FLASH Burst
Cursor displayed during playback corresponds to 3/4/ 2/1
Playing Back Pictures with Audio/Motion Pictures
Fast forwarding/Fast rewinding
To pause
Using the Play mode menu
Select ALL or
Playing Back with Slide Show
Set the items of the Slide Show
Select Start
100
Setting Favorites Favorite
Select the picture and set it
Select on to set it
101
102
Example When rotating clockwise
Rotating the Picture Rotate
Select the picture to be rotated and set it
Select SINGLE, Multi or
Setting the Picture to be Printed and the Number
103
To print the date
To cancel all settings Select YES to cancel all settings
104
Preventing Accidental Erasure of the Picture Protect
Select SINGLE, Multi or Cancel
105
Recording
106
Adding Audio to Recorded
107
Are displayed When the aspect ratio setting is
Resizing the Pictures Resize
Select the size and set it
Select YES or no and set it
108
Trimming the Pictures
Select the picture to trim and set
Shift the picture and press the shutter button to set
109
Enlarge or decrease the picture
Aspect ratio conversion
110
111
Clean-up Clean UP
Select YES to start the clean-up
Initializing the Card Format
112
Select YES to format
During formatting, do not turn the camera off
113
Playing Back Pictures on a TV Screen
Playing back pictures with AV cable supplied
Turn the camera and the TV off
USB Mode
Before Connecting to the PC or the Printer
Select USB Mode
114
115
Connecting to a PC
Windows
Macintosh
Conditions under which a different folder number is used
116
Folder Composition
117
PictBridge PTP setting
Disconnect the USB connection cable after printing
Connecting to a PictBridge-compliant Printer
118
Select a picture to be printed
Set the print settings
119
Select Print Start and then print out the picture
120
Select Dpof Picture
Layout
121
Setting the date printing with the Dpof print in advance
Focus on the subject and take a picture
Using the Remote Shutter
122
MCuMulti-coated NDuNeutral Density
Using the MC Protector/ND Filter
123
5 6 7
124
25 24 23 21 20 19 Backlight 21 17 19, 24 11, 23
Recording
Flip animation P89 Favorites P100
125
Playback
126
Dispose of an unusable battery
When you go out, bring charged spare batteries
127
Charger
128
Message Display
Write Error Please Check the Card
Read Error Please Check the Card
129
Folder Cannot be Created
130
Troubleshooting
131
132
133
134
AV OUT/DIGITAL
135
Remote
VQT0S12