Connecting


Printing


devices


with other


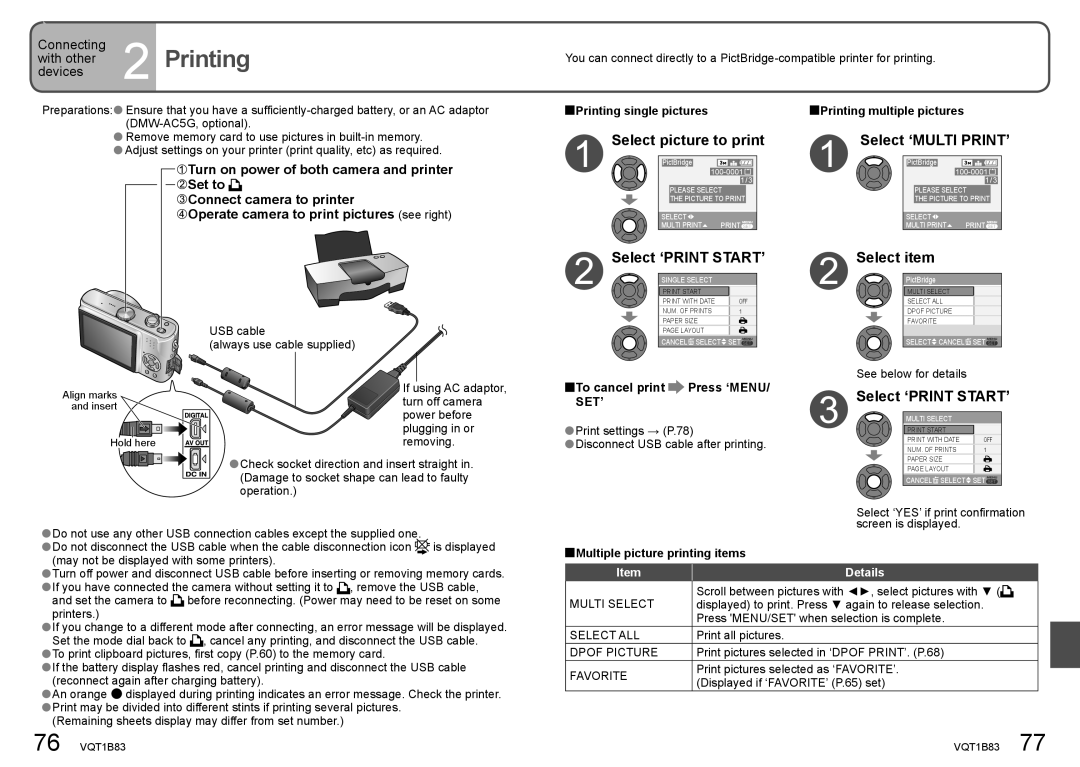
You can connect directly to a PictBridge-compatible printer for printing.

Preparations:Ensure that you have a sufficiently-charged battery, or an AC adaptor (DMW-AC5G, optional).

Remove memory card to use pictures in built-in memory. Adjust settings on your printer (print quality, etc) as required.

Turn on power of both camera and printer

Set to

Connect camera to printer

Operate camera to print pictures (see right)

Printing single pictures

Select picture to print

PictBridge 100-0001 1/3

PLEASE SELECT

THE PICTURE TO PRINT

SELECT


MULTI PRINT

PRINT

Select ‘PRINT START’

SINGLE SELECT

PRINT START

Printing multiple pictures

Select ‘MULTI PRINT’

PictBridge 100-0001 1/3

PLEASE SELECT

THE PICTURE TO PRINT

SELECT


MULTI PRINT

PRINT

Select item

PictBridge

MULTI SELECT

Align marks and insert

Hold here

USB cable

(always use cable supplied)

If using AC adaptor, turn off camera power before plugging in or removing.

Check socket direction and insert straight in. (Damage to socket shape can lead to faulty operation.)

PRINT WITH DATE

OFF

NUM. OF PRINTS

1

PAPER SIZE


PAGE LAYOUT


CANCEL SELECT

SET


To cancel print

Press ‘MENU/


SET’


Print settings → (P.78)

Disconnect USB cable after printing.

SELECT ALL

DPOF PICTURE

FAVORITE

SELECT CANCELSET

See below for details

Select ‘PRINT START’

MULTI SELECT

PRINT START


PRINT WITH DATE

OFF

NUM. OF PRINTS

1

PAPER SIZE


PAGE LAYOUT


CANCELSELECTSET

Do not use any other USB connection cables except the supplied one.


Do not disconnect the USB cable when the cable disconnection icon


is displayed


(may not be displayed with some printers).


Turn off power and disconnect USB cable before inserting or removing memory cards. If you have connected the camera without setting it to , remove the USB cable,

and set the camera to

before reconnecting. (Power may need to be reset on some

printers.)


If you change to a different mode after connecting, an error message will be displayed. Set the mode dial back to , cancel any printing, and disconnect the USB cable.

To print clipboard pictures, first copy (P.60) to the memory card.

If the battery display flashes red, cancel printing and disconnect the USB cable (reconnect again after charging battery).

An orange ● displayed during printing indicates an error message. Check the printer. Print may be divided into different stints if printing several pictures.

(Remaining sheets display may differ from set number.)


Select ‘YES’ if print confirmation


screen is displayed.


Multiple picture printing items


Item

Details

MULTI SELECT

Scroll between pictures with ◄►, select pictures with ▼ (

displayed) to print. Press ▼ again to release selection.


Press 'MENU/SET' when selection is complete.

SELECT ALL

Print all pictures.

DPOF PICTURE

Print pictures selected in ‘DPOF PRINT’. (P.68)

FAVORITE

Print pictures selected as ‘FAVORITE’.

(Displayed if ‘FAVORITE’ (P.65) set)


76 VQT1B83

VQT1B83 77

Page 40
Image 40
Panasonic DMC-TZ2 Printing, Select picture to print, Select ‘PRINT START’, Select ‘MULTI PRINT’, Set’

DMC-TZ2 specifications

The Panasonic DMC-TZ2, introduced in 2007, marked a significant advancement in the compact digital camera market, combining portability with advanced photographic capabilities. Targeted at both amateur and seasoned photographers looking for a lightweight yet powerful option, the TZ2 offered a blend of features that made it stand out in its class.

At the core of the DMC-TZ2 is a 7.2-megapixel sensor that allows for high-resolution images and excellent detail capture. The camera features a Leica DC Vario-Elmar lens with a versatile 28mm wide-angle to 280mm telephoto range (equivalent in 35mm). This lens is perfect for a variety of shooting situations, from broad landscapes to distant subjects, enabling users to capture stunning images without the need for multiple lenses.

One of the standout features of the TZ2 is its Optical Image Stabilization (O.I.S) technology, a boon for handheld photography. This technology minimizes the blurriness caused by camera shake, especially in low-light conditions or when using zoom. Coupled with a fast f/3.3 to f/4.9 aperture, the TZ2 ensures that users can shoot confidently even in challenging lighting conditions.

The DMC-TZ2 also includes a 2.5-inch LCD screen with a high resolution, making it easy to frame shots and review images. The screen's brightness can be adjusted for better visibility in various lighting situations, contributing to the overall user-friendly experience. Furthermore, the camera features a variety of scene modes and intelligent automatic settings, facilitating effortless shooting without requiring in-depth camera knowledge.

In terms of additional technologies, the TZ2 boasts the Venus Engine III image processor, which enhances image quality while minimizing noise at higher ISO settings. This processor also contributes to faster shooting speeds and improved battery performance, allowing for extended usage during outings.

Built with a sleek, compact design, the DMC-TZ2 is made for portability, making it an ideal travel companion. Its robust construction ensures durability, while its lightweight design makes it easy to carry.

In conclusion, the Panasonic DMC-TZ2 provides an impressive combination of features, advanced technologies, and user-friendly options within a compact design. It represents a compelling choice for those seeking a versatile camera that can effortlessly capture high-quality images in a range of environments.