DVD Video Recorder
Contents
Before Use
Helpful Hints
Quick Erase
DVD VHS
≥DVD
This Unit is Intended for USE in Moderate Climates
Inside of product
Tämä Laite on Tarkoitettu Käytettäväksi Leudossa Ilmastossa
For your safety
Standard Accessories
Specific features of DMR-E75V
Conserve the environment
Remote control
Control reference guide
DVD and VHS button
Batteries
Use
Main unit
Unit’s display
Connections
Connections
Connect as following steps
Setting Up
Auto-Setup
Preset Download
Remote Setting
Switching to the AV input on your Panasonic TV
TV operation
Press Return
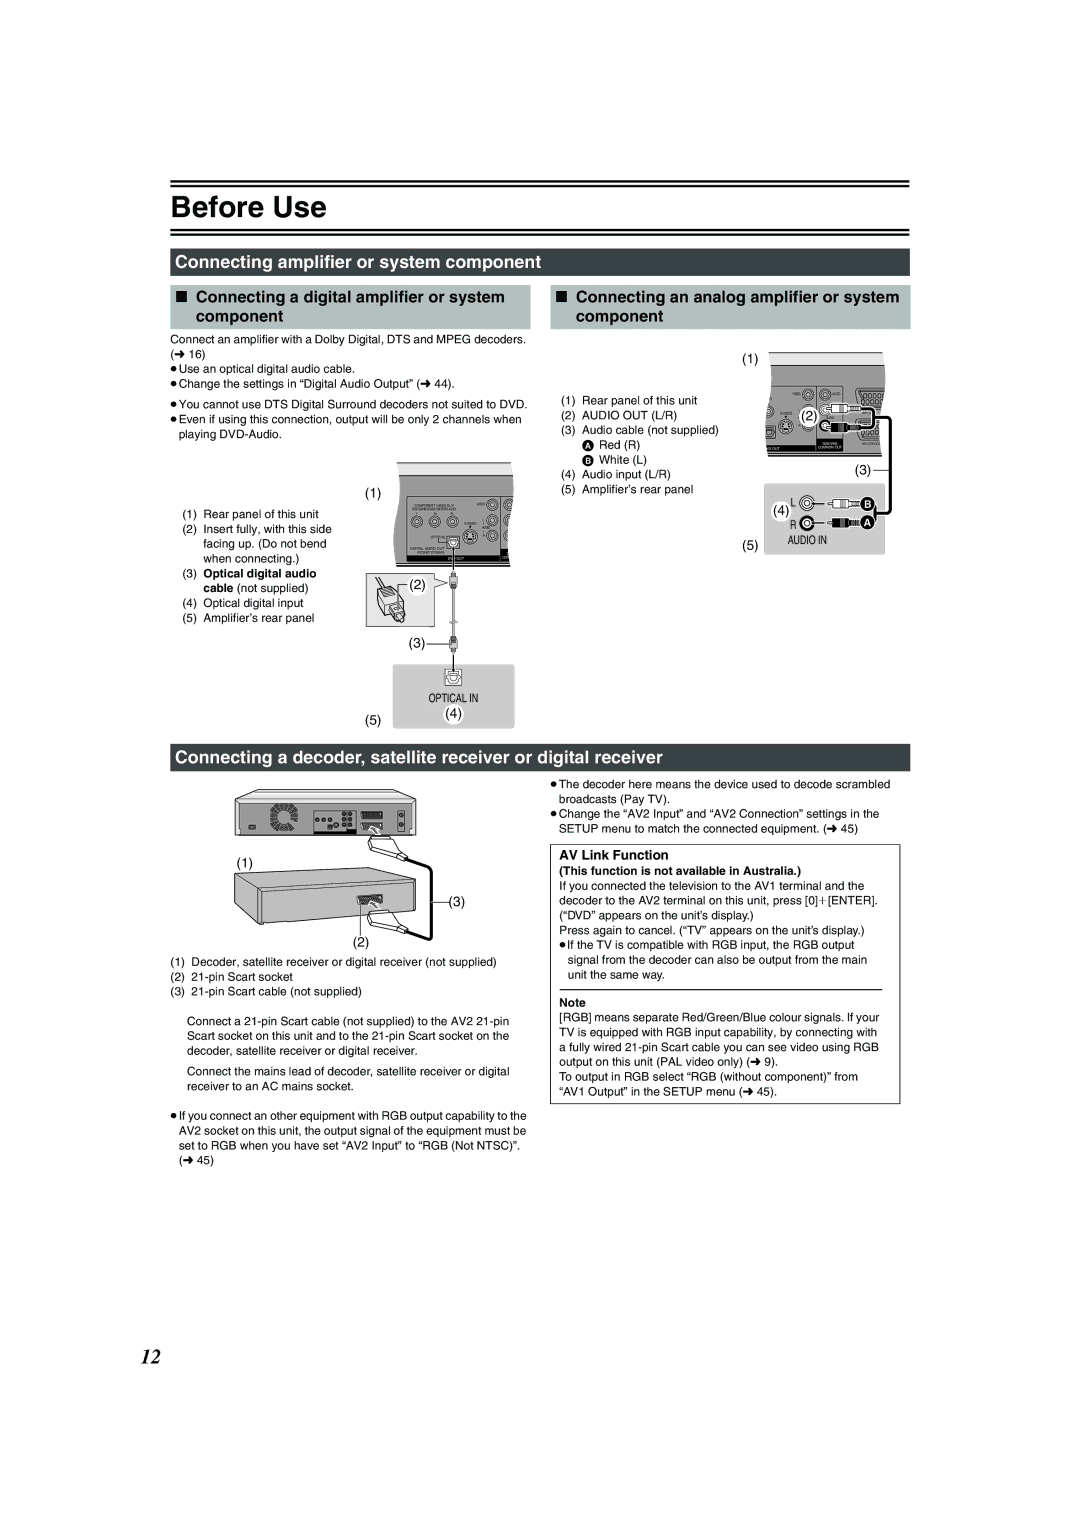
Connecting amplifier or system component
AV Link Function
Audio OUT L/R
Optical digital audio cable not supplied
Connecting an external device
DVD output and DVD/VHS output
AV1 21-pin Scart socket
AV2 21-pin
Regarding Progressive Television Picture
To view the picture at the right aspect
To return to the previous screen
Component Video OUT terminal
Discs
Discs you can use
More about Discs
Protection of cartridge disc
Discs and accessories
Maintenance
Discs that cannot be played
Audio format logos
Disc handling
Inserting discs
Press , OPEN/CLOSE on the main unit to Open the tray
Press , OPEN/CLOSE on the main unit to close the tray
Starting play from where you stopped it Resume Function
When a menu screen appears on the TV
Playing discs
Quick View Play t1.3
Fast forward and rewind-SEARCH
Slow-motion play
Frame-by-frame viewing
Skipping
Using menus to play MP3 discs
Changing audio during play
TOP Menu Enter
Audio
Using the tree screen to find a group
Press 1 to display the tree screen
Press 3, 4 to select a group and press
Playing while you are recording
Chasing play
Simultaneous recording and play
Direct Navigator
Press REC Mode to select the recording mode
Recording TV programmes
Press Í, DVD/VHS to turn the unit on Insert a disc. l
Press CH, W, X to select the channel
Flexible Recording mode FR
Playing/Recording the VHS while recording
Selecting audio to record
Recording modes and approximate recording times in hours
Linked timer recordings with external
Equipment EXT Link
Direct TV Recording
Using G-CODE
REC Mode EXT Link
Manual programming
PROG/CHECK
Press Enter when you have finished making Changes
Press ¢, CANCEL/RESET to delete Or press Enter to change
Check, change or delete programmes
Press 3, 4 to select the programme
Disc Name
Disc Protection
Format Disc
Auto-Play Select
Finalize
Select Start with 2 and press Enter
Entering text
Enter SUB Menu
Press , Stop
Using the Direct Navigator
Selecting recorded programmes titles to play
Direct Navigator
Erase
Properties
Edit
SUB Menu Return
Partial Erase
Change Thumbnail
Divide Title
Press Enter at the point you want to divide Title. l above
Chapter View
Using play list
Creating play lists
Press Functions
Select Play List with 3, 4, 2, 1 and press Enter
Using play list to edit play lists/chapters
Playing play lists
Press 3, 4, 2, 1 to select the play list
Press SUB MENU, then press
Create
Copy
Select Copy with 2 and press Enter
Enter Name
Press Functions Select Play List with 3, 4, 2, 1 and press
Press 3, 4, 2, 1 to select Play list
To play a chapter
To stop scene play
Add Chapter
Move Chapter Erase Chapter
Play List View
Create Chapter Press Enter
Using Display menus
Common procedures
When you are finished
Disc menu
Transfer When Progressive is set to on
Play menu
Picture menu
Sound menu
Changing the unit’s settings
Entering a password Ratings
≥Do not forget your password
Output
Summary of settings
Hybrid VBR Resolution l 63, VBR
Still Mode
VHS Dubbing Setting
Picture Comb Filter
AV2 Settings
Language code list
Display On-Screen Messages
Grey Background
Channel Settings
Selecting the manual tuning
Auto-Setup Restart, Download from TV
Adding, deleting, and moving channels
VHF Catv UHF
Clock Settings
Auto Clock Setting
Manual Clock Setting
Functions window
Status displays
Changing the information displayed
Display examples
Maintenance
Inserting video cassette
Video cassette information
Video cassettes
Playing a video cassette
Fast-forward/Rewind
Cue/Review Playback
Jet Search
Adjusting the playback picture
VHS Quasi Playback Sqpb
To Play back a Recorded Part Repeatedly
VHS Index Search System Viss
Linked timer recordings with external equipment EXT Link
Press REC Mode to select the tape speed
Playing/Recording the DVD while recording
Press ¥, VHS REC to start recording
Turn the unit off when you do not play or record on DVD
Press 1 to move and change the items with 3
Tape Speed Auto Change Function
Video casette in the cassette compartment
VHS Functions Timer recording l Quick Erase l
Tape length
PB Colour system
OSD l
Changing audio
Various indications in on-screen display
Press Status
Dubbing from VHS
One Touch Dubbing VHS l DVD
Press and hold DVD, Dubbing for 3 seconds or more
Manual Dubbing VHS l DVD
To pause or stop Manual Dubbing
To pause or stop recording
To pause or stop play
When starting the One Touch Dubbing from desired Title
Dubbing from DVD
One Touch Dubbing DVD l VHS
Press and hold VHS -, Dubbing for 3 seconds or more
Press REC Mode to select the recording mode Press , Pause
Manual Dubbing DVD l VHS
About DC channel
Preparation DVD Recording source
Enter REC Mode
Recording from an external device
Child Lock
Input Select Return
Glossary
Title/Chapter DVD-Video
Track
Example
VPS/PDC This function is not available in Australia
Frequently asked questions
Set up
Disc
Error messages
Common
Operation
On the TV
Troubleshooting guide
Power
Displays
Recording, Timer recording, Dubbing, External input
Picture
DVD Picture
DVD Sound
DVD Play
DVD Recording, timer recording
DVD Edit
VHS Display
VHS Picture
Specifications
DVD
Laser Specification Class 1 Laser Product Pickup
X0804Ya0