Operating Instructions
Operating Instructions
Operating Instructions For Basic Operations
Notation
Conventions
Icons
Following icons are used in this manual
Table of Contents
Auto Zoom
Zoom / Effects
Zoom
Edge
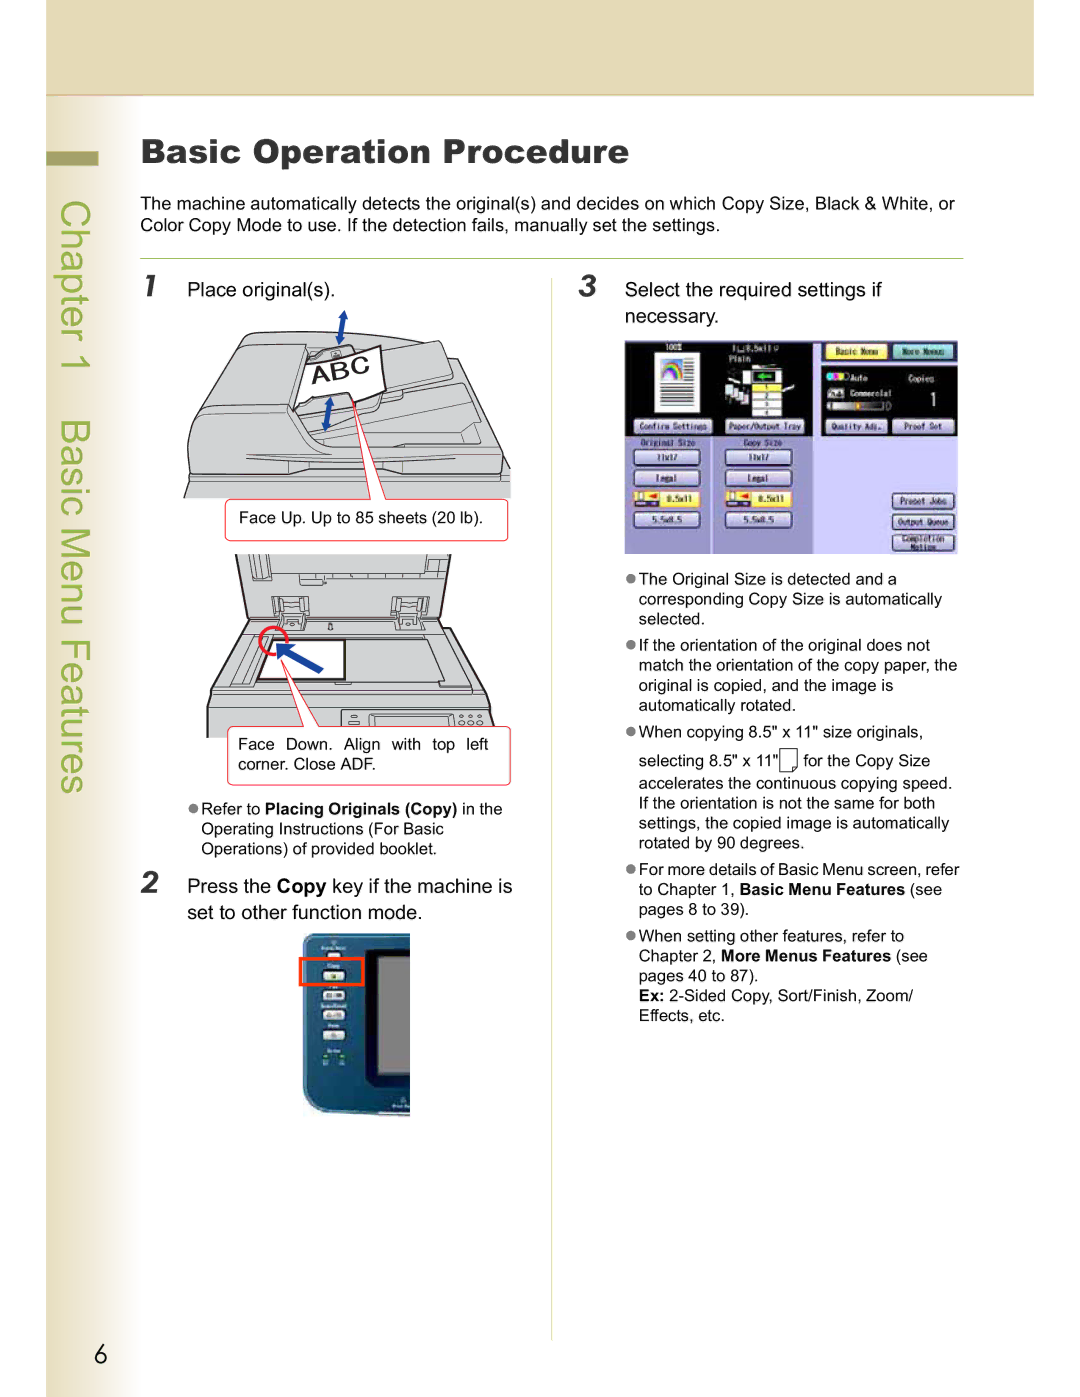
Place originals Select the required settings if Necessary
Basic Menu Features
Basic Operation Procedure
Set to other function mode
Enter the desired number of copies. Up to
Press the Start key
Then select OK
Selecting the Color Mode
Place originals Select the desired Color Mode,
Select Quality Adj
Select Full Color, and then select OK
Full Color Mode
Black Mode
Select Black, and then select OK
Color Mode
When selecting a color from the custom colors
Select Change Color
Select OK
Basic Menu Features
Basic Menu Features
New Color Registration
Check the adjusted color, and then select OK
When the registered color is changed
Select any button without a registered
Confirm the registered color, and then select OK
Place originals Select the Original Type
Selecting Original Type and Adjusting the Density
Adjust the copy density according to your requirements
Select the original type corresponding to your documents
Chapter
Enter the desired number of copies
Registering Quality Preset
Place originals Select the desired quality settings
Select Save
When registering a new Quality Preset
Select a Quality Preset button, and then select OK
Enter any Quality Preset name, and then select OK
When updating a registered Quality Preset
Using Quality Preset
Place originals Select a Quality Preset button,
Memo
Place originals Select an image quality type, and then
Quality Adjusting
Select More Settings
Cooler
Basic Menu Features
Background Removal
Select Custom Setting
Adjust the level of Background
Removal with and +, and then
BleedThrough Prevention
Select BleedThrough Prevention
Tint
To display this screen, refer to of Background Removal see
Original can be copied with adjusted contrast
Contrast
Sharpness
Original can be copied with adjusted saturation
Saturation
Select Color Balance
Adjust its Color Balance as shown
Color Balance
Select remaining colors, and then
Memo
If the copy quality is satisfactory
Proof Copying
Place originals Press the Start key
Select Yes
Check the settings, and then select
Confirming/Editing the Selected Copy Features
Select Confirm Settings
When optional finisher is installed
Place originals Select Save, and then select a job
Select Preset Jobs
Storing a Job in Memory
Button that does not have a job
Confirm Settings, and then select
Recalling a Preset Job Stored in Memory
Place originals To confirm the job settings, select
Press the Start key Select a stored job
Checking the Waiting to Copy Job
Select Output Queue
Select Close
Select a job, and then select Delete
Deleting Copy Jobs
Select Copy in the Output Queue Select Yes Screen
Jobs in Ready status can be deleted
Select Completion Notice
Completion Notice
Place originals Select a designated computer,
Select an index tab or Favorites to
Memo
Basic Operation for the 2-Sided Copy Mode
More Menus Features
Sided Copy Mode
Place originals Select the desired 2-Sided mode
Copying 2-Sided originals onto two separate sheets
Select 2-Sided /Original-Copy, and then select 2
Select the bind position, and then select OK
Then select 2
Copying Facing Page Original to Two Separate Sheets
Select 2-Sided / Original-Copy
Select a page order of original
Then select Booklet
Features
More Menus
Select a bind position
Select OK to exit the cover settings
Copying Mixed Size Originals from the ADF
Select an orientation, and then select
Then select Multi-Size Feed
Touch Basic Menu, and then select a
When copying the same paper size
More
Desired copy size with copy size
Copying Special Originals Thin Paper, etc. from the ADF
No in the confirmation screen
Then select Job Build
Job Build
Memo
Sort Mode
Sort mode
Place originals Select Sort / Finish, and then select
When the optional 1-Bin Saddle Stitch Finisher is installed
Select the stapling position
Zoom Mode
Variable Ratios
Place originals
More Menus Features
Auto Zoom
Select the desired zoom/type ratio, and then select OK
Effect Modes
Setting a Blank Edge
Unnecessary edge can be erased by setting a blank edge
Place originals Select Zoom / Effects, and then
Select to set the same erasing width
Or the keypad, and then select
Eliminate Dark Inner Binding Shadows
Place originals Input the erasing width with
Select Book
Shift Image to Right, Left, Up or Down
Select Margin
Input Width of the binding margin
Select the desired position
Binding margin
With and , or the keypad,
Select Stamping
Copying with Stamping
Place originals on the ADF Select Zoom / Effects, and then
Numbers, Date, etc. can be stamped on each sheet
Chapter More Menus Features
Select Page Number
Starting page number can be set from1 to
Select Issue Number
Select the stamping position of issue
Number
More Menus Features
Select Date Select the stamping position Date stamp
To change the date, follow the steps below
Select OK
Select Text Stamp Select the stamping position of the text
Select Change
Original can be copied with printed text
Input text, and then select OK
Centering
Select Centering
Image Repeat
Select Zoom / Effects, and then select Image Repeat
Create multiple images on the sheet from single original
Insertion Modes
Add a Cover Page to Copies
Select Cover
Determine whether to copy the Front/ Back cover
Select Cover until the paper tray to be used is displayed
Inserts Blank/Copied Pages Between Copies
To erase an entered number, press the Clear key
Inserts Blank Pages Between Transparency Film
Place originals on the ADF
Memo
Place originals Select Insertion / Overlay, and then
Overlay Modes
Overlaying an Image onto the Copies
Select Overlay
Start key
Select the overlay position, and then select OK
Press
Enter Desired number of copies
More Menus Features
Overlay Copying with Registered Image
Select Form Overlay
Overlay an image stored in memory onto the copy
Select the registered form, and then select OK
File Edit
Select File Edit
Select the specified colors of the form
Menus Features
Select Save, and then select OK
From basic/custom, and then select
Input the file name, and then select OK
Select the file name to be deleted
Select Erase, and then OK
Select the file name to be edited
Memo
Skyshot Mode can be selected in the standard settings
Other Features
Skyshot Mode
Making Copies with the ADF Opened
Manual Skyshot Mode
Copying with pre-registered scan size into memory
Place the next original while copying current job
Select Reserve a Job
Interrupt the Current Copy Jobs to Make an Urgent Copy
Press the Start key to resume the previous copying operation
Appendix
Combined Copy Functions
Sort function
Symbols
Index
Numerics
72, 74, 76, 78, 81
18, 22, 25
Memo
For Service, Call
USA Only