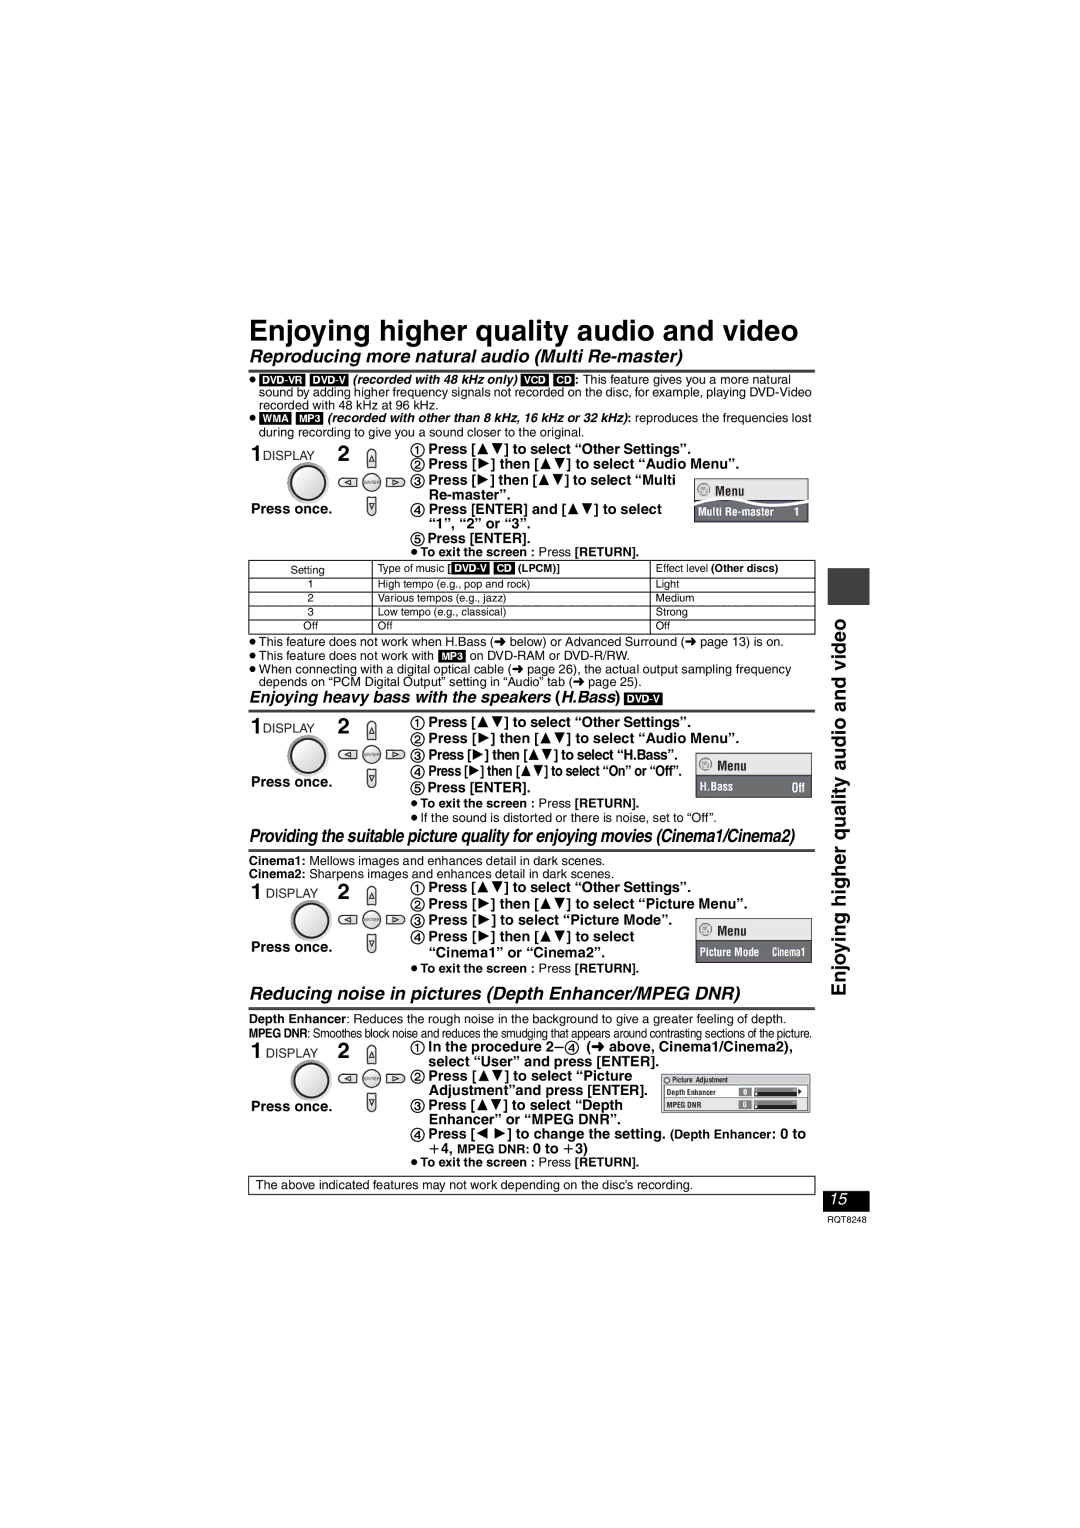
Enjoying higher quality audio and video
Reproducing more natural audio (Multi Re-master)
≥
≥[WMA] [MP3] (recorded with other than 8 kHz, 16 kHz or 32 kHz): reproduces the frequencies lost during recording to give you a sound closer to the original.
1DISPLAY 2 | 1 Press [34] to select “Other Settings”. |
| 2 Press [1] then [34] to select “Audio Menu”. |
![]() ENTER
ENTER ![]() 3 Press [1] then [34] to select “Multi
3 Press [1] then [34] to select “Multi
Press once. 4 Press [ENTER] and [34] to select “1”, “2” or “3”.
5Press [ENTER].
≥To exit the screen : Press [RETURN].
Setting | Type of music | Effect level (Other discs) |
1 | High tempo (e.g., pop and rock) | Light |
2 | Various tempos (e.g., jazz) | Medium |
3 | Low tempo (e.g., classical) | Strong |
Off | Off | Off |
≥This feature does not work when H.Bass (➜ below) or Advanced Surround (➜ page 13) is on. ≥This feature does not work with [MP3] on
≥When connecting with a digital optical cable (➜ page 26), the actual output sampling frequency depends on “PCM Digital Output” setting in “Audio” tab (➜ page 25).
Enjoying heavy bass with the speakers (H.Bass) [DVD-V]
1DISPLAY | 2 |
| 1 Press [34] to select “Other Settings”. |
|
|
|
|
| 2 Press [1] then [34] to select “Audio Menu”. |
| |
|
| ENTER | 3 Press [1] then [34] to select “H.Bass”. |
|
|
Press once. |
|
| 4 Press [1] then [34] to select “On” or “Off”. | Menu |
|
|
|
|
| ||
|
| 5 Press [ENTER]. | H.Bass | Off | |
|
|
| |||
≥To exit the screen : Press [RETURN].
≥If the sound is distorted or there is noise, set to “Off”.
Providing the suitable picture quality for enjoying movies (Cinema1/Cinema2)
Cinema1: Mellows images and enhances detail in dark scenes.
Cinema2: Sharpens images and enhances detail in dark scenes.
1 DISPLAY | 2 |
| 1 Press [34] to select “Other Settings”. |
|
|
|
|
| 2 Press [1] then [34] to select “Picture Menu”. |
| |
|
| ENTER | 3 Press [1] to select “Picture Mode”. |
|
|
Press once. |
|
| 4 Press [1] then [34] to select | Menu |
|
|
|
|
| ||
|
| “Cinema1” or “Cinema2”. | Picture Mode | Cinema1 | |
|
|
| |||
≥To exit the screen : Press [RETURN].
Reducing noise in pictures (Depth Enhancer/MPEG DNR)
Enjoying higher quality audio and video
Depth Enhancer: Reduces the rough noise in the background to give a greater feeling of depth.
MPEG DNR: Smoothes block noise and reduces the smudging that appears around contrasting sections of the picture.
1 DISPLAY | 2 | 1 In the procedure 2s4 (➜ above, Cinema1/Cinema2), | ||
|
| select “User” and press [ENTER]. |
|
|
| ENTER | 2 Press [34] to select “Picture | Picture Adjustment |
|
|
| Adjustment”and press [ENTER]. | Depth Enhancer | 0 |
Press once. |
| 3 Press [34] to select “Depth | MPEG DNR | 0 |
|
| Enhancer” or “MPEG DNR”. |
|
|
|
| 4 Press [2 1] to change the setting. (Depth Enhancer: 0 to | ||
|
| i4, MPEG DNR: 0 to i3) |
|
|
|
| ≥To exit the screen : Press [RETURN]. |
|
|
The above indicated features may not work depending on the disc’s recording.
15
RQT8248
