Storing the shaver |
| |
English | • Store the shaver in a place with low humidity after use. | |
• Disconnect the power cord when storing the shaver. |
| |
| • Do not store the shaver where it will be exposed to direct | |
| sunlight or other heat sources. |
|
| • Do not bend the power cord or wrap it around the shaver. | |
Parts identification |
| |
|
|
|
|
| |
| | |
| ||
![]()
![]()
![]()
![]()
![]()
![]()
![]()
![]()
|
|
|
|
|
| |
| | |
|
| |||
|
|
|
| |
| | |
|
|
| a | b |
| |
| |
| ||
| | c | d |
|
|
| e | f | |
|
|
| g |
|
| |
|
| |
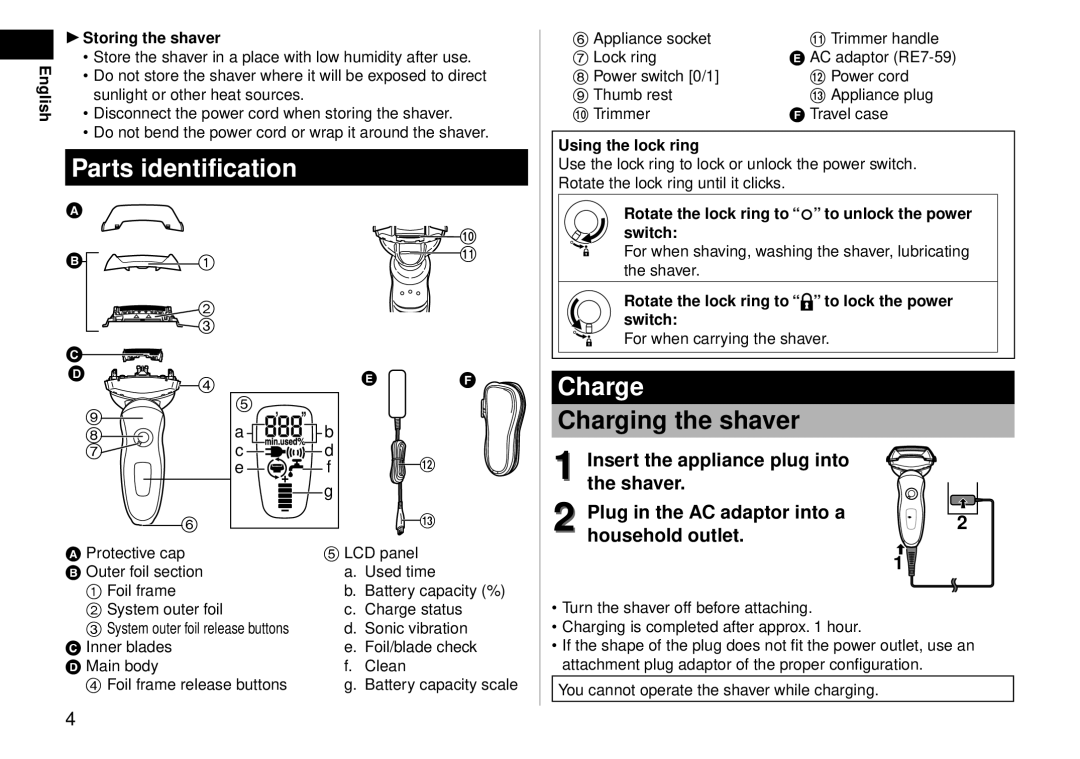
A Protective cap |
| 5 LCD panel |
| |
B Outer foil section |
| a. Used time | ||
| 1 Foil frame |
| b. Battery capacity (%) | |
| 2 System outer foil |
| c. Charge status | |
| 3 System outer foil release buttons | d. Sonic vibration | ||
C Inner blades |
| e. Foil/blade check | ||
D Main body |
| f. Clean |
| |
| 4 Foil frame release buttons | g. Battery capacity scale | ||
6 Appliance socket | Trimmer handle |
7 Lock ring | E AC adaptor (RE7‑59) |
8 Power switch [0/1] | Power cord |
9 Thumb rest | Appliance plug |
Trimmer | F Travel case |
Using the lock ring
Use the lock ring to lock or unlock the power switch. Rotate the lock ring until it clicks.
Rotate the lock ring to “![]() ” to unlock the power switch:
” to unlock the power switch:
For when shaving, washing the shaver, lubricating the shaver.
Rotate the lock ring to “![]() ” to lock the power switch:
” to lock the power switch:
For when carrying the shaver.
Charge
Charging the shaver
1 Insert the appliance plug into |
| |
the shaver. |
| |
Plug in the AC adaptor into a | 2 | |
2 household outlet. | ||
| ||
| 1 |
•Turn the shaver off before attaching.
•Charging is completed after approx. 1 hour.
•If the shape of the plug does not fit the power outlet, use an attachment plug adaptor of the proper configuration.
You cannot operate the shaver while charging.