Setting the Remote Control to Operate Your TV
You can operate the TVs of the manufacturers listed below with the remote control after setting it.
This setting procedure allows you to operate the TVs of some manufacturers using the supplied remote control.
Preparation
• Set [VCR/TV] switch (22) to [TV].
Operations
1Find the manufacturer number of your TV while referring to the following table.
2While holding down
•Be sure to enter the number in two digits. Example: 1 ) 01
3To confirm the correct settings were made, check whether the TV can be operated properly.
•When a manufacturer has multipled numbers in the following table, try entering other numbers if the TV operations cannot be performed properly, and then select the optimal number.
Notes:
•If you are using a Panasonic TV, this setting has already been made, and so you do not need to perform the above setting procedure. However, this remote control may not work with some Panasonic TVs.
•Some TV models cannot be operated using this remote control (including all TVs
List of TVs Compatible with the VCR Remote Control
[Brand] | [Code] |
|
|
Panasonic/National | |
|
|
SONY | 05 |
|
|
TOSHIBA | 06 |
|
|
JVC | 07 |
|
|
HITACHI | 08 |
|
|
MITSUBISHI | 09, 10 |
|
|
SHARP | 11 |
|
|
PHILIPS, SAMSUNG | 12 |
|
|
NEC | 13 |
|
|
SANYO | 14 |
|
|
GOLDSTAR/LG | 15, 16 |
|
|
SAMSUNG | 17,18 |
|
|
SANYO | 19 |
|
|
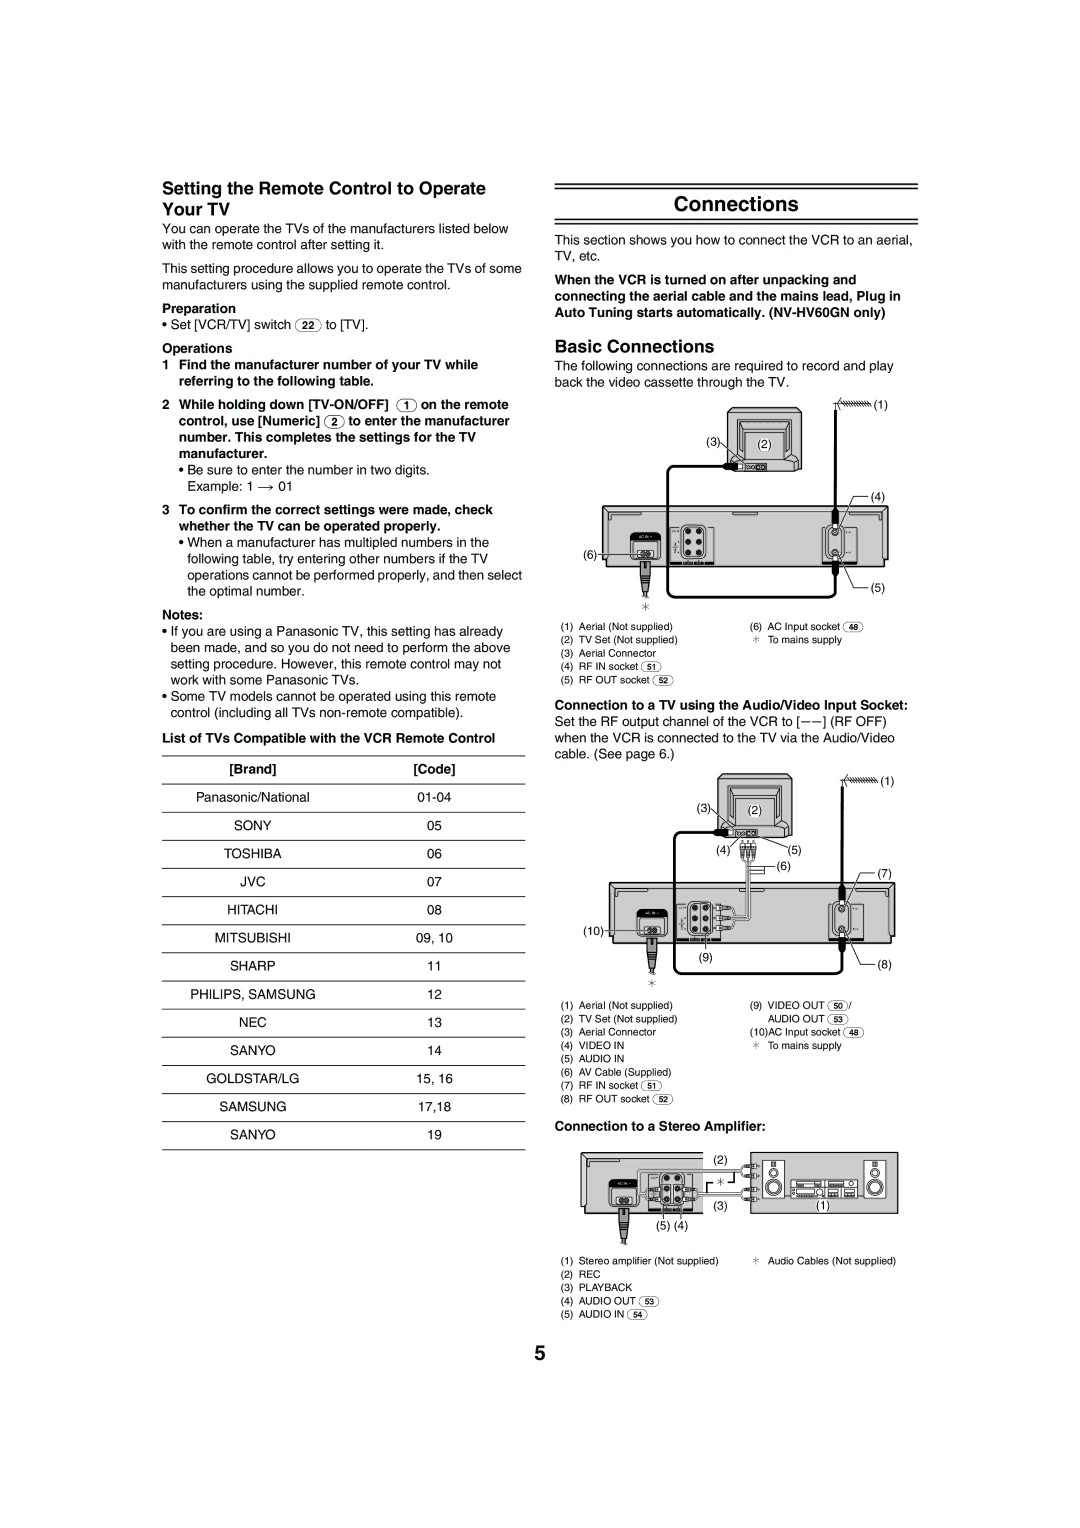
Connections
This section shows you how to connect the VCR to an aerial, TV, etc.
When the VCR is turned on after unpacking and connecting the aerial cable and the mains lead, Plug in Auto Tuning starts automatically.
Basic Connections
The following connections are required to record and play back the video cassette through the TV.
|
| (1) |
| (3) | (2) |
|
| (4) |
| VIDEO2 | 2 IN |
| AC IN ~ |
|
| L 2 |
|
(6) | AUDIO |
|
R 2 | 2 OUT | |
| IN (AV1) OUT | RF |
|
| (5) |
| ¢ |
|
(1) Aerial (Not supplied) | (6) AC Input socket (48) | |
(2) TV Set (Not supplied) | ¢ To mains supply | |
(3)Aerial Connector
(4)RF IN socket (51)
(5)RF OUT socket (52)
Connection to a TV using the Audio/Video Input Socket:
Set the RF output channel of the VCR to [ss] (RF OFF) when the VCR is connected to the TV via the Audio/Video cable. (See page 6.)
|
|
|
| (1) |
|
| (3) | (2) |
|
|
| (4) | (5) |
|
|
|
| (6) | (7) |
|
|
|
| |
| AC IN ~ | VIDEO2 | 2 IN |
|
|
|
|
| |
|
| L 2 |
|
|
| (10) | AUDIO |
|
|
| R 2 | 2 OUT |
| |
|
| IN (AV1) OUT | RF |
|
|
| (9) |
| (8) |
|
|
|
| |
| ¢ |
|
|
|
(1) | Aerial (Not supplied) |
| (9) VIDEO OUT (50)/ |
|
(2) | TV Set (Not supplied) |
| AUDIO OUT (53) |
|
(3) | Aerial Connector |
| (10)AC Input socket (48) |
|
(4) | VIDEO IN |
| ¢ To mains supply |
|
(5)AUDIO IN
(6)AV Cable (Supplied)
(7)RF IN socket (51)
(8)RF OUT socket (52)
Connection to a Stereo Amplifier:
|
| (2) |
|
VIDEO2 |
| ¢ |
|
AC IN ~ |
|
| |
L 2 |
|
|
|
AUDIO |
|
|
|
R 2 |
| (3) | (1) |
IN (AV1) | OUT | ||
(5) (4) |
|
| |
(1) Stereo amplifier (Not supplied) | ¢ Audio Cables (Not supplied) |
(2)REC
(3)PLAYBACK
(4)AUDIO OUT (53)
(5)AUDIO IN (54)
5
