On-screen display

LAMP indicator


Displayed for 30


More than 2 700 hours*

seconds. Pressing any

Illuminates red during

button will clear the


display.

image projection and


Remains displayed until

standby mode.

More than 3 000 hours*


any button is pressed.


* These periods of time may become shorter according to the settings of the projector.

Lamp unit replacement procedure

NOTE:

BIf the lamp usage time has passed 3 000 hours (when “LAMP POWER” has been set to “HIGH” and when “DYNAMIC IRIS” has been set to “ON”), the projector will switch to standby mode after approximately 30 minutes of operation. The steps ) to - on the next page should thus be completed within 30 minutes.

'Install the lamp unit cover, and then use a Phillips screwdriver to securely tighten the lamp unit cover fixing screws.

(Insert the power cord plug into the wall outlet and then press the MAIN POWER switch.

)Press the POWER button so that a picture is projected onto the screen.

*Press the MENU button to display the “MAIN MENU”, and then press the F or G button to select “OPTION”.

MENU

KEYSTONE

PICTURE

POSITION

SHUTTER

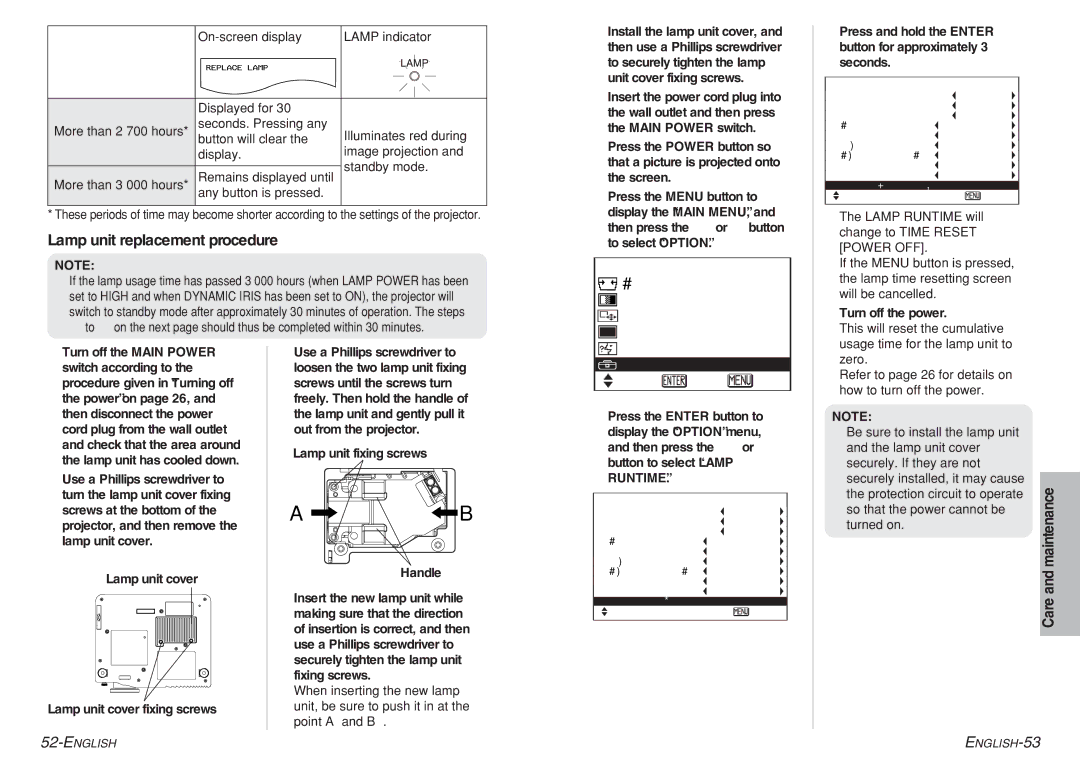
,Press and hold the ENTER button for approximately 3 seconds.


OPTION


OSD


ON


NR


ON


CINEMA REALITY

ON


BACK

COLOR

BLUE


WSS


ON


FRONT/REAR

FRONT


DESK/CEILING

DESK


FAN

CONTROL

NORMAL


LAMP

POWER

HIGH


TIME

RESET [POWER OFF]

SELECT

ESC

The “LAMP RUNTIME” will change to “TIME RESET [POWER OFF]”.

BIf the MENU button is pressed, the lamp time resetting screen will be cancelled.

-Turn off the power.

This will reset the cumulative

#Turn off the MAIN POWER switch according to the procedure given in “Turning off the power” on page 26, and then disconnect the power cord plug from the wall outlet and check that the area around the lamp unit has cooled down.

$Use a Phillips screwdriver to turn the lamp unit cover fixing screws at the bottom of the projector, and then remove the lamp unit cover.

Lamp unit cover

Lamp unit cover fixing screws

%Use a Phillips screwdriver to loosen the two lamp unit fixing screws until the screws turn freely. Then hold the handle of the lamp unit and gently pull it out from the projector.

Lamp unit fixing screws

AB

Handle

&Insert the new lamp unit while making sure that the direction of insertion is correct, and then use a Phillips screwdriver to securely tighten the lamp unit fixing screws.

When inserting the new lamp unit, be sure to push it in at the point A and B .

LANGUAGE

OPTION

SELECT ENTER EXIT

+Press the ENTER button to display the “OPTION” menu, and then press the F or G button to select “LAMP RUNTIME”.


OPTION


OSD


ON


NR


ON


CINEMA REALITY

ON


BACK

COLOR

BLUE


WSS


ON


FRONT/REAR

FRONT


DESK/CEILING

DESK


FAN

CONTROL

NORMAL


LAMP

POWER

HIGH


LAMP

RUNTIME

2720H

SELECT

ESC

usage time for the lamp unit to

zero.

Refer to page 26 for details on

how to turn off the power.

NOTE:

BBe sure to install the lamp unit and the lamp unit cover securely. If they are not securely installed, it may cause the protection circuit to operate so that the power cannot be turned on.

Care and maintenance

52-ENGLISH

ENGLISH-53

Page 27
Image 27
Panasonic PT-AE700U Lamp unit replacement procedure, Press and hold the Enter button for approximately 3 seconds

PT-AE700U specifications

The Panasonic PT-AE700U is a high-performance LCD projector that has garnered attention for its impressive combination of features, performance, and versatility. Designed primarily for home theater enthusiasts, this projector showcases advanced technology that enhances the viewing experience, making it a popular choice for both casual users and cinephiles.

One of the standout features of the PT-AE700U is its native resolution of 1280 x 720 pixels, which allows for a stunning high-definition output. This resolution is particularly well-suited for displaying a wide range of HD content, from movies and sports broadcasts to video games. Coupled with a brightness rating of 1,200 ANSI lumens, the projector delivers vivid and vibrant images, even in moderately lit rooms.

The PT-AE700U is equipped with Panasonic’s proprietary Dynamic Iris technology, which intelligently adjusts the brightness of the image in real-time. This feature allows for deeper black levels and enhanced contrast ratios, elevating the overall picture quality. Additionally, the projector boasts a contrast ratio of 10,000:1, providing rich detail in both shadowy and brightly lit scenes.

Another significant aspect of the PT-AE700U is its lens, featuring a 1.6x zoom capability along with lens shift options. This flexibility in installation allows users to position the projector conveniently without compromising the image quality. The lens shift feature enables the projection of images without distortion, further enhancing the viewing experience.

In terms of connectivity, the PT-AE700U is well-equipped with multiple input options, including HDMI, component video, and S-Video, making it compatible with a range of external devices such as Blu-ray players, gaming consoles, and streaming devices. This extensive range of inputs adds to the projector’s versatility, enabling it to serve as a central hub for home entertainment.

In addition to its impressive technical specifications, the Panasonic PT-AE700U is designed with user-friendly features such as an easy-to-navigate menu system and remote control functionality. These conveniences allow for seamless operation and adjustments while immersed in viewing.

Overall, the Panasonic PT-AE700U projector stands out as a reliable and feature-rich option for home cinema enthusiasts, delivering exceptional performance through its innovative technologies and thoughtful design characteristics.