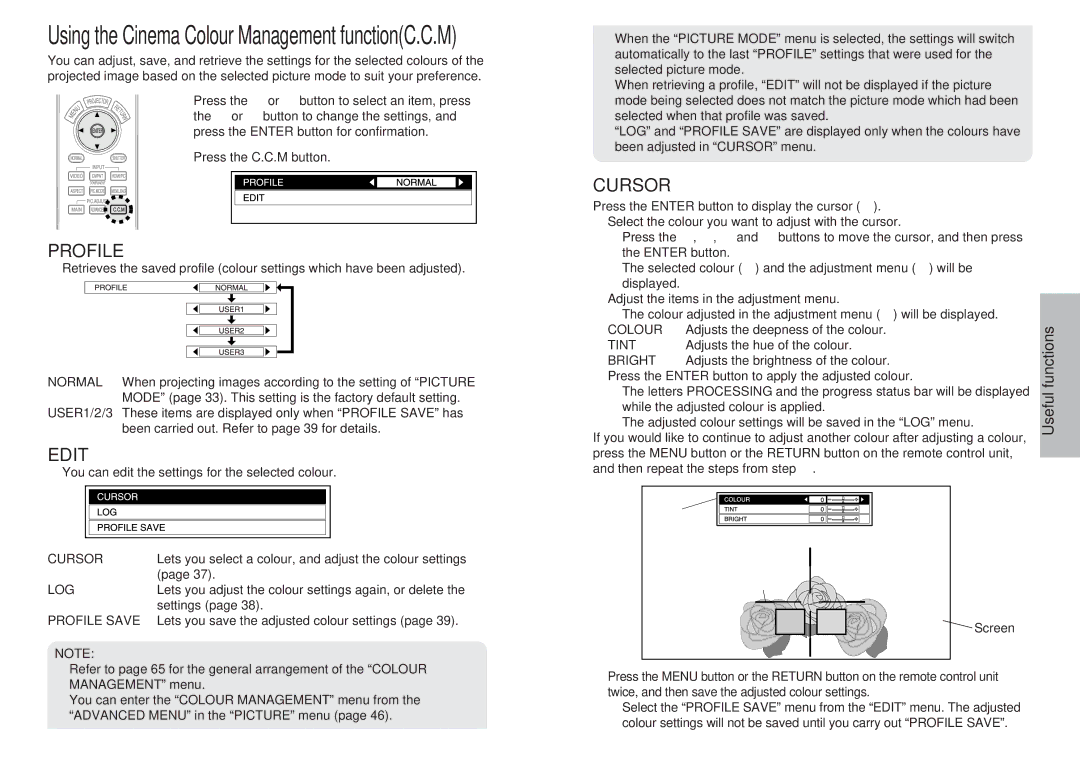
Using the Cinema Colour Management function(C.C.M)

You can adjust, save, and retrieve the settings for the selected colours of the projected image based on the selected picture mode to suit your preference.

Press the F or G button to select an item, press the I or H button to change the settings, and press the ENTER button for confirmation.

Press the C.C.M button.

PROFILE

BRetrieves the saved profile (colour settings which have been adjusted).

NORMAL When projecting images according to the setting of “PICTURE MODE” (page 33). This setting is the factory default setting.

USER1/2/3 These items are displayed only when “PROFILE SAVE” has been carried out. Refer to page 39 for details.

EDIT

BYou can edit the settings for the selected colour.

CURSOR

Lets you select a colour, and adjust the colour settings


(page 37).

LOG

Lets you adjust the colour settings again, or delete the

settings (page 38).

PROFILE SAVE Lets you save the adjusted colour settings (page 39).

NOTE:

BRefer to page 65 for the general arrangement of the “COLOUR MANAGEMENT” menu.

BYou can enter the “COLOUR MANAGEMENT” menu from the “ADVANCED MENU” in the “PICTURE” menu (page 46).

BWhen the “PICTURE MODE” menu is selected, the settings will switch automatically to the last “PROFILE” settings that were used for the selected picture mode.

BWhen retrieving a profile, “EDIT” will not be displayed if the picture mode being selected does not match the picture mode which had been selected when that profile was saved.

B“LOG” and “PROFILE SAVE” are displayed only when the colours have been adjusted in “CURSOR” menu.

CURSOR

Press the ENTER button to display the cursor (B).

#Select the colour you want to adjust with the cursor.

BPress the F, G, I and H buttons to move the cursor, and then press the ENTER button.

BThe selected colour (C) and the adjustment menu (A) will be displayed.

$Adjust the items in the adjustment menu.


BThe colour adjusted in the adjustment menu (D) will be displayed.

functions

%Press the ENTER button to apply the adjusted colour.

COLOUR

Adjusts the deepness of the colour.


TINT

Adjusts the hue of the colour.


BRIGHT

Adjusts the brightness of the colour.


BThe letters PROCESSING and the progress status bar will be displayed

Useful

while the adjusted colour is applied.


BThe adjusted colour settings will be saved in the “LOG” menu.

If you would like to continue to adjust another colour after adjusting a colour, press the MENU button or the RETURN button on the remote control unit, and then repeat the steps from step #.

A

B


C˛ D˛

Screen


&Press the MENU button or the RETURN button on the remote control unit twice, and then save the adjusted colour settings.

BSelect the “PROFILE SAVE” menu from the “EDIT” menu. The adjusted colour settings will not be saved until you carry out “PROFILE SAVE”.

36-ENGLISH

ENGLISH-37

Page 19
Image 19
Panasonic pt-ae900e manual Profile, Edit, Cursor

pt-ae900e specifications

The Panasonic PT-AE900E is a high-performance home theater projector that delivers an impressive combination of advanced technologies and user-friendly features. Known for its exceptional image quality, this projector is ideal for film enthusiasts and gamers alike.

One of the standout features of the PT-AE900E is its 720p resolution, which provides a clear, detailed picture that brings movies and games to life. It utilizes a three-LCD technology, ensuring vivid colors and sharp contrasts. This system minimizes the "rainbow effect" commonly associated with single-chip DLP projectors, making it a preferred choice for viewers sensitive to this phenomenon.

The projector boasts a brightness level of 1,600 ANSI lumens, which makes it suitable for various lighting conditions. Whether you're watching during daylight or in a darkened room, the PT-AE900E maintains a consistent image quality, allowing users to enjoy their content without compromise.

Another notable characteristic is its contrast ratio of 10,000:1. This impressive ratio enables deep blacks and bright whites, enhancing the overall viewing experience. The dynamic iris technology further enhances contrast by automatically adjusting the lens opening based on the scene's brightness, thus producing richer images.

Connectivity options are ample with the PT-AE900E. It features multiple inputs, including HDMI, component video, and S-Video. This versatility allows users to connect various devices, from Blu-ray players to gaming consoles, making it a flexible option for any home theater setup.

Panasonic has also integrated a low-noise design into the PT-AE900E, ensuring that the projector operates quietly even during extended viewing sessions. This feature helps to maintain an immersive experience without disruptive background noise.

The lens of the projector is equipped with a 2x optical zoom and a wide lens shift range, allowing for flexible installation options. This means that users can adjust the placement without compromising image quality or requiring extensive renovations.

In summary, the Panasonic PT-AE900E combines outstanding image quality, flexible connectivity, and quiet operation, making it a compelling choice for home theater enthusiasts. Whether you're enjoying the latest blockbuster or engaging in immersive gaming sessions, this projector delivers an exceptional visual experience that is hard to beat.