Manuals
/
Panasonic
/
Computer Equipment
/
Projector
Panasonic
PT-LB51NTU Projector body, Top and front view, Control panel, English, Preparation
Models:
PT-LB51NTU
1
12
62
62
Download
62 pages
37.82 Kb
9
10
11
12
13
14
15
16
Troubleshooting
Specification
Install
Selecting the input signal
Password
POWER indicator
Wireless Page Presentation
Dimension
Maintenance
Accessories
Page 12
Image 12
Page 11
Page 13
Page 12
Image 12
Page 11
Page 13
Contents
LCD Projector Commercial Use
AUTO SETUP INPUT SELECT COMPUTER WIRELESS VIDEO
WIRELESS PAGE PRESENTATION
MENU RETURN ENTER FREEZE SHUTTER COMPUTER DEFAULT SEARCH INDEX-WINDOW
Important Safety Notice
Dear Panasonic Customer
ENGLISH
Important Information
Important Safety Notice
Declaration of Conformity
Panasonic
Information on Disposal in other Countries outside the European
Contents
1. Set up your projector
5. Adjust the image
Important Information
Settings
Maintenance
Settings Basic Operation Getting Started Preparation Maintenance
Appendix
Precautions with regard to safety
WARNINGS
Important Information
Precautions with regard to safety
CAUTIONS
Cautions when transporting
Cautions when installing
Accessories
Cautions on use
Important Information
Remote control
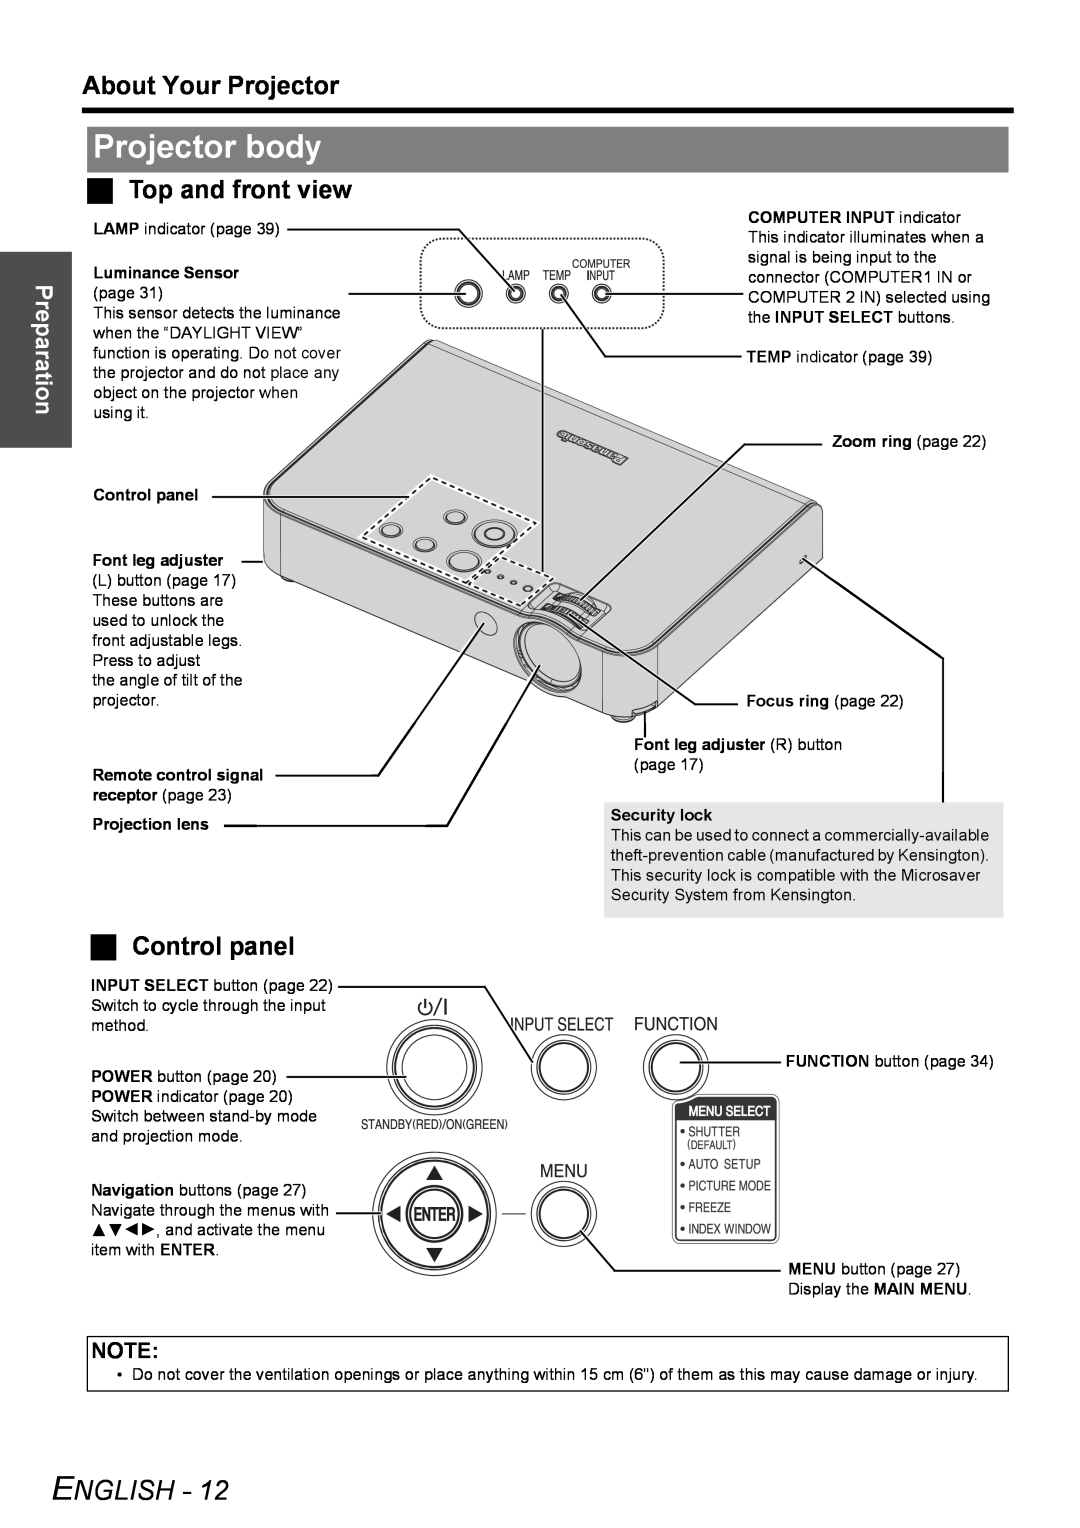
About Your Projector
Preparation
POWER button
About Your Projector
Attaching a hand strap
Projector body
Top and front view
Control panel
Control panel Font leg adjuster
Connector Panel
Back and bottom view
Connector Panel Lamp unit compartment page
Font adjustable legs L/R Adjust the projection angle. page
Setting up
Screen size and throw distance
Started
PT-LB51NTU/PT-LB51U
Setting up Calculation methods for screen dimensions
Getting
Setting up
Setting on a desk/floor and projecting from front
Setting on a desk/floor and projecting from rear
Projection method
Front adjustable legs and throwing angle
If keystone distortion occurs, see “KEYSTONE” on page
Connecting with computers
Connections
Before connection to the projector
Connecting with AV equipment
Connecting with VIDEO IN/S-VIDEO IN
Connecting with COMPONENT IN
Connections
Switching the projector on/off
Power cord
POWER indicator
Connecting
Switching on the projector
Switching off the projector
Switching the projector on/off
Selecting the input signal
Projecting an image
Positioning the image
Zoom ring Focus ring
Remote control operation
Setting up the image position automatically
Operating range
Basic
Switching the input signal
Remote control operation
Pressing the WIRELESS button
Capturing an image
Resetting to the factory default settings
Remote control operation
Switching the position
Projecting an image in INDEX-WINDOW mode
Controlling the volume of the speaker
Enlarging the centered area
Enlarging the image
Shifting the center point
Operating procedure
Adjusting with the bar scale
Settings
Menu Navigation
Main menu and Sub-menu
Menu Navigation
Settings
PICTURE menu
PICTURE MODE
COLOR
TINT
DETAILED SETUP
For RGB signals
For S-VIDEO/VIDEO signals
DAYLIGHT VIEW
CLOCK PHASE
POSITION menu
REALTIME KEYSTONE
KEYSTONE
S1 video signals
LANGUAGE menu
RESIZING
FRAME LOCK
LAMP POWER
OPTION menu
INPUT GUIDE
FUNCTION BUTTON
POWER OFF TIMER
AUTO SETUP
SIGNAL SEARCH
DIRECT POWER ON
HIGHLAND
INDEX-WINDOW
SHUTTER
OSD DESIGN
PASSWORD CHANGE
INPUT PASSWORD
After you change the password
SECURITY menu
Items in WIRELESS menu
WIRELESS menu PT-LB51NTU only
INPUT PASSWORD
PASSWORD CHANGE
TEMP, LAMP Indicators
Managing the indicated problems
LAMP indicator
TEMP indicator
Care and Replacement
Cleaning the projector
Before cleaning the projector
Cleaning the outer surface of the projector
Care and Replacement
When to replace the Lamp unit
Replacing the Lamp unit
Before replacing the Lamp unit
Lamp unit cover
lamp unit cover fixing screws
Handles lamp unit fixing screws
Troubleshooting
Should any problem persist, contact your dealer
List of compatible signals
Technical Information
Pin assignments and signal names
Communication settings
Serial terminal
Technical Information
Technical Information Cable specifications
Control commands
Projector
PC DTE
Computer connection guidance
The computer connection guidance will disappear after 5 minutes
Specifications
ENGLISH
Dimensions
Units mm inch
Trademark acknowledgments
All other trademarks are the property of the various trademark owners
These Operating Instructions are printed on recycled paper
Index
Index
Avis important concernant la sécurité
Cher client Panasonic
FRANÇAIS
Imformation Importante
Avis important concernant la sécurité
Information Importante
Précautions de sécurité
AVERTISSEMENT
MISES EN GARDE
Précautions de sécurité
Précautions lors du transport
Information Importante
Précautions lors de linstallation
Précautions lors de lutilisation
Remplacement de lunité de la lampe
Délai de remplacement de lUnité de la lampe
Avant de remplacer le lUnité de la lampe
REMARQUE
Remplacement de lunité de la lampe Procédure de remplacement
Panasonic Projector Systems Company
Technical Support
Projectors
Unit of Panasonic Corporation of North America
Top
Page
Image
Contents