Before Use

Using the Remote Control (Optional)

Remote Control is not supplied, If you would like to order, the parts number is LSSQ0411 as a replacement parts. Please refer to page 69.

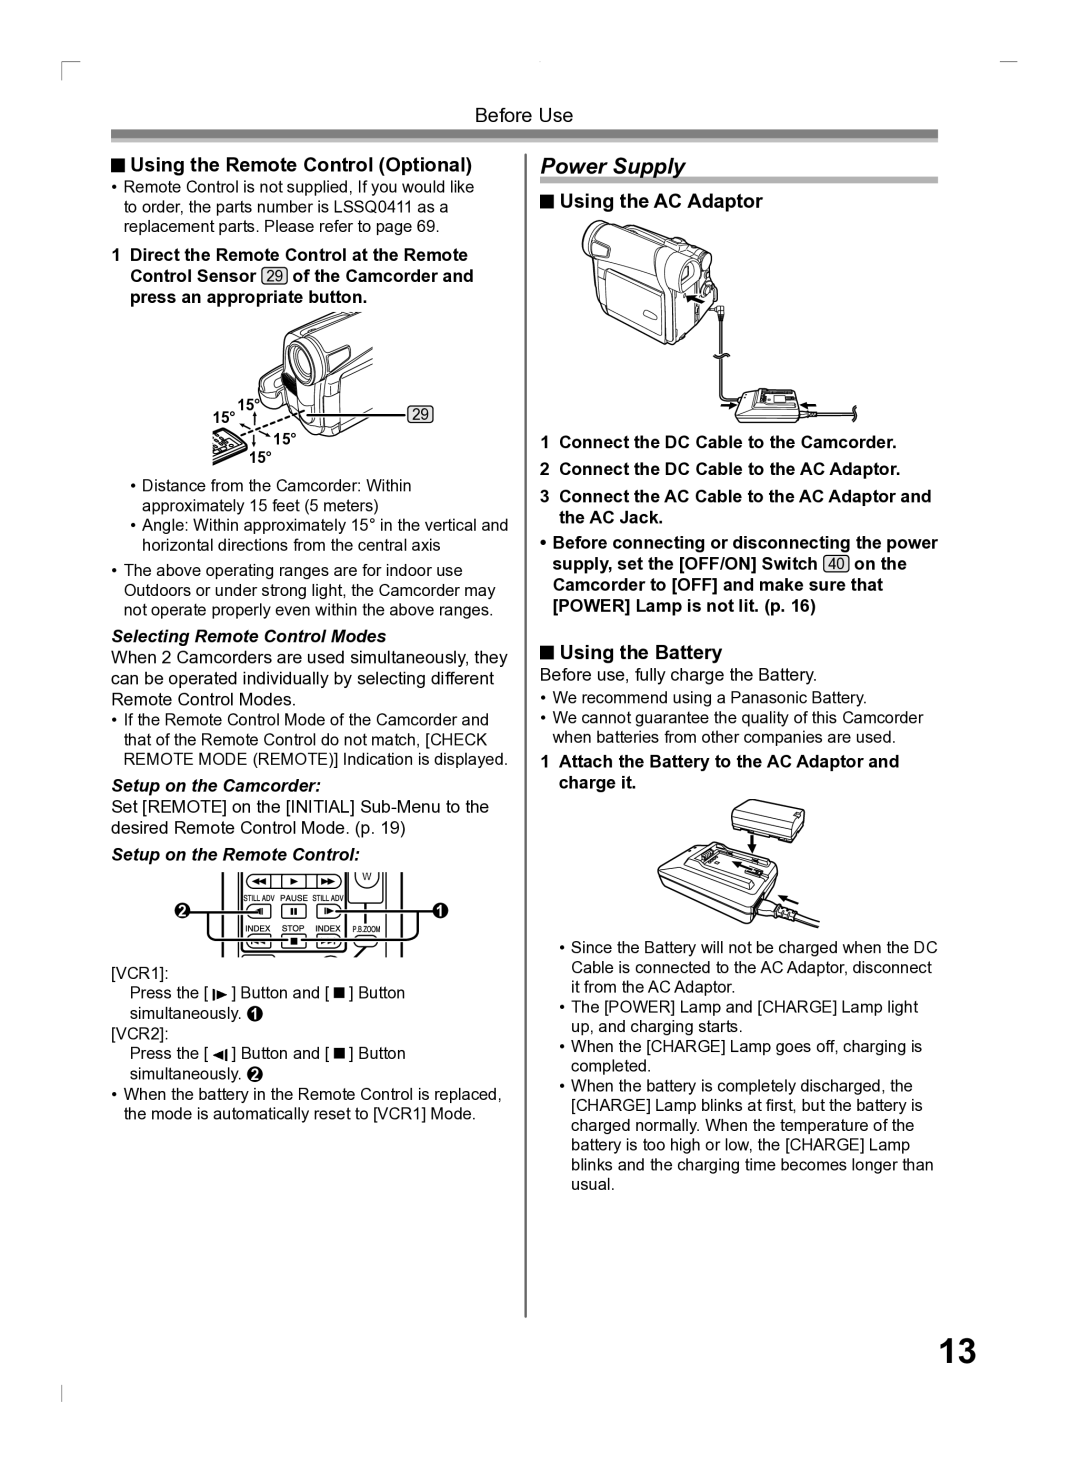
1Direct the Remote Control at the Remote Control Sensor 29 of the Camcorder and press an appropriate button.

15°15°29

15° 15°

Distance from the Camcorder: Within approximately 15 feet (5 meters)

Angle: Within approximately 15° in the vertical and horizontal directions from the central axis

The above operating ranges are for indoor use Outdoors or under strong light, the Camcorder may not operate properly even within the above ranges.

Selecting Remote Control Modes

When 2 Camcorders are used simultaneously, they can be operated individually by selecting different Remote Control Modes.

If the Remote Control Mode of the Camcorder and that of the Remote Control do not match, [CHECK REMOTE MODE (REMOTE)] Indication is displayed.

Setup on the Camcorder:

Set [REMOTE] on the [INITIAL] Sub-Menu to the desired Remote Control Mode. (p. 19)

Setup on the Remote Control:

2

1

[VCR1]:

Press the [ ] Button and [ ] Button simultaneously. 1

[VCR2]:

Press the [ ] Button and [ ] Button simultaneously. 2

When the battery in the Remote Control is replaced, the mode is automatically reset to [VCR1] Mode.

Power Supply

Using the AC Adaptor

1Connect the DC Cable to the Camcorder.

2Connect the DC Cable to the AC Adaptor.

3Connect the AC Cable to the AC Adaptor and the AC Jack.

Before connecting or disconnecting the power supply, set the [OFF/ON] Switch 40 on the

Camcorder to [OFF] and make sure that [POWER] Lamp is not lit. (p. 16)

Using the Battery

Before use, fully charge the Battery.

We recommend using a Panasonic Battery.

We cannot guarantee the quality of this Camcorder when batteries from other companies are used.

1Attach the Battery to the AC Adaptor and charge it.

Since the Battery will not be charged when the DC Cable is connected to the AC Adaptor, disconnect it from the AC Adaptor.

The [POWER] Lamp and [CHARGE] Lamp light up, and charging starts.

When the [CHARGE] Lamp goes off, charging is completed.

When the battery is completely discharged, the [CHARGE] Lamp blinks at first, but the battery is charged normally. When the temperature of the battery is too high or low, the [CHARGE] Lamp blinks and the charging time becomes longer than usual.

13

Page 13
Image 13
Panasonic PV-GS2 Power Supply, Using the Remote Control Optional, Using the AC Adaptor, Using the Battery

PV-GS2 specifications

The Panasonic PV-GS2 is a compact digital camcorder that was released as part of Panasonic’s renowned GS series, designed for users seeking a blend of portability and performance. This model stands out for its robust features and advanced technologies, making it an ideal choice for amateur videographers and enthusiasts alike.

One of the key features of the PV-GS2 is its 3CCD imaging system, which consists of three separate sensors for red, green, and blue. This technology allows for exceptional color reproduction and clarity, resulting in vibrant, true-to-life video quality. The 3CCD system significantly enhances the camcorder's ability to capture details in various lighting conditions, making it suitable for both indoor and outdoor shooting.

The camcorder boasts a 12x optical zoom, complemented by a digital zoom capability, allowing users to capture distant subjects with impressive clarity. The zoom function is paired with image stabilization technology, which helps reduce the effects of camera shake, delivering smoother video footage, particularly useful during handheld shooting.

Equipped with a 2.5-inch LCD display, the PV-GS2 offers a clear and vibrant interface for easy framing and playback of video. The LCD screen can be rotated and flipped, providing flexibility in shooting angles and enabling easier self-recording. Additionally, the camcorder includes a powerful built-in microphone and options for external audio input, ensuring high-quality sound to accompany the visuals.

The PV-GS2 supports recording in various formats, allowing users to choose the optimal quality for their needs. It also features a FireWire (IEEE 1394) port, enabling straightforward connection to a computer for editing and sharing footage, which is crucial for those looking to create polished video projects.

Another notable characteristic is its compact and lightweight design, making it highly portable for travel or events. The ergonomic grip enhances comfort during prolonged use, ensuring that users can shoot for extended periods without discomfort.

The Panasonic PV-GS2 represents a marriage of advanced technology and user-friendly design, serving as a versatile tool for capturing precious moments in high quality. Its combination of the 3CCD system, optical zoom, image stabilization, and flexible viewing options solidifies its reputation as a reliable choice for anyone looking to dive into the world of digital videography.