Before Using
Joystick Control and Screen Display
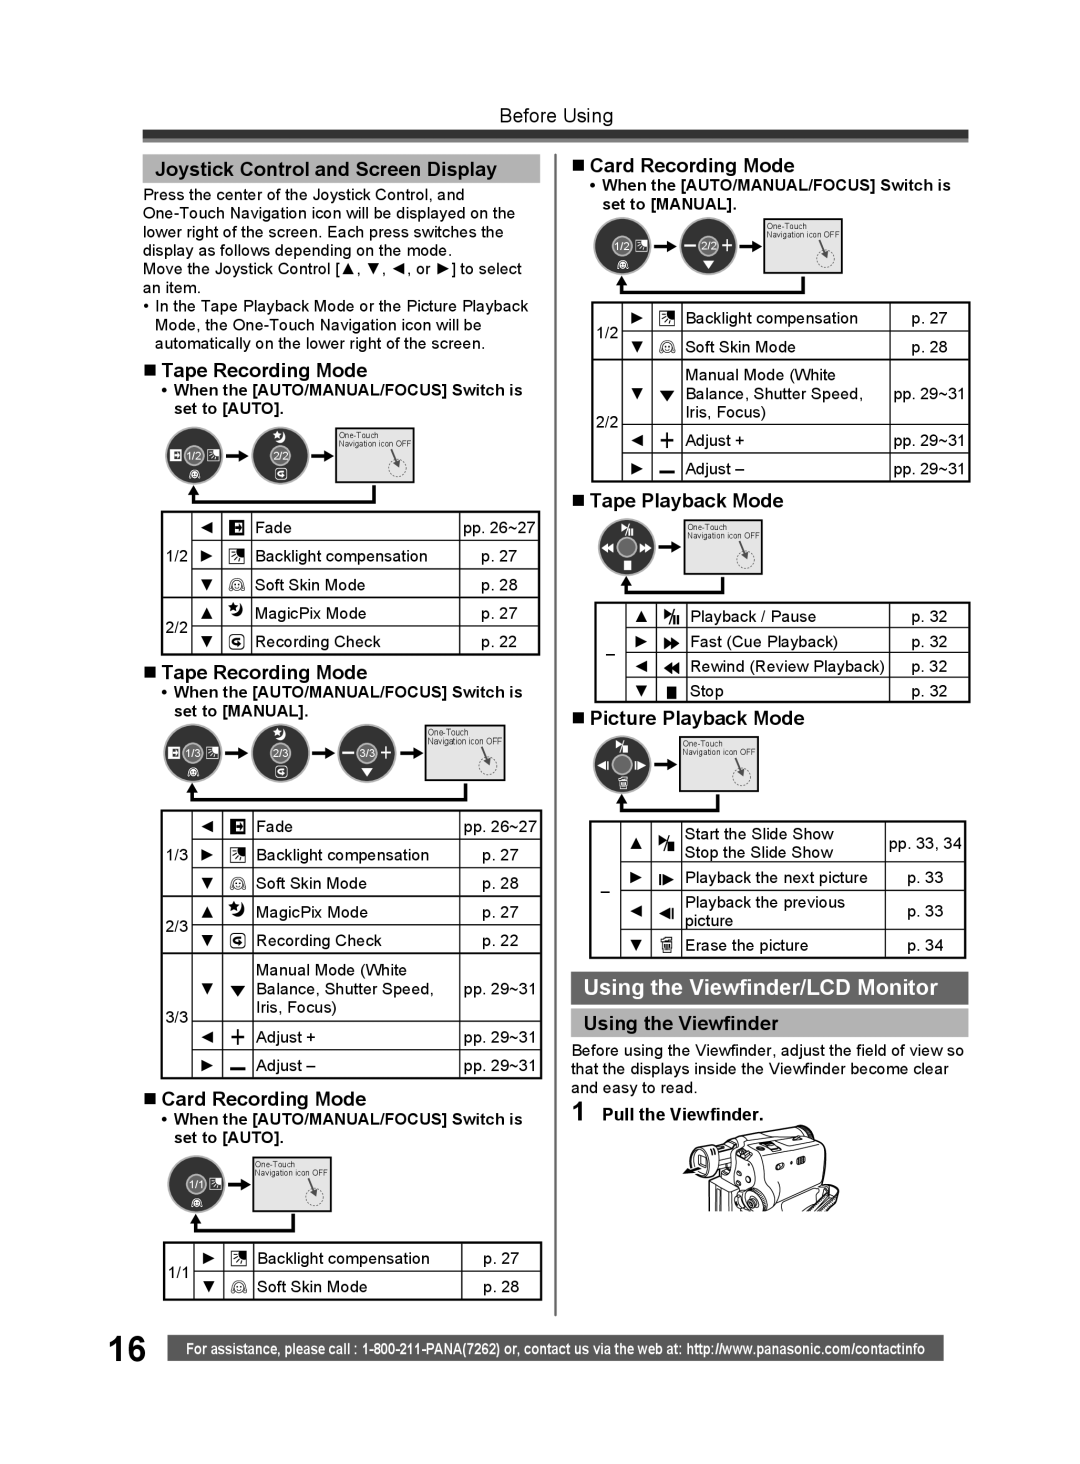
Press the center of the Joystick Control, and
Move the Joystick Control [▲, ▼, ◄, or ►] to select an item.
•In the Tape Playback Mode or the Picture Playback Mode, the
Tape Recording Mode
•When the [AUTO/MANUAL/FOCUS] Switch is set to [AUTO].
| |
| Navigation icon OFF |
1/2 | 2/2 |
| ◄ |
| Fade | pp. 26~27 |
1/2 | ► |
| Backlight compensation | p. 27 |
| ▼ |
| Soft Skin Mode | p. 28 |
2/2 | ▲ |
| MagicPix Mode | p. 27 |
▼ |
| Recording Check | p. 22 | |
|
|
Tape Recording Mode
•When the [AUTO/MANUAL/FOCUS] Switch is set to [MANUAL].
|
| |
|
| Navigation icon OFF |
1/3 | 2/3 | 3/3 |
| ◄ |
|
|
| Fade | pp. 26~27 |
1/3 | ► |
|
|
| Backlight compensation | p. 27 |
| ▼ |
|
|
| Soft Skin Mode | p. 28 |
2/3 | ▲ |
|
|
| MagicPix Mode | p. 27 |
▼ |
|
|
| Recording Check | p. 22 | |
|
|
|
|
| Manual Mode (White |
|
| ▼ |
|
|
| Balance, Shutter Speed, | pp. 29~31 |
3/3 |
|
|
|
| Iris, Focus) |
|
◄ |
|
|
| Adjust + | pp. 29~31 | |
|
|
|
| |||
| ► |
|
|
| Adjust – | pp. 29~31 |
|
|
|
|
Card Recording Mode
•When the [AUTO/MANUAL/FOCUS] Switch is set to [AUTO].
Navigation icon OFF
1/1 ![]()
![]()
1/1 | ► | Backlight compensation | p. 27 |
▼ | Soft Skin Mode | p. 28 |
Card Recording Mode
•When the [AUTO/MANUAL/FOCUS] Switch is set to [MANUAL].
| |
| Navigation icon OFF |
1/2 | 32/32 |
1/2 | ► |
|
|
| Backlight compensation | p. 27 |
▼ |
|
|
| Soft Skin Mode | p. 28 | |
|
|
|
| |||
|
|
|
|
| Manual Mode (White |
|
| ▼ |
|
|
| Balance, Shutter Speed, | pp. 29~31 |
2/2 |
|
|
|
| Iris, Focus) |
|
◄ |
|
|
| Adjust + | pp. 29~31 | |
|
|
|
| |||
| ► |
|
|
| Adjust – | pp. 29~31 |
|
|
|
|
Tape Playback Mode
Navigation icon OFF
| ▲ |
| Playback / Pause | p. 32 |
– | ► |
| Fast (Cue Playback) | p. 32 |
◄ |
| Rewind (Review Playback) | p. 32 | |
| ▼ |
| Stop | p. 32 |
Picture Playback Mode
Navigation icon OFF
| ▲ |
|
|
| Start the Slide Show | pp. 33, 34 |
|
|
|
| Stop the Slide Show | ||
|
|
|
|
|
| |
– | ► |
|
|
| Playback the next picture | p. 33 |
|
|
| ||||
|
|
| ||||
◄ |
|
|
| Playback the previous | p. 33 | |
|
|
|
| |||
|
|
|
| picture | ||
|
|
|
|
|
| |
| ▼ |
|
|
| Erase the picture | p. 34 |
Using the Viewfinder/LCD Monitor
Using the Viewfinder
Before using the Viewfinder, adjust the field of view so that the displays inside the Viewfinder become clear and easy to read.
1 Pull the Viewfinder.
16 | For assistance, please call : |
|
