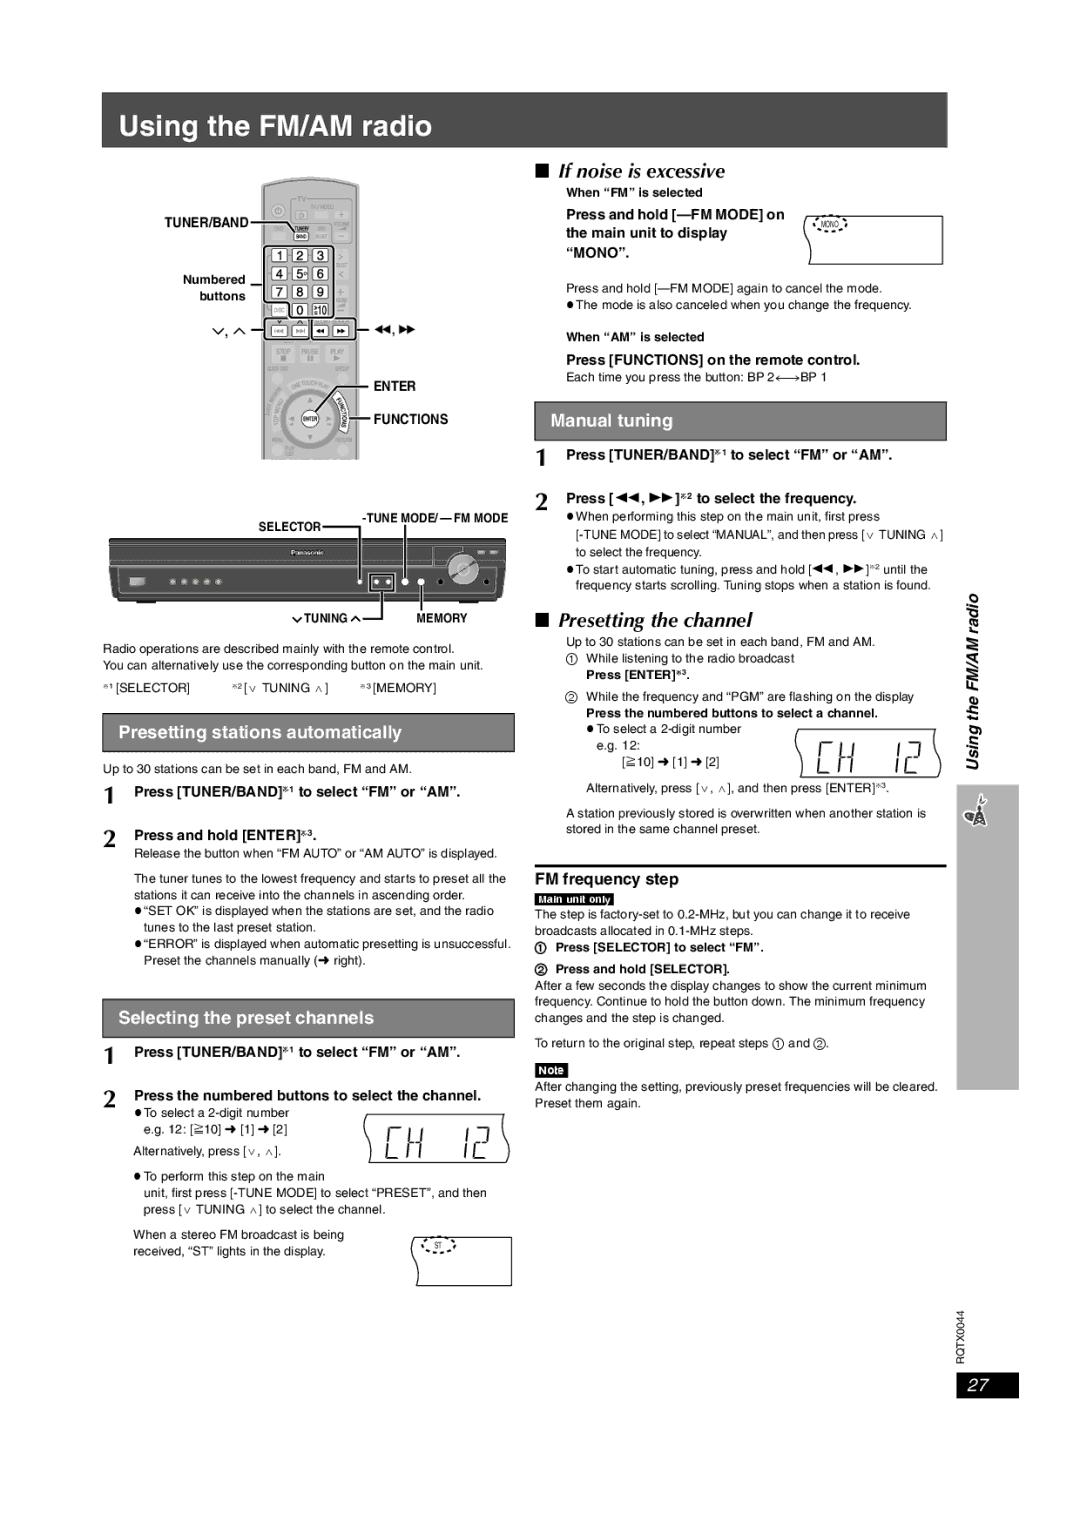
Using the FM/AM radio

TUNER/BAND

Numbered buttons

, ,

ENTER

FUNCTIONS

If noise is excessive

When “FM” is selected

Press and hold [—FM MODE] on

D.MIX MONO SLP STCT

DDTS

PL

the main unit to display

SRDE. PRG

“MONO”.

PGMRNDRDS

EQ W1 W2

WS

Press and hold [—FM MODE] again to cancel the mode.

The mode is also canceled when you change the frequency.


When “AM” is selected


Press [FUNCTIONS] on the remote control.


Each time you press the button: BP 2()BP 1


Manual tuning


1

Press [TUNER/BAND]§1 to select “FM” or “AM”.

2

Press [6, 5]§2 to select the frequency.

SELECTOR

-TUNE MODE/-FM MODE

When performing this step on the main unit, first press

[-TUNE MODE] to select “MANUAL”, and then press [X TUNING W] to select the frequency.

To start automatic tuning, press and hold [6, 5]§2 until the frequency starts scrolling. Tuning stops when a station is found.

TUNING MEMORY

Radio operations are described mainly with the remote control.

You can alternatively use the corresponding button on the main unit.

§1 [SELECTOR]

§2 [X TUNING W]

§3 [MEMORY]

Presetting stations automatically

Up to 30 stations can be set in each band, FM and AM.

1

Press [TUNER/BAND]§1 to select “FM” or “AM”.

2

Press and hold [ENTER]§3.


Release the button when “FM AUTO” or “AM AUTO” is displayed.

Presetting the channel

Up to 30 stations can be set in each band, FM and AM.

1While listening to the radio broadcast

Press [ENTER]§3.

2While the frequency and “PGM” are flashing on the display

Press the numbered buttons to select a channel.

To select a 2-digit number

DISC S.SRD TG KARA D.MIX MONO SLP

e.g. 12:

[S10] [1] [2]

Alternatively, press [X, W], and then press [ENTER]§3.

A station previously stored is overwritten when another station is stored in the same channel preset.

Using the FM/AM radio


The tuner tunes to the lowest frequency and starts to preset all the


FM frequency step


stations it can receive into the channels in ascending order.


\Main\unit\only]


“SET OK” is displayed when the stations are set, and the radio


The step is factory-set to 0.2-MHz, but you can change it to receive


tunes to the last preset station.


broadcasts allocated in 0.1-MHz steps.


“ERROR” is displayed when automatic presetting is unsuccessful.


1 Press [SELECTOR] to select “FM”.


Preset the channels manually (right).


2 Press and hold [SELECTOR].


After a few seconds the display changes to show the current minimum


frequency. Continue to hold the button down. The minimum frequency


Selecting the preset channels


changes and the step is changed.


To return to the original step, repeat steps 1 and 2.

1

Press [TUNER/BAND]§1 to select “FM” or “AM”.


[Note]


2

Press the numbered buttons to select the channel.


After changing the setting, previously preset frequencies will be cleared.


Preset them again.


To select a 2-digit number


SB DISC S.SRD TG KARA D.MIX MONO SLP


e.g. 12: [S10] [1] [2]


DVD


Alternatively, press [X, W].

CD


ODE


To perform this step on the main

unit, first press [-TUNE MODE] to select “PRESET”, and then press [X TUNING W] to select the channel.

When a stereo FM broadcast is being

received, “ST” lights in the display.

SLP STCT

DDTS

PL


SRDE. PRG


PGMRNDRDS


EQ W1 W2

WS

RQTX0044

27

Page 27
Image 27
Panasonic SC-PT753, SCPT750 manual Using the FM/AM radio, If noise is excessive, Presetting the channel

SC-PT753, SCPT750 specifications

The Panasonic SC-PT750 and SC-PT753 home theater systems represent a significant advancement in audio technology, designed to enhance your home entertainment experience. These systems immerse viewers in a powerful sound landscape, making them ideal for movie nights, gaming sessions, or listening to music.

One of the standout features of the SC-PT750 and SC-PT753 is their 5.1-channel surround sound system. This configuration includes five satellite speakers and a subwoofer, delivering rich and dynamic audio that brings films and music to life. The clarity of sound across various frequencies ensures that dialogues are crisp, action sequences are thrilling, and music is vibrant.

Both models also utilize Panasonic’s advanced audio technologies, such as Dolby Digital and DTS, to provide an authentic cinematic experience. The systems decode multichannel audio streams, creating an engaging surround sound environment that immerses listeners in the action. This is further enhanced by the inclusion of a powerful subwoofer that delivers deep bass, adding depth to movie soundtracks and musical performances.

Connectivity is another strong point of the SC-PT750 and SC-PT753. They feature multiple HDMI inputs and outputs, allowing users to connect various devices such as Blu-ray players, gaming consoles, and streaming devices effortlessly. This ensures high-definition video and audio quality is maintained across sources. Additionally, both systems support USB playback, enabling users to enjoy music stored on their drives directly.

The design of these home theater systems is both elegant and practical. Their sleek satellite speakers can be wall-mounted or positioned on stands, providing flexibility in setup. The main unit boasts an intuitive interface, making it easy to navigate settings and playback options. The remote control ensures that users can adjust settings from the comfort of their seats.

Moreover, the Panasonic SC-PT750 and SC-PT753 also support various audio formats, including MP3 and WMA, making them suitable for diverse music libraries. The inclusion of features like VIERA Link allows for seamless integration with other Panasonic devices, enhancing the overall user experience.

Ultimately, the Panasonic SC-PT750 and SC-PT753 are robust home theater systems that combine superior sound quality, versatile connectivity, and an elegant design, making them excellent choices for anyone looking to elevate their home entertainment setup. Whether it’s watching movies, listening to music, or gaming, these systems provide an immersive audio experience that is hard to match.