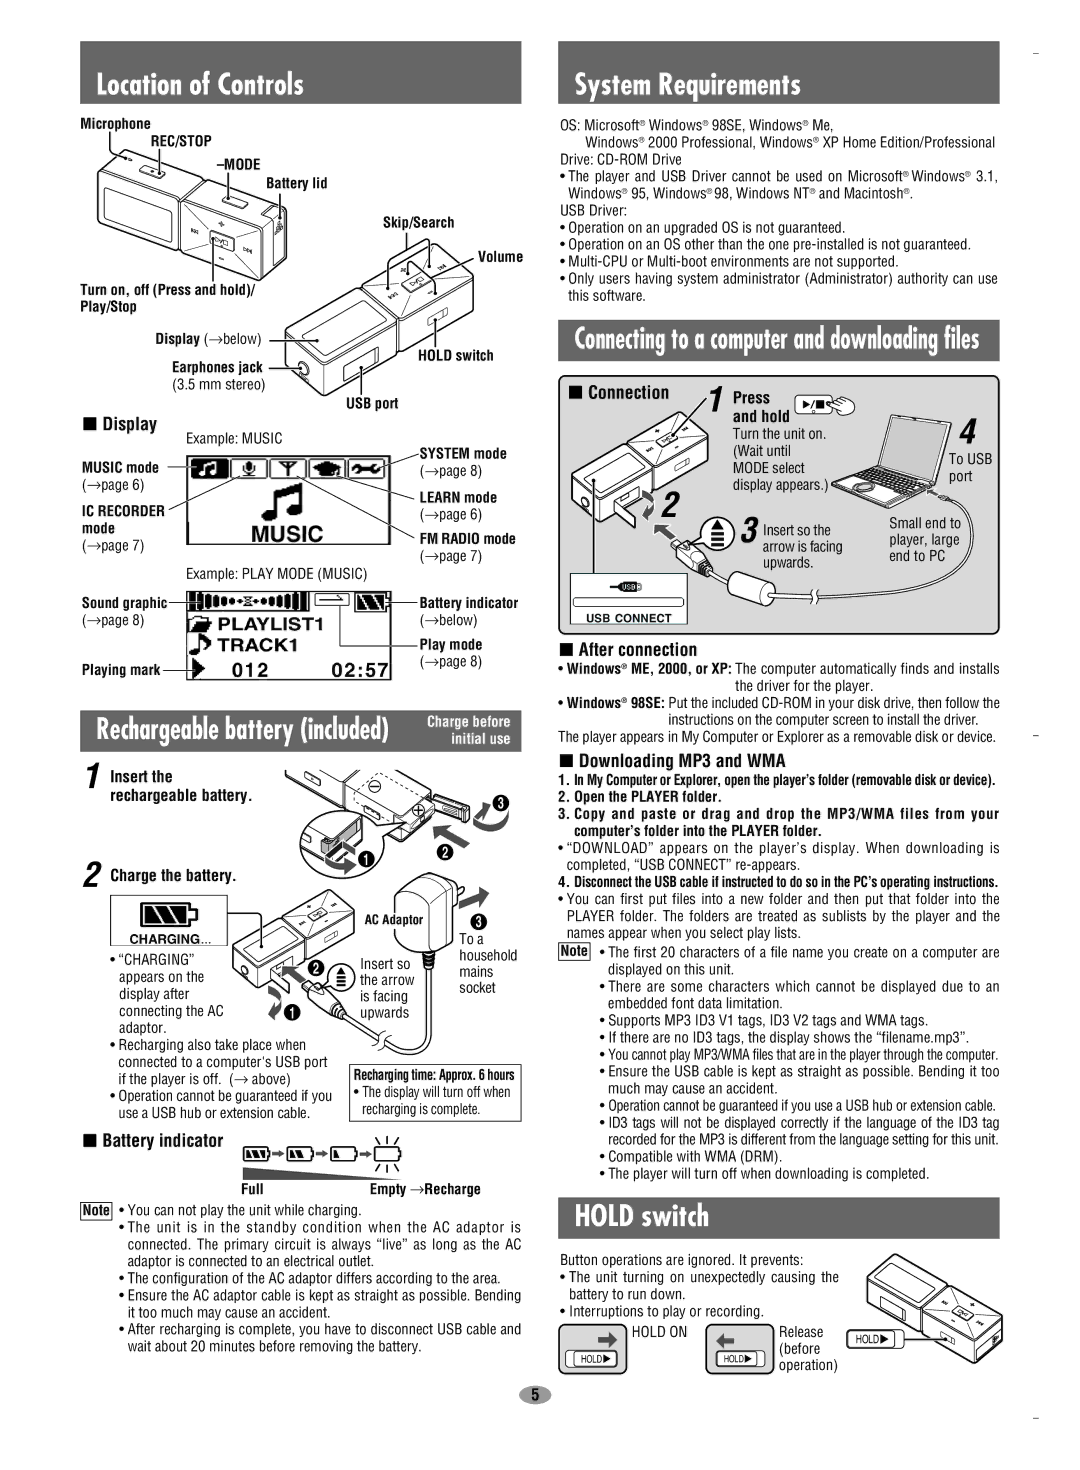
Location of Controls

Microphone

REC/STOP

–MODE

Battery lid

Skip/Search

Volume

Turn on, off (Press and hold)/

Play/Stop

Display (below)

HOLD switch


Earphones jack


(3.5 mm stereo)


USB port


Display

Example: MUSIC


MUSIC mode

SYSTEM mode

(page 8)

(

page 6)

LEARN mode


IC RECORDER

(page 6)

mode

FM RADIO mode

(

page 7)

(page 7)


Example: PLAY MODE (MUSIC)


Sound graphic

Battery indicator

(

page 8)

(

below)


Play mode

Playing mark

(page 8)


Rechargeable battery (included)

initial use


Charge before

1

Insert the


rechargeable battery.

3


2

1

2


Charge the battery.


System Requirements

OS: Microsoft® Windows® 98SE, Windows® Me,

Windows® 2000 Professional, Windows® XP Home Edition/Professional Drive: CD-ROM Drive

The player and USB Driver cannot be used on Microsoft® Windows® 3.1, Windows® 95, Windows® 98, Windows NT® and Macintosh®.

USB Driver:

Operation on an upgraded OS is not guaranteed.

Operation on an OS other than the one pre-installed is not guaranteed.

Multi-CPU or Multi-boot environments are not supported.

Only users having system administrator (Administrator) authority can use this software.

Connecting to a computer and downloading files

Connection

1

Press


and hold

4


Turn the unit on.


(Wait until

To USB


MODE select


port

2


display appears.)


Insert so the

Small end to


3 arrow is facing

player, large


upwards.

end to PC


After connection

Windows® ME, 2000, or XP: The computer automatically finds and installs the driver for the player.

Windows® 98SE: Put the included CD-ROM in your disk drive, then follow the instructions on the computer screen to install the driver.

The player appears in My Computer or Explorer as a removable disk or device.

Downloading MP3 and WMA

1.In My Computer or Explorer, open the player’s folder (removable disk or device).

2.Open the PLAYER folder.

3.Copy and paste or drag and drop the MP3/WMA files from your computer’s folder into the PLAYER folder.

• “DOWNLOAD” appears on the player’s display. When downloading is completed, “USB CONNECT” re-appears.

4. Disconnect the USB cable if instructed to do so in the PC’s operating instructions.

• You can first put files into a new folder and then put that folder into the

• “CHARGING”

2

appears on the


display after


connecting the AC

1

adaptor.


Recharging also take place when

connected to a computer's USB port if the player is off. (above)

Operation cannot be guaranteed if you use a USB hub or extension cable.

AC Adaptor

3


To a

Insert so

household

mains

the arrow

socket

is facing


upwards


Recharging time: Approx. 6 hours

The display will turn off when recharging is complete.

PLAYER folder. The folders are treated as sublists by the player and the

names appear when you select play lists.

Note • The first 20 characters of a file name you create on a computer are displayed on this unit.

• There are some characters which cannot be displayed due to an

embedded font data limitation.

• Supports MP3 ID3 V1 tags, ID3 V2 tags and WMA tags.

• If there are no ID3 tags, the display shows the “filename.mp3”.

• You cannot play MP3/WMA files that are in the player through the computer.

• Ensure the USB cable is kept as straight as possible. Bending it too

much may cause an accident.

• Operation cannot be guaranteed if you use a USB hub or extension cable.

• ID3 tags will not be displayed correctly if the language of the ID3 tag

Battery indicator

Full

Empty Recharge

Note • You can not play the unit while charging.


The unit is in the standby condition when the AC adaptor is connected. The primary circuit is always “live” as long as the AC adaptor is connected to an electrical outlet.

The configuration of the AC adaptor differs according to the area.

Ensure the AC adaptor cable is kept as straight as possible. Bending it too much may cause an accident.

After recharging is complete, you have to disconnect USB cable and wait about 20 minutes before removing the battery.

recorded for the MP3 is different from the language setting for this unit.

• Compatible with WMA (DRM).

• The player will turn off when downloading is completed.

HOLD switch

Button operations are ignored. It prevents:

The unit turning on unexpectedly causing the battery to run down.

• Interruptions to play or recording.

HOLD ON


Release

HOLD


(before

HOLD

HOLD


operation)


5

Page 5
Image 5
Panasonic SV-MP720V, SV-MP710V, SV-MP700V operating instructions Location of Controls, System Requirements, Hold switch

SV-MP710V, SV-MP720V, SV-MP700V specifications

The Panasonic SV-MP700V, SV-MP720V, and SV-MP710V are a trio of innovative digital audio players that cater to music enthusiasts who demand high quality and versatile features. Each model, while distinct, shares several core technologies and characteristics, creating a cohesive lineup that emphasizes audio fidelity and user-friendly functionality.

The SV-MP700V stands out with its compact design and robust build, making it ideal for users on the go. Equipped with a high-resolution audio playback capability, it supports a wide range of audio formats, ensuring versatility for various listening preferences. This model also features an intuitive interface with a bright LCD screen, allowing for easy navigation through playlists or albums. The device incorporates advanced equalizer settings, enabling users to customize their audio experience based on their personal taste.

The SV-MP720V elevates the user experience further by including Bluetooth connectivity. This allows seamless wireless pairing with compatible headphones and speakers, providing the freedom to enjoy music without the hassle of cables. With an extended battery life, the SV-MP720V ensures hours of uninterrupted playback. Additionally, it features a built-in FM tuner, allowing users to listen to their favorite radio stations on the go. The device also includes a high-quality DAC (Digital-to-Analog Converter) that enhances audio clarity, reducing distortion and ensuring a rich listening experience.

Meanwhile, the SV-MP710V is designed for audiophiles seeking premium sound quality. This model boasts an impressive audio processing system and supports high-definition audio files, making it ideal for those who appreciate the intricacies of sound. It features memory expansion capability, allowing users to store extensive music libraries. The SV-MP710V also pays special attention to sound isolation, providing a better listening experience in noisy environments.

In summary, the Panasonic SV-MP700V, SV-MP720V, and SV-MP710V exemplify the fusion of form and function in portable music devices. Each model offers distinct features tailored to different user needs while maintaining high audio performance. Whether it's the compact convenience of the SV-MP700V, the wireless capabilities of the SV-MP720V, or the superior sound quality of the SV-MP710V, Panasonic continues to push the boundaries of digital audio technology, making these models appealing choices for any music lover.