English Español
ViVA
58.0/64.7 inches measured diagonally
58,0/64,7 pulgadas medidas diagonalmente
Experience an amazing level of multimedia excitement
ViVA
Turn your own living room into a movie theater
Please read before using the unit
Advanced Features
FAQs, etc
Quick Start Guide Viewing Advanced FAQs, etc
RISK OF ELECTRIC SHOCK DO NOT OPEN
Safety Precautions
Important Safety Instructions
FCC STATEMENT
When using the Plasma TV
Set up
AC Power Supply Cord
If problems occur during use
Accessories
Accessories/Optional Accessory
Accessories
Optional Accessory
Attaching the pedestal to TV TH-58PZ850U
QuickGuideStart Accessories/Optional Accessory
Assembling the pedestal
Set-up
HDMI terminal
Reference of connection
Antenna terminal
Pin terminals
Example
Basic Connection Antenna + TV Accessories/Optional Accessory
Connecting Antenna To watch TV
Basic Connection
To connect antenna terminal and DVD recorder or VCR
Example 2 Connecting DVD recorder VCR To record/playback
Connecting TV and AV equipment
Basic Connection Continued
TV + DVD Recorder TV + DVD Recorder
Connecting DVD recorder VCR and satellite receiver
QuickGuideStart Basic Connection
or VCR + Satellite Receiver or VCR
A To use HDMI terminals
High-Definition
Definition
Standard
Identifying Controls Basic Connection AV cable connections
TV controls/indicators
Remote control
Identifying Controls
Select your language
First Time Setup
Turn the TV On with the POWER button
Auto channel setup
Manual setting
QuickGuideStart First Time Setup
Network setting/VIERA CAST setting
Adjust the clock
Analog mode
Turn power on
Select Audio Mode for watching TV
Digital mode
Change aspect ratio Call up a favorite channel
Favorite Feature
Set Favorite Feature
Use Favorite Feature
Select the item
Viewing from SD Card
Insert the SD card and select “Play SD card now”
Press the SD key or select “SD card” on the Menu
3 View
Other settings
To adjust picture and audio/ To use VIERA Link function
Select the movie to be listed
Press to return to TV
Follow direction in Movie player P Select the data to be viewed
View
Photo viewer
Setup slide show
To change the view slide show mode, adjusting images, etc
To set up the slide show mode
To adjust picture
You can select the external equipment to access
Display the Input select menu Select the input mode
Select the remote control mode
remote control at the equipment
Select “VIERA Link”
Select “On”
Viewing Watching Videos and DVDs
The screen of the PC connected to the unit can be displayed on the TV
Displaying PC Screen on TV
Display the Input select menu
Select “PC”
Menu
Adjustments/Configurations options
adjust
Viewing Displaying PC Screen on TV
Operate VIERA CAST
To adjust picture and audio
VIERA CASTTM
Display the Home screen Select the item and press OK
B Advanced wired connection
Contact your Broadband service provider
Select wired or wireless connection
Connecting to the internet
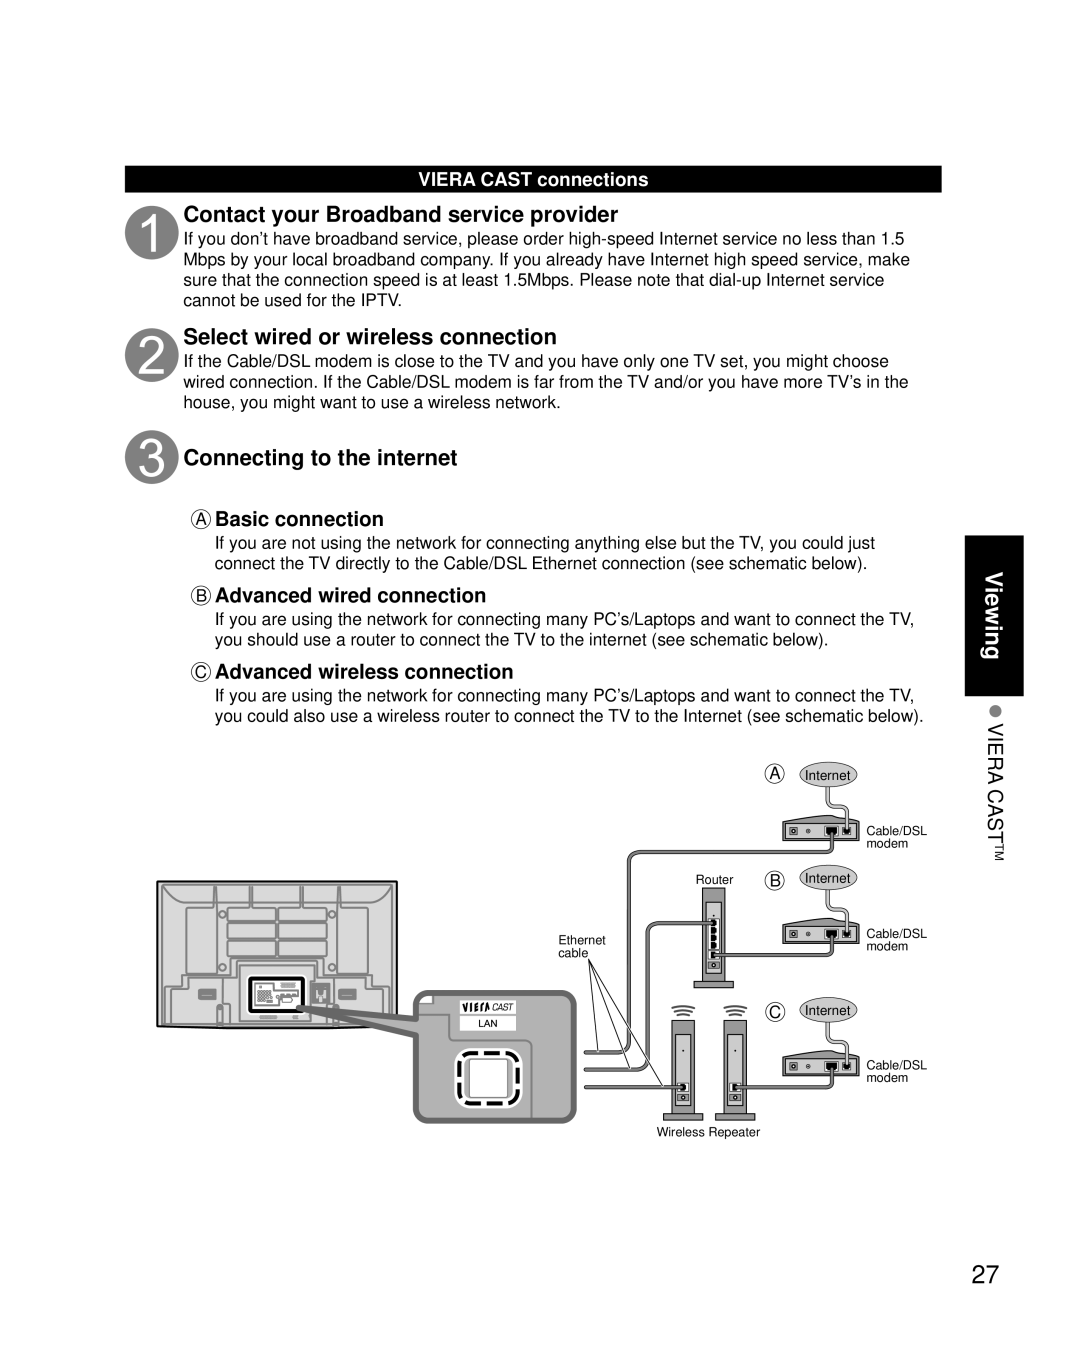
Reset
How to Use Menu Functions
Adjust or select
Timer
How to Use Menu Functions picture, sound quality, etc
Adjustments/Configurations alternatives
Advanced
Power off link
Select “Setup”
Setup
Surf mode
Adjustments/Configurations alternatives
Continued
How to Use Menu Functions picture, sound quality, etc
Adjustments/Configurations alternatives
Default speakers One-touch theater playback
setting” p
Select settings
Automatic Input Switching Power on link Power off link
Player
VIERA LinkTM “HDAVI ControlTM”
Transmittable data
Home
Speaker control
VIERA Link Control only with the TV’s remote control
Display VIERA Link menu
Select
Select “Stop recording”, when you want to stop recording
Volume up/down Mute
Select “VIERA Link Control” Select the equipment you want to access
Available TV’s remote control buttons
Select the item and adjust
Network Setting
Display menu Select “Setup”
Select “Network setting”
Select “IP setting mode” and set to “Automatic”
Network Setting
Select “DNS setting mode” and set to “Automatic”. Manual setting
Select “Software update”
Connection test Proxy setting
VIERA CASTTM Setting
Select “VIERA CAST setting”
Select the item and adjust
Proxy port
Setting
VIERA CASTTM
Select “Connection test” and Press OK
Display menu Select “Lock”
Input your 4-digit password
Select the Lock mode
Lock
Channel lock
Change password
To disable recording of the locked program
To change the password
To reset the settings of setup menu
Editing and Setting Channels
signal
Signal
Select “ANT in”
Editing and Setting Channels
Select a scanning mode p
To cancel the Edit
Closed Caption
To make more in-depth display settings in digital programs
Select “Digital setting” and press OK Select the item and set
To reset the settings
Press to exit from Select “Input labels” or “Monitor out”
Display menu and select “Setup”
Input Labels/Monitor Out
Select “External devices”
Set the timer
Using Timer
Display menu Select “Timer”
Select the timer to set
Press both buttons simultaneously for
Power Off the external equipment
When the correct code is found
more than 3 seconds
Recommended AV Connections
AV Connections
Connecting this unit to the DVD recorder DIGA, RAM
Connecting this unit to a DVD
Setting of this unit after connection
Remote Control Operation List
Remote Control Operation/Code List
Code
Remote Control Operation/Code List FAQs, etc
Remote Control Code List
Brand
Code
Remote Control Operation/Code ListContinued
Remote Control Code List
Brand
U.S. TV PROGRAMS RATINGS U. S. TV
Ratings List for Lock FAQs, etc. Remote Control Operation/Code List
Ratings List for Lock
U.S. MOVIE RATINGS MPAA
Technical Information
Closed Caption CC
Aspect Ratio FORMAT
SD Card warning messages Meaning
Data format for SD Card browsing
Cautions in handling SD Card
Message
HDMI connection
Picture mode
Technical Information Continued
VIERA LinkTM “HDAVI ControlTM”
PC Input Terminals Connection
Technical Information FAQs, etc
Pro setting
Input signal that can be displayed
Scrolling bar
Care and Cleaning
First, unplug the Power cord plug from the wall outlet
Side Bar
TH-65PZ850U
Specifications
Specifications FAQs, Technical Information Care and Cleaning
TH-58PZ850U
Interference or frozen digital channels
intermittent sound
The remote control does not work
White spots or shadow images noise
displayed
FAQ FAQs, etc
Problem
One spot remains dark Chaotic image, noisy
On-Site or Carry-in Service
Limited Warranty for U.S.A
Panasonic Color Television Limited Warranty
Limited Warranty Coverage
npcparts@us.panasonic.com
Customer Services Directory
Accessory Purchases
Service in Puerto Rico
In-home service
Limited Warranty for Canada
Panasonic Canada Inc PANASONIC PRODUCT - LIMITED WARRANTY
WARRANTY SERVICE
Limited Warranty for Canada
FAQs, etc
Panasonic Puerto Rico, Inc
Customer’s Record
Anotación del cliente
Panasonic Consumer Electronics