Training & Maintenance Manual |
Installation & Setup Instructions
Installation – Air and Electrical
A. Installing Weld Block with Existing Equipment
1.Shut off air supply to weld gun and turn power off to cell.
2.Disconnect air hoses from existing weld block ports. This will vary depending on weld gun type, and whether the existing weld block is single or dual pressure.
Note: If the current weld block is mounted directly to the cylinder, then only the inlet port hoses will be disconnected.
3.Disconnect solenoid connectors from valves. Be sure to note which connectors are being used for
4.Remove current weld block from gun.
B.Installing Weld Block on New Equipment
5.Mount weld block spotwelding system to robot using (4) M8 screws and torque to 130 to 145 in. lbs (14.7 to 16.4 Nm).
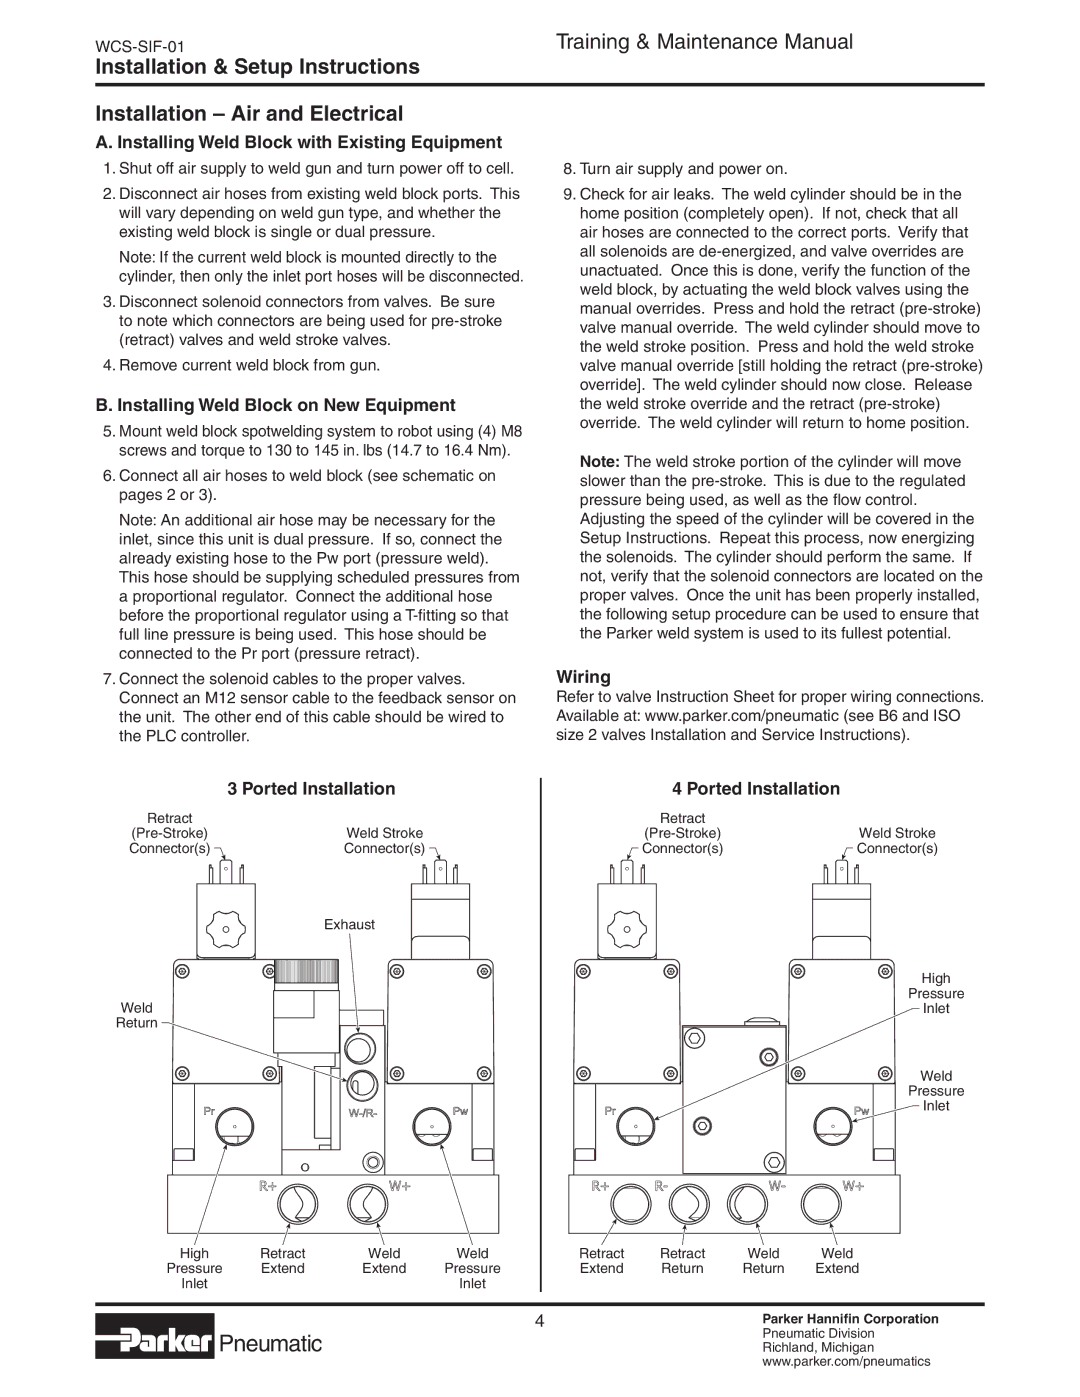
6.Connect all air hoses to weld block (see schematic on pages 2 or 3).
Note: An additional air hose may be necessary for the inlet, since this unit is dual pressure. If so, connect the already existing hose to the Pw port (pressure weld).
This hose should be supplying scheduled pressures from a proportional regulator. Connect the additional hose before the proportional regulator using a
8.Turn air supply and power on.
9.Check for air leaks. The weld cylinder should be in the home position (completely open). If not, check that all air hoses are connected to the correct ports. Verify that all solenoids are
Note: The weld stroke portion of the cylinder will move slower than the
Adjusting the speed of the cylinder will be covered in the Setup Instructions. Repeat this process, now energizing the solenoids. The cylinder should perform the same. If not, verify that the solenoid connectors are located on the proper valves. Once the unit has been properly installed, the following setup procedure can be used to ensure that the Parker weld system is used to its fullest potential.
7.Connect the solenoid cables to the proper valves. Connect an M12 sensor cable to the feedback sensor on the unit. The other end of this cable should be wired to the PLC controller.
Wiring
Refer to valve Instruction Sheet for proper wiring connections. Available at: www.parker.com/pneumatic (see B6 and ISO size 2 valves Installation and Service Instructions).
| 3 Ported Installation |
Retract | Weld Stroke |
Connector(s) | Connector(s) |
| Exhaust |
Weld |
|
Return |
|
High | Retract | Weld | Weld |
Pressure | Extend | Extend | Pressure |
Inlet |
|
| Inlet |
4 Ported Installation
Retract |
|
| Weld Stroke | |
|
| |||
Connector(s) |
| Connector(s) | ||
|
|
|
|
|
|
|
|
|
|
|
|
|
|
|
High
Pressure
Inlet
Weld
Pressure
![]() Inlet
Inlet
Retract | Retract | Weld | Weld |
Extend | Return | Return | Extend |
 Pneumatic
Parker Hannifin Corporation Pneumatic Division Richland, Michigan www.parker.com/pneumatics
